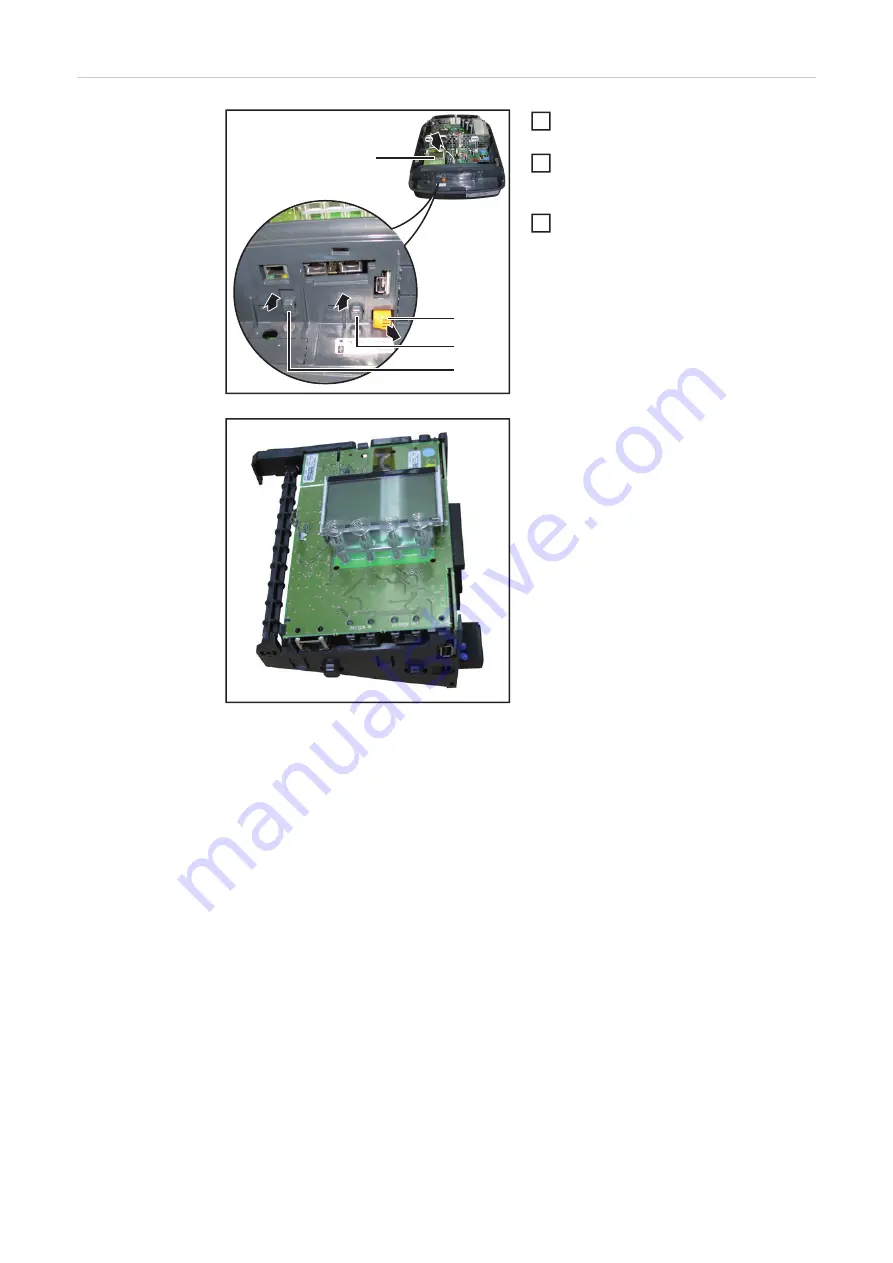
Fronius Galvo RECERBO Installation Instructions Manual Download Page 18

16

Removing the PC 
Board

Remove the plug (2) using a small slo-
ted screwdriver
Slide up the PC board brackets (3) and 
(4) together with the RECERBO PC 
board (1)
Take out the RECERBO PC board to-
wards inverter top

Disassembled RECERBO PC board with mounting 
support

(1)

(2)
(3)
(4)

2

2

1

3

1

2

3

Summary of Contents for Galvo RECERBO

Page 1: ...Welding Technology Solar Electronics 42 0410 1941 001 06022013 Print RECERBO Fronius Galvo RECERBO PC Board Fronius Galvo Einbauanleitung Netzgekoppelter Wechselrichter Installation instructions Grid...

Page 2: ...0...

Page 3: ...nes 3 Sicherheit 3 ESD Bestimmungen 3 Lieferumfang 4 Erforderliche Werkzeuge und Hilfsmittel 4 Print RECERBO wechseln 5 Wechselrichter ffnen 5 Print ausbauen 6 Speicher Print aufstecken 7 Print einbau...

Page 4: ...2...

Page 5: ...onal durchgef hrt werden WARNUNG Ein elektrischer Schlag kann t dlich sein Gefahr durch Restspan nung von Kondensatoren Entladezeit der Kondensatoren abwarten Die Entladezeit betr gt 3 Minuten VORSICH...

Page 6: ...4 Lieferumfang Speicher Print am Print RECERBO Erforderliche Werkzeuge und Hilfsmittel Torx Schraubendreher TX25 kleiner Schlitz Schraubendreher Hand Drehmoment Schrauber Bit Einsatz TX25...

Page 7: ...5 DE Print RECERBO wechseln Wechselrichter ffnen Vorhandene DATCOM Komponenten vom Wechselrichter trennen 1 AC OFF I 0 3 2 1 1 2 3 2 3 2 4 1 3 4 4 110 mm 4 1 2 4 3 5 4x TX25 5...

Page 8: ...inem Schlitz Schraubendreher entfernen Print Halterungen 3 und 4 mit dem Print RECERBO 1 nach oben schie ben Print RECERBO Richtung Wechsel richter Oberkante herausziehen Ausgebauter Print RECERBO mit...

Page 9: ...lschen Speicher Prints Das Aufstecken eines falschen Speicher Prints kann zur berhitzung von ver schiedenen elektronischen Bauteilen f hren Hieraus k nnen thermische Sch den resultieren die in Folge z...

Page 10: ...Leistungsdaten und das L nder Setup f r den Wechselrichter vor Print RECERBO 2 in die Montage Konsole einklappen und die Klemmna sen 1 und 3 einrasten lassen Print einbauen Print RECERBO in Richtung...

Page 11: ...9 DE Wechselrichter schlie en Vorhandene DATCOM Komponenten wieder am Wechselrichter anschlie en 4x TX25 2 3 4 5 1 2 2 5 Nm 1 2 1 1 1 4 3 2 Nm 110 mm 2 3 1 3 2 2 Nm 4 AC ON I 0 3 1 2 5...

Page 12: ...10...

Page 13: ...3 ESD guidelines 13 Scope of supply 14 Required tools and material 14 Replacing the RECERBO PC Board 15 Opening the Inverter 15 Removing the PC Board 16 Connecting the Memory PC Board 17 Installing PC...

Page 14: ...12...

Page 15: ...G An electric shock can be fatal Danger from residual voltage from ca pacitors You must wait until the capacitors have discharged Discharge takes 3 minutes CAUTION An inadequate grounding conductor co...

Page 16: ...14 Scope of supply Memory PC board at the RECERBO PC Board Required tools and material TX 25 screwdriver Small Slotted screwdriver Hand torque wrench TX 25 bit insert...

Page 17: ...15 EN Replacing the RECERBO PC Board Opening the In verter Disconnect all available DATCOM components from the inverter 1 AC OFF I 0 3 2 1 1 2 3 2 3 2 4 1 3 4 4 110 mm 4 1 2 4 3 5 4x TX25 5...

Page 18: ...g 2 using a small slo ted screwdriver Slide up the PC board brackets 3 and 4 together with the RECERBO PC board 1 Take out the RECERBO PC board to wards inverter top Disassembled RECERBO PC board with...

Page 19: ...ger of inverter damage due to connecting an improper memory PC board Connecting an improper memory PC board may cause overheating of several electronic components This could cause thermal damage which...

Page 20: ...data the power data and the country setup for the inverter Swing the RECERBO PC board 2 back into the mounting support and let the clamping devices 1 and 3 snap in Installing PC Board Insert the RECE...

Page 21: ...19 EN Closing the In verter Reconnect all available DATCOM components to the inverter 4x TX25 2 3 4 5 1 2 2 5 Nm 1 2 1 1 1 4 3 2 Nm 110 mm 2 3 1 3 2 2 Nm 4 AC ON I 0 3 1 2 5...

Page 22: ...20...

Page 23: ...21 EN...

Page 24: ...find all addresses of our sales branches and partner firms Fronius International GmbH 4600 Wels Froniusplatz 1 Austria E Mail pv fronius com http www fronius com Fronius USA LLC Solar Electronics Divi...

Reviews: