


1
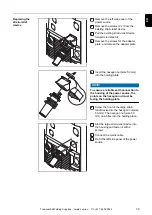
Plug the welding potential bayonet plug on the interconnecting hosepack into the (+)
socket and twist to fasten it
2
Plug the LocalNet plug on the interconnecting hosepack into the LocalNet connec-
tion and secure with a union nut
3
CMT power sources only:
Connect the LHSB plug to the LHSB connection
4
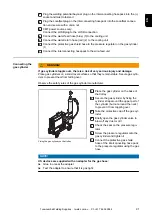
Connect the water feed hose (blue) (3) to the cooling unit
5
Connect the water return hose (red) (2) to the cooling unit
6
Connect the protective gas shield hose to the pressure regulator on the gas cylinder
(1)
7
Connect the interconnecting hosepack to the wire-feed unit
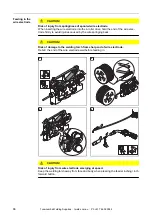
Connecting the
gas cylinder
WARNING!
If gas cylinders topple over, there is a risk of very serious injury and damage.
Place gas cylinders on a solid, level surface so that they remain stable. Secure gas cylin-
ders to prevent them from falling over.
Observe the safety rules of the gas cylinder manufacturer.
3
1
2
2
4
5
5
Fixing the gas cylinder on the trolley
1
Place the gas cylinder on the base of
the trolley
2
Secure the gas cylinder by fixing the
cylinder strap around the upper part of
the cylinder (but not around the neck)
to prevent it from toppling over
3
Take the protective cap off the gas cyl-
inder
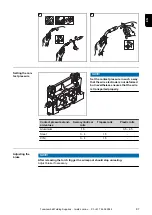
4
Briefly open the gas cylinder valve to
blow off any dust or dirt
5
Check the seal on the pressure regu-
lator
6
Screw the pressure regulator onto the
gas cylinder and tighten it
7
Connect the protective gas shield
hose of the interconnecting hose pack
to the pressure regulator using the gas
hose
NOTE!
US devices are supplied with an adapter for the gas hose:
▶
Glue in or seal the adapter
▶
Test the adapter to ensure that it is gas tight.
91
EN
Toowoomba Welding Supplies : tweld.com.au : Ph +61 7 4659 0044
Summary of Contents for CMT 4000 Advanced
Page 2: ...Toowoomba Welding Supplies tweld com au Ph 61 7 4659 0044...
Page 20: ...20 Toowoomba Welding Supplies tweld com au Ph 61 7 4659 0044...
Page 21: ...General information 21 Toowoomba Welding Supplies tweld com au Ph 61 7 4659 0044...
Page 22: ...22 Toowoomba Welding Supplies tweld com au Ph 61 7 4659 0044...
Page 30: ...30 Toowoomba Welding Supplies tweld com au Ph 61 7 4659 0044...
Page 31: ...Control elements and connections 31 Toowoomba Welding Supplies tweld com au Ph 61 7 4659 0044...
Page 32: ...32 Toowoomba Welding Supplies tweld com au Ph 61 7 4659 0044...
Page 71: ...Installation and commissioning 71 Toowoomba Welding Supplies tweld com au Ph 61 7 4659 0044...
Page 72: ...72 Toowoomba Welding Supplies tweld com au Ph 61 7 4659 0044...
Page 95: ...Welding 95 Toowoomba Welding Supplies tweld com au Ph 61 7 4659 0044...
Page 96: ...96 Toowoomba Welding Supplies tweld com au Ph 61 7 4659 0044...
Page 131: ...Setup settings 131 Toowoomba Welding Supplies tweld com au Ph 61 7 4659 0044...
Page 132: ...132 Toowoomba Welding Supplies tweld com au Ph 61 7 4659 0044...
Page 173: ...Troubleshooting and maintenance 173 Toowoomba Welding Supplies tweld com au Ph 61 7 4659 0044...
Page 174: ...174 Toowoomba Welding Supplies tweld com au Ph 61 7 4659 0044...
Page 188: ...188 Toowoomba Welding Supplies tweld com au Ph 61 7 4659 0044...
Page 189: ...Appendix 189 Toowoomba Welding Supplies tweld com au Ph 61 7 4659 0044...
Page 190: ...190 Toowoomba Welding Supplies tweld com au Ph 61 7 4659 0044...
Page 209: ...209 EN Toowoomba Welding Supplies tweld com au Ph 61 7 4659 0044...
Page 210: ...210 Toowoomba Welding Supplies tweld com au Ph 61 7 4659 0044...
Page 211: ...211 EN Toowoomba Welding Supplies tweld com au Ph 61 7 4659 0044...
Page 212: ...Toowoomba Welding Supplies tweld com au Ph 61 7 4659 0044...