background image

LUNE

™ 

ASSEMBLY INSTRUCTION

4

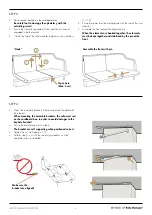
STEP 3

•  Place second module on the cardboard box 

Be careful not to damage the upholstery with the 

extruding screw!

•  Ensure the front are separated 2-3cm and the pin are not 

engaged in both elements

•  “Hook” the top of the sofa modules together as shown below 

[1, 2, 3]

•  Ensure a proper insertion and alignment of the top of the two 

modules

•  Assemble the front around the alignment pin 

When the elements are hooked together, the elements 

must be kept together and stabilized by the pin at the 

front

“Hook”

Assemble the front with pin

Open here

(Max. 3cm)

STEP 4

•  Mount the assembly brackets (front and rear) on the bottom of 

the elements 

When mounting the assembly brackets, the sofa must rest 

on the cardboard box, in order to avoid damages to the 

keyhole bracket!

•  Ensure the bracket are well in place 

The bracket are self supporting when positioned correct

•  Tighten the nut well (approx. 5N)

•  Perform step 3 + 4 with the remaining modules, until the 

complete sofa is assembled

Make sure the

bracket are aligned!

Summary of Contents for LUNE

Page 1: ...LUNE ASSEMBLY INSTRUCTION Design Jaime Hayon 2017 ...

Page 2: ...s This instruction INTRODUCTION Please pay attention to the assembly directions and need of space around the sofa before reading the following assembly instructions Colli 2 etc Contains the remaining sofa modules Tools needed not included 13 mm wrench Screwdriver PZ2 TIPS Beware of extruding screw at the side of element Lift the cardboard tube of when the items are unpacked The elements do not nee...

Page 3: ...itted with a keyhole 1 and a corresponding screw 2 that will hook the top of the modules together The screw 2 is pre mounted and adjusted Do not alter the position of the screw Please note the extruding screw when handling the elements Place the right element with legs on the cardboard box as shown below Mount the pin in the front hole 3 1 2 3 ASSEMBLY SEQUENCE When a sofa consists of more than tw...

Page 4: ...en the elements are hooked together the elements must be kept together and stabilized by the pin at the front Hook Assemble the front with pin Open here Max 3cm STEP 4 Mount the assembly brackets front and rear on the bottom of the elements When mounting the assembly brackets the sofa must rest on the cardboard box in order to avoid damages to the keyhole bracket Ensure the bracket are well in pla...

Page 5: ...ntil correct position is achieved LEG POSITION FOR DIFFERENT CONFIGURATIONS Configurations with three straight modules between end modules have legs positioned in the middle of the center module This module is marked Center module on the carton outside Notice Disassembling the sofa is done in reverse order from left to right Avoid separating the front after the assembly brackets are removed ...

Reviews: