background image

1

INSTRUCCIONES DE INSTALACION PARA LA ESTUFA A GAS

(Para modelos con 4 quemadores sellados, superficies de vidrio templado o de porcelana esmaltada)

LA INSTALACION Y EL SERVICIO DEBEN SER EFECTUADOS POR

UN INSTALADOR CALIFICADO.

IMPORTANTE: GUARDE ESTAS INSTRUCCIONES PARA USO DEL

INSPECTOR LOCAL DE ELECTRICIDAD.

LEA Y GUARDE ESTAS INSTRUCCIONES PARA REFERENCIA FUTURA.

Si  la información contenida en este manual no es seguida exactamente, puede

ocurrir un incendio o explosión causando daños materiales, lesión personal o la muerte.

PARA SU SEGURIDAD:
— No almacene ni utilice gasolina u otros vapores y líquidos inflamables en la proximidad de éste

o de cualquier otro artefacto.

— QUE DEBE HACER SI PERCIBE OLOR A GAS:

No trate de encender ningún artefacto.

No toque ningún interruptor eléctrico; no use ningún teléfono en su edificio.

Llame a su proveedor de gas desde el teléfono de un vecino.  Siga las instrucciones del
proveedor de gas.

Si no logra comunicarse con su proveedor de gas, llame al departamento de bomberos.

— La instalación y el servicio de mantenimiento deben ser efectuados por un instalador

calificado, la agencia de servicio o el proveedor de gas.

Papel reciclado

Impreso en el Canadá

P/N 318063905 (9604) Rev. A

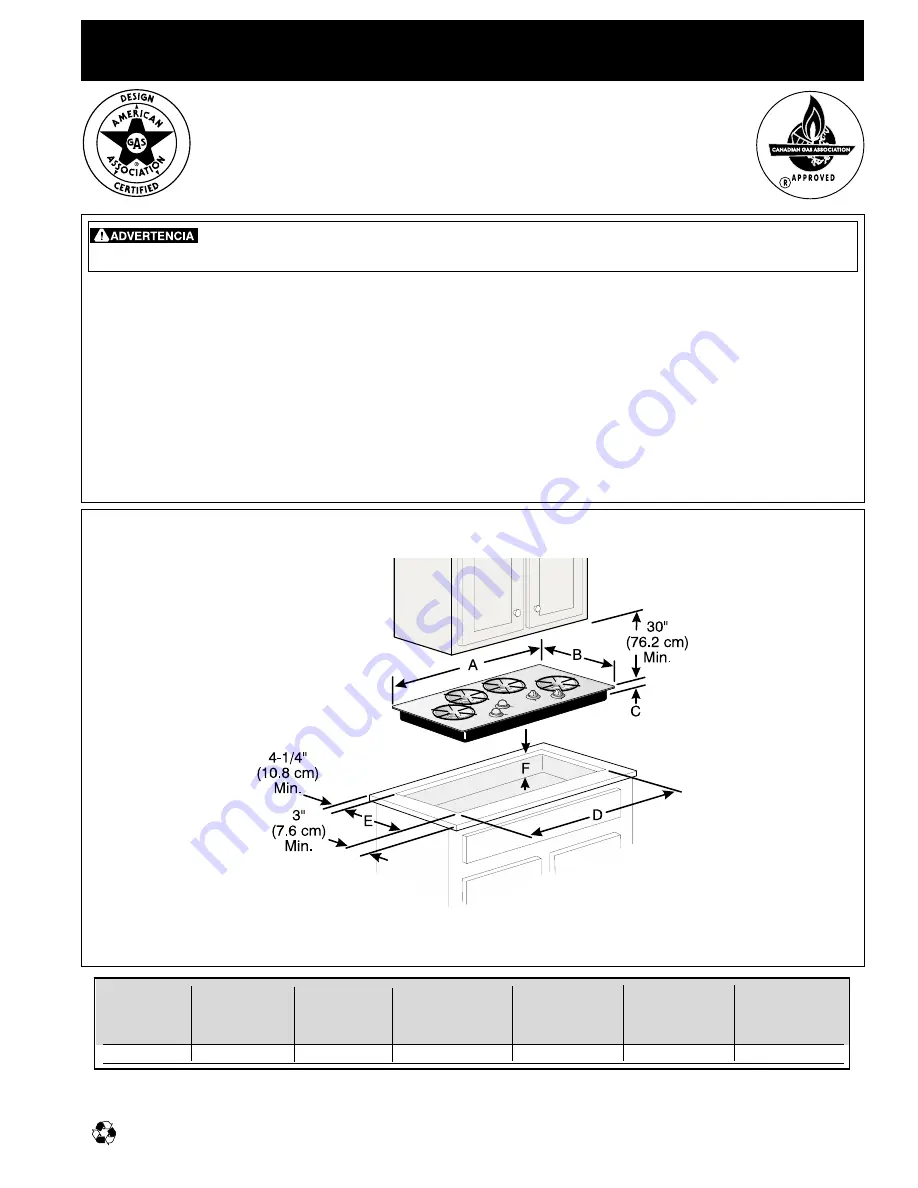
Figura 1

Dimensiones de la estufa y del recortado

* 30" (76.2 cm) mín. para un

gabinete desprotegido.
24" (61 cm) mín. para una
superficie protegida.

* Incluye un espacio de 5"(12.7 cm) debajo de la estufa para conexión con una línea de suministro de gas.

DIMENSIONES

DIMENSTIONES

F.  PROFUNDIDAD

MODELO

A. LONGITUD

B. ANCHURA

C. PROFUNDIDAD

DE RECORTADO

DE RECORTADO

DEBAJO DE LA

D. LONGITUD

E. ANCHURA

ESTUFA*

Estufa de 36"

36 (91.5 cm)

18 (45.7 cm)

3


5

/

32

 (8 cm)

34 

1

/

4

 (8.7 cm)

16 

3

/

4

 (42.5 cm)

1

/

4

 (21 cm)

*

Summary of Contents for FGC6X5XEWD

Page 1: ...any other appliance WHAT TO DO IF YOU SMELL GAS Do not try to light any appliance Do not touch any electrical switch do not use any phone in your building Immediately call your gas supplier from a neighbor s phone Follow the gas supplier s instructions If you cannot reach your gas supplier call the fire department Installation and service must be performed by a qualified installer service agency o...

Page 2: ...rest to children in the cabinets above the cooktop Children could be seriously burned climbing on the cooktop to reach items To eliminate the need to reach over the surface burners cabinet storage space above the burners should be avoided Adjust surface burner flame size so it does not extend beyond the edge of the cooking utensil Excessive flame is hazardous Never use your cooktop for warming or ...

Page 3: ...s Figure 3 CABINET DESIGN To eliminate the risk of burns or fire by reaching over heated surfaces cabinet storage space located above the cooktop should be avoided If cabinet storage is provided risk can be reduced by installing a range hood that projects horizontally a minimum of 5 10 2 cm beyond the bottom of the cabinets ...

Page 4: ...t Side of Cabinet To be accessible for shut off valve operation Flare Union 4 10 2 cm Pressure Regulator Manual Shutoff Valve 120V 60Hz Grounded Outlet Flexible Appliance Conduit Cabinet sides or filler panel 6 1 2 16 5 cm Min Flare Union 5 12 7 cm Max Figure 5 TYPICAL GAS COOKTOP INSTALLATION OVER AN ELECTRIC BUILT IN OVEN INSTALLED UNDER THE COUNTER THE COOKTOP SHOWN IS A GAS ON GLASS MODEL ...

Page 5: ...adjoining cabinets Panel height should allow for installation of approved cooktop models See Typical Gas Cooktop Installation Over an Electric Built in Oven Installed Under the Counter on the preceding page Only certain cooktop models may be installed over certain built in electric oven models listed by the MFG ID number see the insert sheet included in the literature package For detailed installa...

Page 6: ...sure regulator in order manual shutoff valve nipple flare union adapter flexible connector flare union adapter nipple pressure regulator Use pipe joint compound made for use with Natural and LP Propane gas to seal all gas connections If flexible connectors are used be certain connectors are not kinked Clamp Down Information Once the unit is installed in the counter opening you must clamp the unit ...

Page 7: ...alve should be located in the same room as the cooktop and should be in a location that allows ease of opening and closing Do not block access to the shutoff valve The valve is for turning on or shutting off gas to the appliance Open the shutoff valve in the gas supply line Wait a few minutes for gas to move through the gas line Check for leaks After connecting the cooktop to the gas supply check ...

Page 8: ... available to the top burner Each burner should light within four 4 seconds in normal operation after air has been purged from supply lines Visually check that burner has lit C Once the burner lights the control knob should be rotated out of the LITE position There are separate ignition devices for each burner Try each knob separately until all burner valves have been checked 4 Adjust the LO or SI...

Page 9: ...del and serial numbers and a lot number or letter from the serial plate on your range Your serial plate also tells you the rating of the burners the type of fuel and the pressure the range was adjusted for when it left the factory Before You Call for Service Read the Avoid Service Checklist and operating instructions in your Owner s Guide It may save you time and expense The list includes common o...

Page 10: ...10 GAS COOKTOP INSTALLATION INSTRUCTIONS For Models with 4 Sealed Burners Tempered Glass Cooktops or Porcelain Enamel Cooktops NOTES ...

Page 11: ...cto No toque ningún interruptor eléctrico no use ningún teléfono en su edificio Llame a su proveedor de gas desde el teléfono de un vecino Siga las instrucciones del proveedor de gas Si no logra comunicarse con su proveedor de gas llame al departamento de bomberos La instalación y el servicio de mantenimiento deben ser efectuados por un instalador calificado la agencia de servicio o el proveedor d...

Page 12: ...ratando de trepar a la estufa para alcanzar estos artículos Los gabinetes de almacenamiento sobre la estufa deben ser evitados para eliminar la necesidad de tener que pasar sobre los quemadores superiores de la estufa para llegar a ellos Ajuste el tamaño de la llama de los quemadores superiores de tal manera que ésta no sobrepase el borde de los utensilios de cocinar La llama excesiva es peligrosa...

Page 13: ... 020 30 76 2 cm min de espacio entre la parte superior del fogón y la parte inferior de un armario de madera o metal sin protección 3 7 6 cm mín desde el borde delantero del corte hasta el borde delantero de la parte superior del armario Para evitar riesgos de quemaduras o incendios al tocar superficies calientes se deben evitar los armarios sobre la superficie de los quemadores Si existe un armar...

Page 14: ...CTRICO INCORPORADO INSTALADO DEBAJO DEL MOSTRADOR CON UNA ESTUFA MONTADA ARRIBA LA ESTUFA MOSTRADA ARRIBA ES UN MODELO DE GAS ENCIMA DE VIDRIO 4 10 2 cm 6 1 2 16 5 cm Min 5 12 7 cm Max Conector flexible para artefactos ESTUFA DE GAS Lados del gabinete o panel llenador Regulador de presión Adaptor de gas Válvula de cierre manual Tomacorriente puesto a tierra de 120 voltios 60Hz DE LA UNIDAD DE LA U...

Page 15: ... e instaladas Si no hay una estufa instalada por encima del horno a pared se permite un máximo de 5 12 7 cm Approx 3 7 6 cm 36 Min 91 4 cm 4 1 2 11 4 cm Max E Paneles llenadores laterales son necesarios para aislar el horno de los gabinetes adyacentes La altura de los paneles debe dejar espacio suficiente para la instalación de una estufa aprobada Consulte la sección Instalación Típica para la Est...

Page 16: ...ca para operar con gas natural solamente Si usted desea de convertir su estufa para uso con el gas de propano líquido use los orificios fijos ubicados en el paquete que contiene las Instrucciones de Instalación en la bolsa marcada FOR LP PROPANE GAS CONVERSION PARA LA CONVERSION A GAS DE PROPANO LIQUIDO Sigue las instrucciones provistas con los orificios La conversión debe ser efectuado por un téc...

Page 17: ... abrir y cerrar No bloquée el acceso a la válvula de cierre La válvula es para abrir o cerrar el suministro de gas al aparato Abra la válvula de cierre en la línea de suministro de gas Espere unos minutos a que el gas se mueva por el tubo Asegúrese de que no haya escapes de gas Después de conectar la estufa al suministro de gas compruebe el sistema con un menómetro Si no tiene un manómetro abre el...

Page 18: ...sta enganchar el tornillo interior El tamaño de la llama puede ser aumentado o disminuido girando el tornillo Ajuste el tamaño de la llama hasta que pueda pasar rápidamente de la posición HI hasta la posición MAS BAJA sin que se apaague la llama La llama debe ser lo más pequeña posible sin que se apague E Si usted necesita ajustar otro quemador repite los pasos A a D hasta que todos los quemadores...

Page 19: ...seguro de incluir el número de modelo y de serie y el número o letra del lote de la placa de serie de su estufa La placa con el número de serie también le da la potencia nominal de los quemadores el tipo de combustible y la presión a la cual fué ajustada la estufa en la fábrica Antes de Llamar al Servicio Lea la sección Evite Llamadas de Servicio en su Manual del Usuario Esto le podrá ahorrar tiem...

Page 20: ...10 INSTRUCCIONES DE INSTALACION PARA LA ESTUFA A GAS Para modelos con 4 quemadores sellados superficies de vidrio templado o de porcelana esmaltada NOTA ...

Reviews: