background image

6

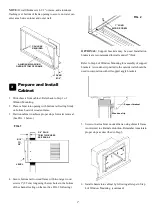
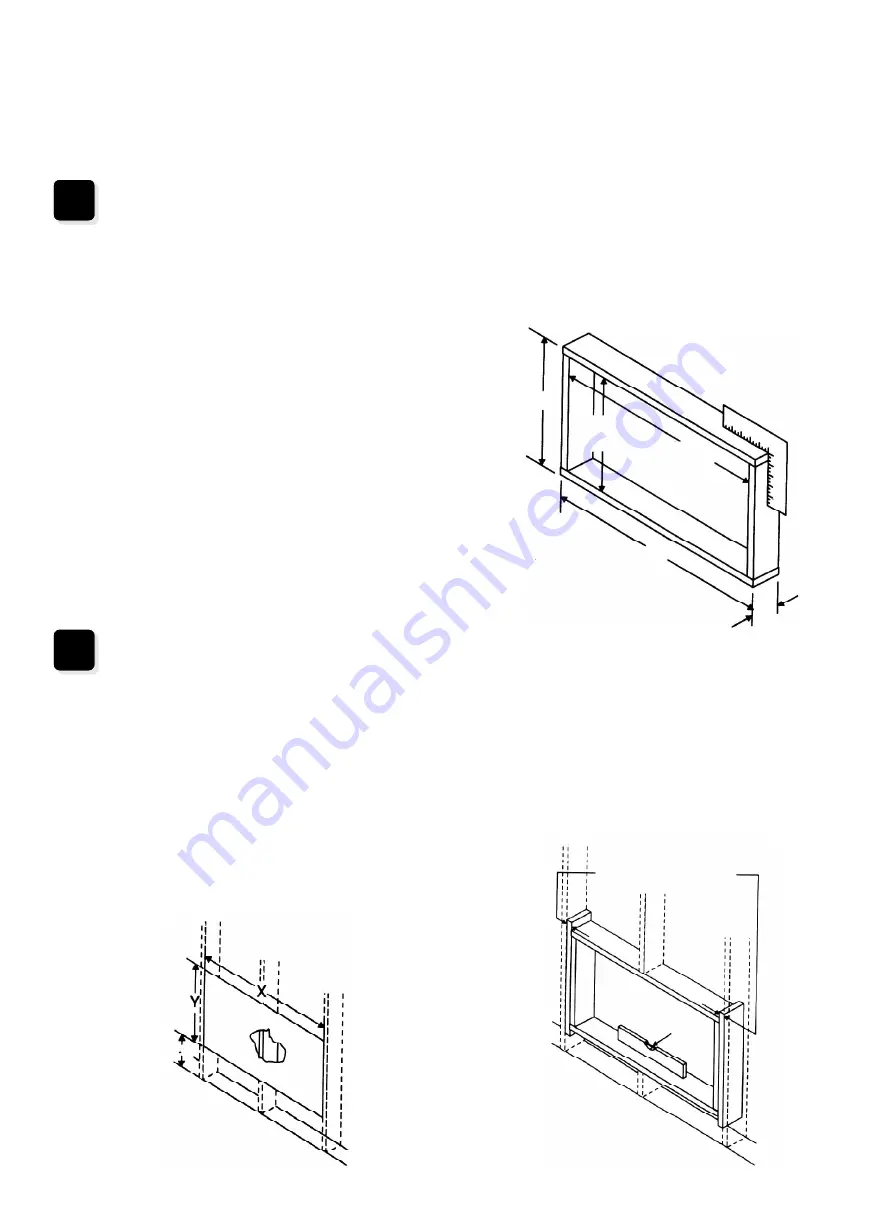
Carefully measure and cut an opening with t he following

dimensions. See FIGS. 1 and 2.

WIDTH “X” = 26-3/4'' (67.9cm) plus twice the thickness

of framing material used.

HEIGHT “Y” = 18-7/8'' (47.9cm) plus twice the

thickness of framing material used.

4. Build a wooden sleeve with the INSIDE dimensions of

26-3/4'' (67.9cm) in width and 18-7/8'' (47.9cm) in height.

Frame depth should be the same as wall thickness. Fill in

the space from the opening to the  studs with wood spacers,

as shown.

5. Nail frame to spacers to spacers with front flush with

drywall.

NAIL SPACERS TO STUDS

LEVEL

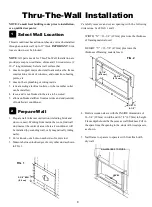
Thru-The-Wall Installation

NOTE: Consult local building codes prior to installation,

or a qualified carpenter.

Select Wall Location

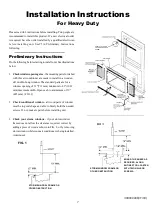
This air conditioner has a slide-out chassis, so it can be installed

through an outside wall up to 12'' thick. 

IMPORTANT

: Side

louvers must never be blocked.

NOTE

: All parts neede for Thru-The-Wall Installation are

provided, except a wood frame, shims, and 10 wood screws (#

10-1'' long minimum). Select a wall surface that:

1. does not support major structural loads such as the  frame

construction at ends of windows, and under truss-bearing

points, etc.

2. does not have plumbing or wiring inside.

3. is near existing electrical outlets, or where another outlet

can be installed.

4. faces, and is not blocked to the area to be cooled.

5. allows unblocked airflow from rear sides and end (outside)

of installed air conditioner.

Prepare Wall

1. Prepare wall in frame construction (including brick and

stucco veneer). Working from inside the room, find wall

stud nearest the center of area where air conditioner will

be installed (by sounding wall, or by magnetically inding

nails).

2. Cut or knock out a hole on each side of center stud.

3. Measure between inside edges of every other stud as shown

in FIG. 1.

2

1

FIG. 1

3-3/8'' MIN

(8.6 cm)

Y

FIG. 2

18-7/8''

(47.9 cm)

26-3/4''

(67.9 cm)

X

UP TO

8-1/2''

Y

Summary of Contents for FAS156N1

Page 1: ...of 31 711 mm minimum to 42 1067 mm maximum width Open sash to a minimum of 19 483 mm FIG 1 2 Check condition of window all wood parts of window must be in good shape and able to firmly hold the needed screws If not make repairs before installing unit 3 Check your storm windows if your storm window frame does not allow the clearance required correct by adding a piece of wood as shown in FIG 2 or by...

Page 2: ... Carefully unpack air conditioner remove all packing material Protect floor or carpet from damage Two people should be used to move and install unit Avoid fire hazard or electric shock Do not use an extension cord or an adapter plug Do not remove any prong from the power cord WARNING Grounding type wall receptacle Do not under any circumstances cut remove or bypass the grounding prong from this pl...

Page 3: ... gasket to top angle above holes as shown in FIG 1 2 Install top angle and side retainers to cabinet as shown in FIG 1 1 2 Assemble Window Filler Panels 1 Place cabinet on floor a bench or a table 2 Slide I section of window filler panel into side retainer on the side of the cabinet see Figures 2 3 Do both sides 3 Insert top and bottom legs of window filler panel frame into channel in the top angl...

Page 4: ... window stool 4 5 Bottom Rail Seal 3 4 LONG HEX HEAD SCREW STOOL STOOL ANGLE Install Support Bracket 1 Hold each support bracket flush against outside of sill and tight to bottom of cabinet as shown below Mark brackets at top level of sill and remove 2 Assemlle sill angle bracket to support brackets at the marked position as shown Hand tighten but allow for any changes later 3 Install support brac...

Page 5: ...ow Filler Panels 1 Carefully raise window to expose filler panel locking screws Loosen screws so filler panels slide easily 2 Extend panels to fill window opening completely Tighten locking screws on top 3 Close window behind top angle Install Window Lock and Sash Seal 1 Trim sash seal to fit window width Insert into space between upper and lower sashes 2 Attach right angle safety lock as shown 7 ...

Page 6: ... must never be blocked NOTE All parts neede for Thru The Wall Installation are provided except a wood frame shims and 10 wood screws 10 1 long minimum Select a wall surface that 1 does not support major structural loads such as the frame construction at ends of windows and under truss bearing points etc 2 does not have plumbing or wiring inside 3 is near existing electrical outlets or where anothe...

Page 7: ...hannel resting on frame See FIG 2 following 3 1 LONG WOOD SCREW FIG 2 OPTIONAL Support brackets may be used Installation brakcets are recommended for walls under 5 thick Refer to Step 4 of Window Mounting for assembly of support brackets A wooden strip nailed to the outside wall should be used in conjunction with sill support angle brackets 5 Screw or nail cabinet wooden frame using shims if frame...

Page 8: ...is to build an in between frame of 2x4 s as shown in the Step 2 Prepare Wall illustrations but make it double framed on either side and install between masonry wall opening and cabinet Frame must be securely anchored to masonry wall opening This way gives very good louver clearance on either side of cabinet 3 Install a lintel to support masonry wall above cabinet Existing holes in cabinet can be u...

Reviews: