background image

10

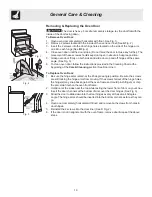
Fig. 3

Removing & Replacing the Oven Door

 The door is heavy. For safe, temporary storage, lay the door flat with the

inside of the door facing down.
To Remove Oven Door:

1.

Open oven door completely (horizontal with floor - See Fig. 1).

2.

Remove 2 screws located on the inside of the oven door liner (See A Fig. 2)

3.

Insert the 2 screws into the door hinge holes located on the side of the hinge arm,
one into each hinge (See B Fig. 2).

4.

Close oven door until the door stops, (Do not force the door to close any further). The
placement of these screws should keep door open in about a 45 degree position.

5.

Grasp oven door firmly on both sides and slide door up and off hinges at the same
angle. (See Fig. 3)

6.

To clean oven door, follow the instructions provided in the Cleaning Chart at the
beginning of the Care & Cleaning section (See Door Liner).

To Replace Oven Door:
1.

Be sure the hinge arms remain at the 45 degree angle position. Be sure the screws
are still locking the hinge arms from moving. If the screws fall out of the hinge holes,
the hinge(s) may snap back against the oven frame and could pinch fingers or chip
the porcelain finish on the oven front frame.

2.

Hold door at the sides near the top while resting the lower front of door on your knee.
Insert the door channels at the bottom of door over the door hinges, (See Fig. 3).

3.

Allow the door to slide down into the door hinges evenly at the same 45 degree
angle. The hinge arms should be inserted into the bottom corners as far as they can
go.

4.

Open door completely (horizontal with floor) and remove both screws from holes in
door hinges.

5.

Reinstall the 2 screws into the door liner (See C Fig. 2).

6.

If the door is not in alignment with the oven frame, remove door & repeat the above
steps.

Fig. 2

Fig. 1

General Care & Cleaning

Summary of Contents for ES100

Page 1: ...it the Frigidaire Web Site at http www frigidaire com READ AND SAVE THESE INSTRUCTIONS Welcome 2 Important Safety Instructions 2 4 Before Setting Oven Controls 4 5 Oven Control Functions 5 Setting Surface Controls 6 Setting Oven Controls 6 7 General Care Cleaning 7 10 Before You Call Solutions to Common Problems 11 Warranty Back Page ...

Page 2: ...should be filled in completely signed and returned to Electrolux Home Products Product Registration Congratulations on your purchase of a new range At Electrolux Home Products we are very proud of our product and are completely committed to providing you with the best service possible Your satisfaction is our number one priority We know you ll enjoy your new range and Thank You for choosing our pr...

Page 3: ... fire if allowed to become too hot Use Only Dry Potholders Moist or damp potholders on hot surfaces may result in burns from steam Do not let potholders touch hot heating elements Do not use a towel or other bulky cloth instead of a potholder DoNotHeatUnopenedFoodContainers Buildupofpressure may cause container to burst and result in injury Removetheovendoorfromanyunusedrangeifitistobestored or di...

Page 4: ...irculation in the oven and good baking results DO NOT BLOCK OVEN VENT Before Setting Oven Controls IMPORTANTINSTRUCTIONSFORUSINGYOUR OVEN Use Care When Opening Oven Door or Warmer Drawer if equipped Stand to the side of the range when opening the door of a hot oven Let hot air or steam escape before you remove or replace food in the oven Keep Oven Vent Ducts Unobstructed The oven vent is located u...

Page 5: ... during any of the other oven functions When the minute timer is in use with any other function the minute timer will be shown in the display To view other functions press the pad for that function To Change the Minute Timer while it is in use While the timer is active and shows in the display press and hold the or to increase or decrease the time To Cancel the Minute Timer before the set time has...

Page 6: ...below are based on cooking in medium weight metal pans with lids Settings may vary when using other types of pans Note The size and type of utensil used and the amount and type of food being cooked will influence the setting needed for best cooking results Do not place plastic items such as salt and pepper shakers spoon holders or plastic wrappings on top of the range when it is in use These items...

Page 7: ...celain Enamel Burner Grates Cooktop Surface Below Cooktop Broiler Pan Insert Broiler Drawer Door Liner Oven Bottom How to Clean Surfaces The broiler pan the insert some models allows grease to drain and be kept away from the high heat of the broiler DO NOT use the pan without the insert DO NOT cover the insert with foil the exposed grease could ignite Broiling 1 Arrangeovenrackwhileovenisstillcool...

Page 8: ...l cooktop cleaning cream leaves a protective finish on the glass to help prevent scratches and abrasions Sliding aluminum or copper clad bottom pans on the cooktop can cause metal markings on the cooktop surface These marks should be removed immediately after the cooktop has cooled using the cooktop cleaning cream Metal marks can become permanent if not removed prior to future use Cookware cast ir...

Page 9: ...e sure the range is unplugged and all parts are COOL before replacing oven light Wear a leather faced glove for protection against possible broken glass Some models are equipped with stainless steel exterior parts Special care and cleaning are required for maintaining the appearance of stainless parts Please refer to the Cleaning Chart provided at the beginning of the General Care Cleaning section...

Page 10: ...ing of the Care Cleaning section See Door Liner To Replace Oven Door 1 Be sure the hinge arms remain at the 45 degree angle position Be sure the screws are still locking the hinge arms from moving If the screws fall out of the hinge holes the hinge s may snap back against the oven frame and could pinch fingers or chip the porcelain finish on the oven front frame 2 Hold door at the sides near the t...

Page 11: ...ke range appear not level Be sure cabinets are square have sufficient room for range clearance Oven control beeps and displays any F code error for example F3 Electronic control has detected a fault condition Press CLEAR OFF to clear the display stop beeping Reprogram oven If fault recurs record fault number Press CLEAR OFF contact your authorized service agent Oven light does not work some models...

Page 12: ...ice be required If service is performed it is in your best interest to obtain and keep all receipts This written warranty gives you specific legal rights You may also have other rights that vary from state to state Service under this warranty must be obtained by contacting Electrolux Home Products Inc or Electrolux Canada Corp FULLONE YEAR WARRANTY LIMITED 2ND 5TH YEARWARRANTY Glass Smoothtop Seal...

Reviews: