background image

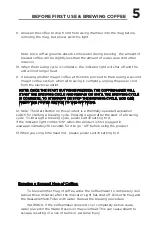
9. Allow all the coffee to drip from the brewing chamber into the mug before

removing the mug

 but power switch is light .

Note: since coffee grounds absorb some water during brewing , the amount of
brewed coffee will be slightly less than the amount of water pure dint other
reservoir.

10. When the brewing cycle is complete , the indicator light will shut off and the

unit will not longer heat.

1

12. Note

The Start Button on this product is a thermally-operated activation         

switch for starting a brewing cycle. Pressing it again after the start of a brewing      

cycle. To interrupt a brewing cycle, power switch setting to 0,

If the indicator light comes ”ON” when the product is first plugged in,

wait approximately 30 seconds for it to go “off” before using the product.

13.When you Long time need not,  please power switch setting to 0.

1. If brewing another mug of coffee at this time proceed to the brewing a second

mug of coffee section, when all brewing is complete, unplug the power cord
from the electrical outlet.

NOTE: ONCE THE START BUTTON IS PRESSED, THE COFFEEMAKER WILL
START THE BREWING CYCLE AND REMAIN ON UNTIL THE BREWING CYCLE
IS COMPLETE, TO INTERRUPT OR STOP THE BREWING CYCLE,

                                                                                                            YOU CAN 

PRESS THE POWER SWITCH TO THE OFF MODE.

Brewing a Second Mug of Coffee:

To brew another Mug of coffee, allow the Coffeemaker to completely cool

(about three minutes) after the Indicator Light has shut off. Rinse the Mug and
the Reusable Mesh Filter with water. Repeat the brewing procedure.

WARNING: If the Coffeemaker does not cool completely before reuse,

water placed in the Water Reservoir may overheat. This can cause steam to
escape, resulting in a risk of burns or personal injury.

5

BEFORE FIRST USE & BREWING COFFEE

Summary of Contents for ECMK095-Black

Page 1: ... FUTURE REFERENCE 3 BEFORE FIRST USE BREWING COFFEE 4 5 READ ALL INSTRUCTION BEFORE USE 2 CARE AND MAINTENANCE 6 7 USING YOUR COFFEE MAKER 8 LIMITED WARRANTY 9 Coffee Maker 31 9 Odg 0ZOQY EVWbS USA CANADA 1 800 968 9853 use care ...

Page 2: ...ng the appliance Do not operate any appliance with a damaged cord or plug or after the appliance malfunctions or has been damaged in any manner Return the appliance to the nearest authorized service facility for examination repair or adjustment The use of an accessory not evaluated for use with this appliance may cause injuries Do not use outdoors Do not let cord hang over the edge of table or cou...

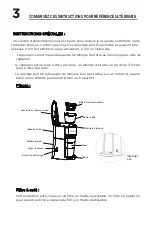
Page 3: ...of the grounding type the extension cord must be a grounding type3 wire cord The longer cord should be arranged so that it will not drape over a countertop or tabletop where it can be pulled on by children or tripped over Parts Coffee filter This coffee maker comes with a reusable mesh filter A paper filter can t be used in place of reusable mesh filter Water reservoir Lid Water reservoir Main Hou...

Page 4: ...ore coffee per cup to achieve the strength offiner coffee grounds 3 Gently shake the mesh filter to distribute the coffee evenly 4 Place the mesh filter into the filter basket and place filter basket into the brewing chamber see the figure 5 Close the water reservoir lid 6 Remove the lid from the mug and place the mug into the base 7 Plug the power cord into a standard 120 volt AC electrical outle...

Page 5: ...product 13 When you Long time need not please power switch setting to 0 1 If brewing another mug of coffee at this time proceed to the brewing a second mug of coffee section when all brewing is complete unplug the power cord from the electrical outlet NOTE ONCE THE START BUTTON IS PRESSED THE COFFEEMAKER WILL START THE BREWING CYCLE AND REMAIN ON UNTIL THE BREWING CYCLE IS COMPLETE TO INTERRUPT OR...

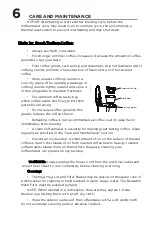
Page 6: ...coffee is at its peak flavor immediately after brewing A clean Coffeemaker is essential for making great tasting coffee Clean regularly as specified in the Care and Maintenance section Prevent an oily buildup A small amount of oil on the surface of brewed coffee is due to the release of oil from roasted coffee beans Heavily roasted coffee beans release more oil than others Regularly cleaning your ...

Page 7: ...g 120V 60Hz We exclude all claims for special incidental and consequential damages caused by breach of express or implied warranty All liability is limited to the amount of the purchase price Every implied warranty including any statutory warranty or condition of merchantability or fitness for a particular purpose is disclaimed except to the extent prohibited by law in which case such warranty or ...

Page 8: ...FRIGIDAIRE is a pending or registered trademark of Electrolux Home Products Inc and used under a license from Electrolux Home Products Inc ...

Page 9: ...CMK095 CONSERVEZ CES INSTRUCTIONS POUR RÉFÉRENCE ULTÉRIEURE 3 AVANT LA PREMIÈRE UTILISATION PRÉPARATION DU CAFÉ 4 6 MESURES DE SÉCURITÉ IMPORTANTES 2 ENTRETIEN ET MAINTENANCE 7 CARTE DE GARANTIE 8 CARTE DE GARANTIE 9 utieisation se soucier ...

Page 10: ...er un appareil dont le cordon ou la fiche est endommagé ou qui présente un défaut de fonctionnement ou qui a été endommagé de quelque manière que ce soit Retournez l appareil au centre de service agréé le plus proche pour examen réparation ou réglage L utilisation d un accessoire non évalué pour être utilisé avec cet appareil peut provoquer des blessures Ne pas utiliser à l extérieur Ne laissez pa...

Page 11: ...onge doit être un cordon à 3 fils du type à mise à la terre La rallonge doit être disposée de manière à ne pas traîner sur un comptoir ou une table où les enfants pourraient la tirer ou trébucher Pièces Filtre à café Cette cafetière est livrée avec un filtre en maille réutilisable Un filtre en papier ne peut pas être utilisé à la place du filtre en maille réutilisable Couvercle du réservoir d eau ...

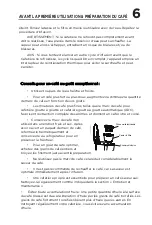
Page 12: ...r tasse pour obtenir la même force que le café moulu fin 3 Secouez doucement le filtre pour répartir uniformément le café 4 Placez le filtre à mailles dans le panier à filtre et placez le panier à filtre dans la chambre d infusion voir la figure 5 Fermez le couvercle du réservoir d eau 6 Retirez le couvercle de la tasse et placez la tasse dans la base 7 Branchez le cordon d alimentation dans une p...

Page 13: ...ne fois l infusion terminée débranchez le cordon d alimentation de la prise électrique 12 Note une fois le bouton de démarrage appuyé la cafetière démarre le cycle d infusion et reste allumée jusqu à la fin du cycle d infusion pour interrompre ou arrêter le cycle d infusion vous devez débrancher la fiche de la prise électrique Préparation d une deuxième tasse de café Pour préparer une autre tasse ...

Page 14: ...te des arômes et donnent un café riche et corsé Conservez le marc de café non utilisé dans un endroit frais et sec Après avoir ouvert un paquet de marc de café refermez le hermétiquement et conservez le au réfrigérateur pour en préserver la fraîcheur Pour un goût de café optimal achetez des grains de café entiers et broyez les finement juste avant la préparation Ne réutilisez pas le marc de café c...

Page 15: ... l eau de votre région est particulièrement riche en minéraux faites le toutes les deux semaines 1 Remplissez la tasse avec un volume de vinaigre blanc et trois volumes d eau froide 2 Versez le mélange d eau et de vinaigre dans le réservoir d eau 3 Placez la tasse sans le couvercle sur la base 4 Appuyez sur le bouton de démarrage le voyant lumineux s allume REMARQUE Pendant le nettoyage il y a plu...

Page 16: ...it est utilisé pour un usage autre que domestique ou s il est soumis à une tension ou une forme d onde autre que celle indiquée sur l étiquette par exemple 120V 60Hz Nous excluons toute réclamation pour des dommages spéciaux accessoires et consécutifs causés par une violation de la garantie explicite ou implicite Toute responsabilité est limitée au montant du prix d achat Toute garantie implicite ...

Page 17: ...taire un service Notre maison est votre maison Visitez nous si vous besoin d aide pour l une de ces choses FRIGIDAIRE est une marque déposée ou en instance d Electrolux Home Products Inc Et utilisée sous licence d Electrolux Home Products Inc ...

Reviews: