background image

7

Care and Cleaning

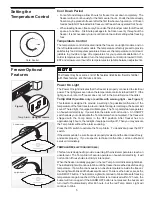
Some upright freezers are frost-free and defrost automatically, but should be
cleaned occasionally.

Between Defrostings

To avoid frequent defrosting, occasionally use a plastic scraper to remove frost.
Scrape with a pulling motion. Never use a metal instrument to remove frost.

Defrosting

It is important to defrost and clean freezer when ¼ to ½ inch of frost has
accumulated.  Frost may tend to accumulate faster on upper part of the freezer due
to warm, moist air entering the freezer when the door is opened.  Remove food  and
leave the door open when defrosting the freezer.

On upright models

 with a defrost drain (Figure 1), remove drain plug on the

inside floor of the freezer by pulling straight out. To access external drain tube
on models with a base panel, first remove the two screws from the base panel.
Locate the drain tube near the left center under the freezer. Place a shallow pan
under the drain tube. Defrost water will drain out.  Check pan occasionally so
water does not overflow. A ½ inch garden hose adapter can be used to drain the
freezer directly into a floor drain. If your model is not equipped with an adapter,
one can be purchased at most hardware stores. Replace the drain plug when
defrosting and cleaning are completed.  If the drain is left open, warm air may enter
freezer.

On chest models 

 with a defrost drain, place a shallow pan or the Divider/Drain

Pan (some models) beneath the drain outlet (Figure 2). A ½ inch garden hose
adapter can be used to drain the freezer directly into a floor drain (Figure 3). If your
model is not equipped with an adapter, one can be purchased at most hardware
stores. Pull out the drain plug inside the freezer, and pull off the outside defrost
drain plug (Figure 4). Defrost water will drain out. Check pan occasionally so
water does not overflow. Replace the drain plugs when defrosting is completed.

On models without a defrost drain,

 place towels or newspapers on the freezer bottom

to catch the frost. The frost will loosen and fall. Remove towels and/or newspapers.

• If the frost is soft, remove it by using a plastic scraper. If the frost is glazed and hard,

fill deep pans with hot water and place them on the freezer bottom. Close the freezer
door. Frost should soften in about 15 minutes. Repeat this procedure if necessary.

Cleaning the Inside

After defrosting, wash inside surfaces of the freezer with a solution of two
tablespoons of baking soda in one quart (1.136 litres) warm water. Rinse and dry.
Wring excess water out of the sponge or cloth when cleaning in the area of the
controls, or any electrical parts.

Wash the removable parts with the baking soda solution mentioned above, or mild
detergent and warm water. Rinse and dry.  

Never

 use metallic scouring pads,

brushes, abrasive cleaners, or alkaline solutions on any surface. Do not wash
removable parts in a dishwasher.

Cleaning the Outside

Wash the cabinet with warm water and mild liquid detergent. Rinse well and wipe
dry with a clean soft cloth. Replace parts and food.

Figure 3

Damp objects stick to cold metal
surfaces. Do not touch interior metal
surfaces with wet or damp hands.

HOSE

ADAPTOR

DEFROST

DRAIN

PLUG

 CA

 CA

 CA

 CA

 CAUTION

UTION

UTION

UTION

UTION

Freezer must be unplugged (to avoid electrical hazard) from power source
when defrosting unit.

Drain Pan

Drain Tube

Drain

Pan

Drain Tube

Figure 2

Figure 1

U09 Models

Only

Summary of Contents for AFFU2068DW1

Page 1: ...t Registration 2 2 4 3 5 5 6 7 8 9 10 11 Energy Saving Ideas Important Safety Instructions First Steps Setting the Temperature Control Freezer Optional Features Care and Cleaning Power Failure Freezer Failure Avoid Service Checklist Warranty Freezer Use Care Manual ...

Page 2: ...r as soon as possible The information contained in this Owner s Guide will instruct you on how to properly operate and care for your product Please read through the information contained in your literature pack to learn more about your new appliance Record Your Model and Serial Numbers Record the Model No and Serial No of this freezer in the space provided below ModelNo ___________________________...

Page 3: ...oitsownproperlygroundedthree prongreceptacle protectedwitha15amptimedelayfuseorcircuitbreaker The receptaclemustbeinstalledinaccordancewiththelocalcodesandordinances Consult a qualified electrician Receptacles protected by Ground Fault Circuit Interrupters GFCI are NOT RECOMMENDED DO NOT use an extension cord or adapter plug If voltage varies by 10 percent or more freezer performance may be affect...

Page 4: ...pads and floor Cleaning Washanyremovableparts thefreezerinterior andexteriorwithmilddetergent and warm water Wipe dry DO NOT USE HARSH CLEANERS ON THESE SURFACES Do not use razor blades or other sharp instruments which can scratch the appliance surface when removing adhesive labels Any glue left from the tape can be removed with a mixture of warm water and mild detergent or touch the residue with ...

Page 5: ... willalsoglow TheTempAlarmfeatureoperates on household electricity If power fails the alarm will not function An ON OFF switch allows you to deactivate the Temp Alarm when not wanted The freezer is shipped with the Temp Alarm in the OFF position After freezer has run approximately4hours theredlight ifequipped willgooff Thenyoumayactivate the Temp Alarm without the alarm sounding Press the ON switc...

Page 6: ...ift the shelf up and out to move to the desired position Defrost Drain The defrost drain provides a method of draining the water during defrosting and cleaning See Defrosting in Care and Cleaning Section Slide Aside Basket chest models This basket helps organize odd shaped items To reach other packages in the freezer slide the basket aside or lift out Divider Drain Pan chest models TheDivider Drai...

Page 7: ...tequippedwithanadapter onecanbepurchasedatmosthardware stores Pull out the drain plug inside the freezer and pull off the outside defrost drain plug Figure 4 Defrost water will drain out Check pan occasionally so waterdoesnotoverflow Replacethedrainplugswhendefrostingiscompleted Onmodelswithoutadefrostdrain placetowelsornewspapersonthefreezerbottom tocatchthefrost Thefrostwillloosenandfall Removet...

Page 8: ... hours if the freezeriskeptclosed Ifthepowerfailurecontinues packsevenoreightpoundsof dry ice into the freezer every 24 hours Look in the Yellow Pages under Dry Ice Dairies or Ice Cream Manufacturers for local dry ice suppliers Always wear gloves and use caution when handling dry ice If the freezer has stopped operating see Freezer does not run in the Avoid Service Checklist Section of this manual...

Page 9: ...uently Warm air enters the freezer every time the door is opened Open the door less often Freezer door may be slightly open See OCCURRENCE Door Problems Temperature control is set too cold Turn the control knob to a warmer setting Allow several hours for the temperature to stabilize Freezer gasket is dirty worn cracked or poorly fitted Clean or change gasket Leaks in the door seal will cause freez...

Page 10: ...the freezer Freezer is touching the wall Level the freezer or move freezer slightly Refer to Leveling in the First Steps section Moisture forms on inside freezer walls Weather is hot and humid which increases internal rate of frost build up This is normal Door is slightly open See OCCURRENCE Door Problems Door is kept open too long or is opened too frequently Open the door less often Moisture form...

Page 11: ...by Electrolux Home Products Inc We authorize no person to change or add to any of our obligations under this warranty Our obligations for service and parts under this warranty must be performed by us or an authorized Electrolux Home Products Inc servicer In Canada your appliance is warranted by Electrolux Canada Corp This warranty applies only to products in ordinary household use and the consumer...

Page 12: ...12 Notes ...

Reviews: