background image

5

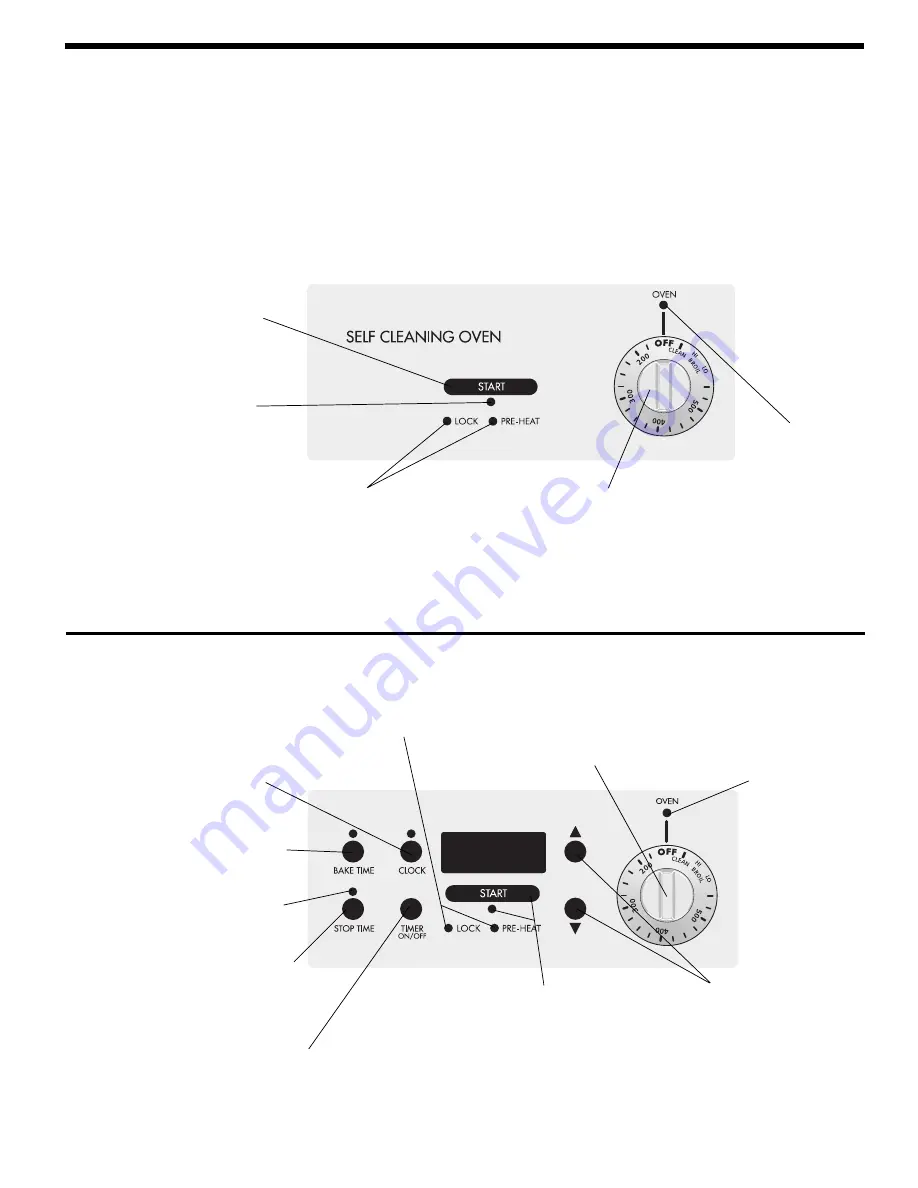
Control Pad Functions

READ THE INSTRUCTIONS CAREFULLY BEFORE USING THE OVEN.

For satisfactory use of your oven, become familiar with the various functions of the oven as described below. Your model will
have one of the 2 controls shown. Refer to Figure 1 or Figure 2, depending on your model.

The oven can be programmed to:

• Bake normally
• Time bake
• Vari Broil
• Self-clean

START PAD

—Push to activate

oven after oven functions are
set.

START INDICATOR LIGHT—

Flashes as a reminder to push
the 

START pad

 to activate the

oven.

TEMPERATURE CONTROL
KNOB

— Operates the Variable

Broil, Bake or Self-Clean Cycle
modes when used with the

START pad

. Cancels all oven

functions when the Temperature
Control knob is turned to 

OFF

.

OVEN
INDICATOR
LIGHT

—Glows

each time the
oven burner
(element) turns
on to maintain
the set oven
temperature.

PRE-HEAT & LOCK LIGHTS

—The 

"PRE-HEAT" light 

will glow

when the oven is first set to operate, or if the desired
temperature is reset higher than the actual oven temperature.
The 

"LOCK" light

 will flash until the door locks (or unlocks fully)

when the self-clean cycle is in use. It glows constantly after the
door locks.

FEATURE INDICATOR LIGHTS—

These light to show which feature is
in use.

STOP TIME PAD

— Used to set the

desired stop time for baking. Can
be used with 

BAKE TIME

 to

program a delayed bake cycle.

BAKE TIME PAD

— Used to enter

the length of the baking time.

CLOCK PAD

— Used to set the

time of day clock.

TIMER ON/OFF PAD

— Used to set the

minute timer. The minute timer does not
start or stop cooking.

UP and DOWN ARROW
PADS

— Used along with

the function pads to select
cooking time, stop time
(when programming an
automatic stop time), time
of day and minute timer,
and self-clean function.

Figure 2

OVEN
INDICATOR
LIGHT

—Glows

each time the
oven burner
(element) turns
on to maintain
the set oven
temperature.

TEMPERATURE CONTROL
KNOB

— Operates the Variable

Broil, Bake or Self-Clean Cycle
modes when used with the

START pad

. Cancels all oven

functions when the Temperature
Control knob is turned to 

OFF

.

PRE-HEAT & LOCK LIGHTS

—The 

"PRE-HEAT" light 

will glow

when the oven is first set to operate, or if the desired
temperature is reset higher than the actual oven temperature.
The 

"LOCK" light

 will flash until the door locks (or unlocks fully)

when the self-clean cycle is in use. It glows constantly after the
door locks.

START PAD

—Push to activate oven

after oven functions are set.

START INDICATOR LIGHT

—Flashes as

a reminder to push the 

START pad

 to

activate the oven.

Figure 1

Summary of Contents for 316000635

Page 1: ...P N 316000635 9703 ...

Page 2: ...t meant to cover every possible condition and situation that may occur Common sense and caution must be practiced when installing operating and maintaining any appliance Versión en español Si desea obtener una copia en español de este Manual del Usuario sírvase escribir aladirecciónqueseincluyeacontinuación Solicite la P N 316080257 Spanish Owner s Guides Frigidaire Company P O Box 9061 Dublin Ohi...

Page 3: ...in the area where an appliance is in use They should never be allowed to sit or stand on any part of the appliance DO NOT TOUCH SURFACE UNITS AREAS NEAR THESE UNITS HEATING ELEMENTS OR INTERIOR SURFACES OF THE OVEN Both surface units and oven heating elements may be hot even though they are dark in color Areas near surface units may become hot enough to cause burns During and after use do not touc...

Page 4: ...amage may also be done to the cooktop IMPORTANT INSTRUCTIONS FOR USING YOUR OVEN Use Care When Opening Door Stand to the side of the range when opening the door of a hot oven Let hot air or steam escape before you remove or replace food in the oven Keep Oven Vent Ducts Unobstructed The oven is vented through the left rear surface element Touching the surfaces in this area when the oven is operatin...

Page 5: ...INDICATOR LIGHTS These light to show which feature is in use STOP TIME PAD Used to set the desired stop time for baking Can be used with BAKE TIME to program a delayed bake cycle BAKE TIME PAD Used to enter the length of the baking time CLOCK PAD Used to set the time of day clock TIMER ON OFF PAD Used to set the minute timer The minute timer does not start or stop cooking UP and DOWN ARROW PADS Us...

Page 6: ...inute increments Push and hold the UP ARROW to increase the time in 10 minute increments The timer can be set for any amount of time from 1 minute to 11 hours and 59 minutes Note If you push the DOWN ARROW first the timer will advance to 11 hours and 59 minutes 3 The display shows the timer count down in minutes until one minute remains Then the display will count down in seconds 4 When the set ti...

Page 7: ...ement Setting Surface Controls To Operate the Surface Element 1 Place cooking utensil on the surface element 2 Push in and turn the Surface Control knob in either direction to the desired setting Start most cooking operations on a higher setting and then turn to a lower setting to finish cooking The control knobs do not have to be set exactly on a particular mark Use the marks as a guide and adjus...

Page 8: ...nting is necessary for proper air circulation in the oven and good baking results Arranging Oven Racks Some models may have one rack ALWAYS ARRANGE OVEN RACKS WHEN THE OVEN IS COOL PRIOR TO OPERATING THE OVEN Always use oven mitts when using the oven Before Setting Oven Controls REMOVING REPLACING OVEN RACKS To remove pull the rack forward until it stops Lift up front of rack and slide out To repl...

Page 9: ... the control will beep as a reminder 3 The oven will begin heating to the selected temperature When the temperature reaches the desired baking temperature the control will beep 3 times 4 To cancel the baking function turn Temperature Control Knob to OFF To Change the Oven Temperature after Baking has Started Turn Temperature Control Knob to the new desired temperature If the Power is Interrupted D...

Page 10: ...ntrol will beep 3 times every 60 seconds until the Temperature Control Knob is turned to OFF For a Delayed Start Time and Automatic Shut Off Follow steps 1 5 above THEN 6 Push STOP TIME The earliest possible stop time will flash in the display 7 Push the UP or DOWN ARROW until the desired stop time appears in the display 8 Push START 9 Once the controls are set the control calculates the time when...

Page 11: ...ite 5 Place the pan on the oven rack Close the oven door to the broil stop position when broiling 6 Broil on one side until food is browned turn and cook on the second side Season and serve Note Always pull the rack out to the stop position before turning or removing food 7 When broiling is finished turn Temperature Control Knob to OFF Should an oven fire occur close the oven door and turn off the...

Page 12: ...ven material of the oven door gasket is essential for a good seal Care should be taken not to rub damage or remove the gasket DO NOT use any cleaning materials on the oven door gasket Doing so could cause damage 2 Remove the broiler pan and insert all utensils and any aluminum foil These items cannot withstand high cleaning temperatures 3 Oven racks may be left in the oven or may be removed If the...

Page 13: ...low in the display but the lock motor and clean cycle will not start As soon as the controls are set and the door is closed the motor driven lock will begin to close automatically and the Lock indicator light will flash CLn will appear and remain in the display until the cleaning cycle is completed or cancelled DO NOT open the door while the light is flashing it takes about 15 seconds for the lock...

Page 14: ...r cleaning line up the flat sides of both the knob and the shaft then push the knob into place Gentlescouringwithasoapyscouringpadwillremovemostspots Rinsewitha1 1solution of clear water and ammonia If necessary cover difficult spots with an ammonia soaked paper towel for 30 to 40 minutes Rinse with clean water and a damp cloth and then scrub with a soap filled scouring pad Rinse and wipe dry with...

Page 15: ...wn clip and snap into place 3 After the element is positioned in the drip bowl line up the terminal end with the terminal plug as shown 4 Hold the surface element and drip bowl together as level as possible and firmly push the terminal end into the terminal plug Make sure element terminal is seated properly into terminal plug Make sure the surface element is level to reduce the hazard of pans slid...

Page 16: ...with Phillips Head screws 2 To Change the Oven Light some models On some models the oven light automatically turns on when the door is opened Some models have a switch located on the control panel to turn on the light The oven light is located at the rear of the oven and is covered with a glass shield held by a wire holder The glass shield must be in place whenever the oven is in use To replace th...

Page 17: ... light indicates a positive offset while a flashing LOCK indicator light indicates a negative offset The lights will flash once for each 5 F of offset If no light is flashing the oven control has the original factory calibration and the offset is 0 F Example If the OVEN indicator light is flashing three times and then pauses the offset is 15 F 4 When you have made the desired adjustment turn the T...

Page 18: ...der Entire Appliance Does Not Operate in this Avoid Service Checklist Incorrect control setting Make sure the correct control is on for the surface element to be used Element not making contact in block Follow instructions under Surface Elements and Drip Bowls in the General Cleaning section Make sure cord plug is plugged tightly into outlet Service wiring is not complete Contact your dealer insta...

Page 19: ...s are too dark on top or bottom allow the oven to preheat to the set temperature before placing food in the oven Make sure the proper rack position is used when baking food Set temperature 25 F lower than recommended If food is not done after recommended time increase set temperature by 25 F Control s not set properly Follow instructions under Oven Cleaning Self cleaning cycle was interrupted Foll...

Page 20: ... the bill establishes the warranty period should service be required If service is performed it is in your best interest to obtain and keep all receipts This written warranty gives you specific legal rights You may also have other rights that vary from state to state Service under this warranty must be obtained by following these steps in order 1 Contact Frigidaire Company Consumer Services or an ...

Reviews: