background image

11

Between Defrosting

To avoid frequent defrosting, occasionally use 

a plastic scraper to remove frost. Scrape with 

a pulling motion. Never use a metal instrument 

to remove frost.

CARE AND CLEANING

CAUTION

Damp objects stick to cold metal surfaces. 

Do not touch interior metal surfaces with 

wet or damp hands.

Defrosting

It is important to defrost and clean freezer 

when ¼ to ½ inch of frost has accumulated. 

Frost may tend to accumulate faster on upper 

part of the freezer due to warm, moist air 

entering the freezer when the door/lid is 

opened. Remove food and leave the door/lid 

open when defrosting the freezer.

• 

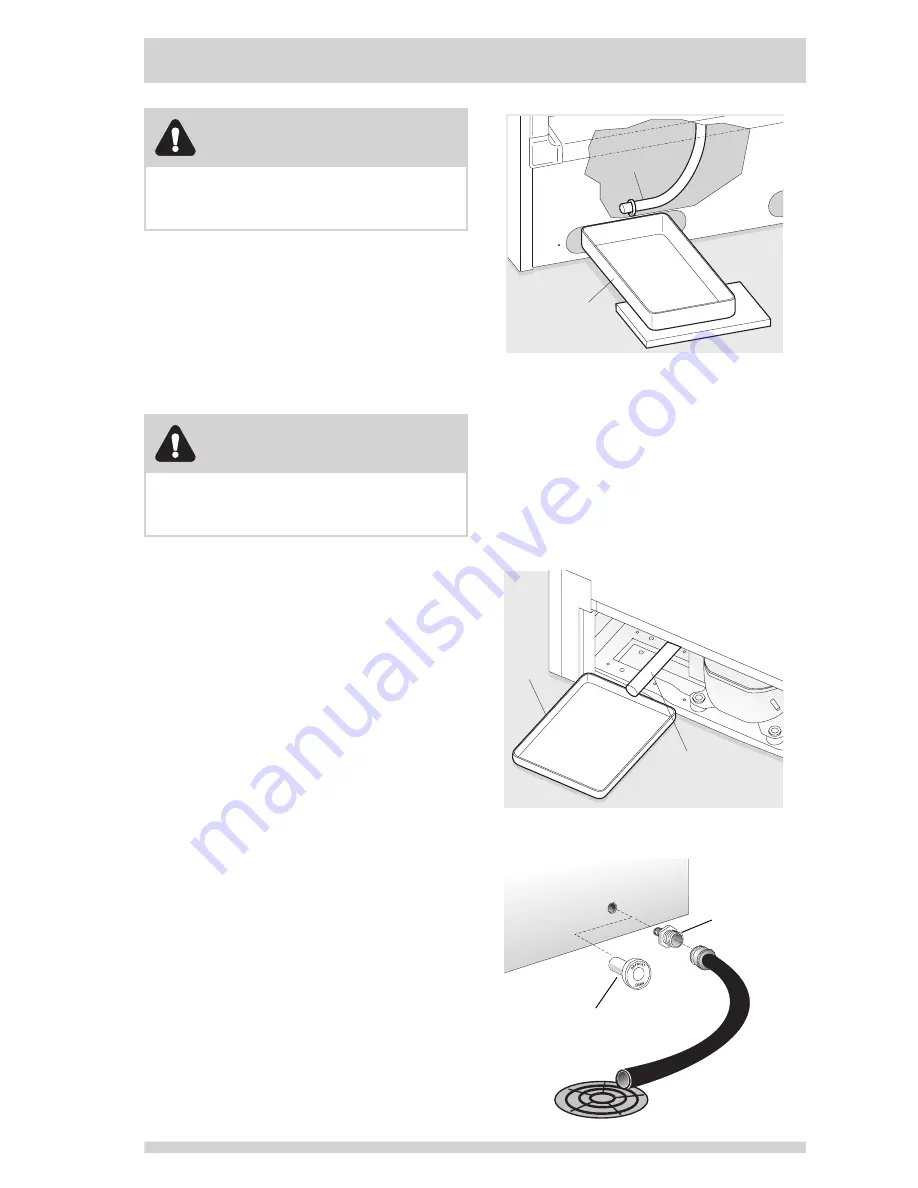
On upright models with a defrost drain 

(Figure 1), remove drain plug on the inside 

floor of the freezer by pulling straight out. 

To access external drain tube on models 

with a base panel, first remove the two 

screws from the base panel. Locate the 

drain tube near the left center under the 

freezer. Place a shallow pan under the 

drain tube. Defrost water will drain out. 

Check pan occasionally so water does 

not overflow. A ½ inch garden hose 

adapter can be used to drain the freezer 

directly into a floor drain. If your model 

is not equipped with an adapter, one can 

be purchased at most hardware stores. 

Replace the drain plug when defrosting and 

cleaning are completed. If the drain is left 

open, warm air may enter freezer.

• 

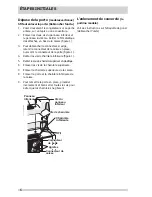
On chest models with a defrost drain, place 

a shallow pan or the Divider/Drain Pan 

(some models) beneath the drain outlet 

CAUTION

Freezer must be unplugged (to avoid 

electrical hazard) from power source when 

defrosting unit.

Some upright freezers are frost-free 

and defrost automatically, but should be          

cleaned occasionally.

Drain Pan

Drain Tube

Figure 1

(Figure 2). A ½ inch garden hose adapter 

can be used to drain the freezer directly 

into a floor drain (Figure 3). If your model 

is not equipped with an adapter, one can 

be purchased at most hardware stores.  

Drain

Pan

DrainTube

U09 Models

Only

Figure 2

Hose

Adaptor

Defrost

Drain

Plug

Figure 3

Summary of Contents for 2970792

Page 1: ......

Page 2: ...out the Use Care of your Freezer Product Registration 2 Energy Saving Ideas 2 Important Safety Instructions 3 First Steps 5 Setting the Temperature Control 7 297079200 May 2012 Optional Freezer Options 8 Care and Cleaning 11 Power Failure Freezer Failure 13 Before You Call 14 Major Appliance Warranty 16 ...
Page 3: ...cated in the coolest area of the room away from heat producing appliances or heating ducts and out of direct sunlight Let hot foods cool to room temperature before placing in the freezer Overloading the freezer forces the compressor to run longer Foods that freeze too slowly may lose quality or spoil Be sure to wrap foods properly and wipe containers dry before placing them in the freezer This cut...

Page 4: ...his freezer WARNING For Your Safety Do not store or use gasoline or other flammable vapors and liquids in the vicinity of this or any other appliance Read product labels for flammability and other warnings WARNING Proper Disposal of your Freezer Risk of child entrapment Child entrapment and suffocation are not problems of the past Junked or abandoned freezers are still dangerous even if they will ...
Page 5: ...t power can damage the motor Such damage is not cov ered under the warranty If you suspect your household voltage is high or low consult your power company for testing To prevent the freezer from being turned off accidentally do not plug unit into an outlet controlled by a wall switch or pull cord Do not pinch knot or bend power cord in any manner WARNING Avoid fire hazard or electric shock Do not...

Page 6: ...3 C Temperatures of 32 F 0 C and below will NOT affect freezer operation Additional com pressor heaters are not recommended Allow space around the unit for good air circula tion Leave a 3 inch 75 mm space on all sides of the freezer for adequate circulation Installation 3 AIR SPACE 3 3 3 1 To level Upright Units After discarding crating screws and wood base use a carpenter s level to level the fre...

Page 7: ... bottom of cabinet if required 3 Unplug connector if required by holding the cabinet connector in place and pulling door connector out 4 Remove bottom hinge screws 5 Remove plastic top hinge cover 6 Remove screws from top hinge 7 Remove top hinge from cabinet 8 Remove door and bottom hinge from cabinet 9 To replace door reverse the above order and securely tighten all screws to prevent hinge slipp...

Page 8: ...s However the temperature control is adjustable to provide a range of temperatures for your personal satisfaction To adjust the temperature setting turn the tempera ture control knob clockwise or counter clockwise Allow several hours for the temperature to stabilize between adjustments Electromechanical Temperature Control Figure 1 Standard Electronic Temperature Control some upright frost free mo...

Page 9: ...electronic chest models This feature is designed to provide a warning if the inside temperatures reach an unsafe level The Temp Alarm Feature operates on household electricity It will not function if household electricity is interrupted When the freezer is initially plugged in the red Temp Alarm Indicator Light blinks The indicator light will continue to blink until the freezer has reached a safe ...

Page 10: ...nd provides additional storage space To access an item tilt top of basket shelf down Drop Front some upright models The drop front located at the bottom of the freezer provides a separate compartment for small irregular shaped items Lift the front up and out to remove Basket Divider some upright models Use these handy dividers to keep the various items stored in your baskets more organized To chan...

Page 11: ... each tab until all four are firmly in place and then load with desired items OPTIONAL FREEZER FEATURES Chest Divider some chest models Use these clever dividers to custom arrange a variety of different sized storage bins in the bottom of your chest freezer Use the peel n stick labels found in your literature packet to help remind you which items are stored where If you have an item that isn t alr...

Page 12: ...enter under the freezer Place a shallow pan under the drain tube Defrost water will drain out Check pan occasionally so water does not overflow A inch garden hose adapter can be used to drain the freezer directly into a floor drain If your model is not equipped with an adapter one can be purchased at most hardware stores Replace the drain plug when defrosting and cleaning are completed If the drai...

Page 13: ...he freezer with a solution of two tablespoons of baking soda in one quart 1 136 litres warm water Rinse and dry Wring excess water out of the sponge or cloth when cleaning in the area of the controls or any electrical parts Wash the removable parts with the baking soda solution mentioned above or mild detergent and warm water Rinse and dry Never use metallic scouring pads brushes abrasive cleaners...

Page 14: ...ar item If a power failure occurs frozen foods will stay frozen for at least 24 hours if the freezer is kept closed If the power failure continues pack seven or eight pounds of dry ice into the freezer every 24 hours Look in the Yellow Pages under Dry Ice Dairies or Ice Cream Manufacturers for local dry ice suppliers Always wear gloves and use caution when handling dry ice If the freezer has stopp...

Page 15: ...hours for the temperature to stabilize Clean or change gasket Leaks in door lid seal will cause freezer to run longer in order to maintain desired temperatures FREEZER TEMPERATURES Interior freeze temperature is too cold Freezer control is set too low Set freezer control to a warmer setting Allow several hours for temperature to stabilize Temperature inside freezer is too warm Freezer control is s...

Page 16: ...en lid less often WATER MOISTURE FROST OUTSIDE REFRIGERATOR Moisture forms on outside of freezer Door lid may not be seating properly causing cold air from inside freezer to meet warm air from outside See LID PROBLEMS ODOR IN FREEZER Odor in freezer Interior needs to be cleaned Foods with strong odors are in the freezer Clean interior with sponge warm water and baking soda Cover the food tightly D...

Page 17: ...r than authorized service companies or external causes such as abuse misuse inadequate power supply accidents fires or acts of God DISCLAIMER OF IMPLIED WARRANTIES LIMITATION OF REMEDIES CUSTOMER S SOLE AND EXCLUSIVE REMEDY UNDER THIS LIMITED WARRANTY SHALL BE PRODUCT REPAIR OR REPLACEMENT AS PROVIDED HEREIN CLAIMS BASED ON IMPLIED WARRANTIES INCLUDING WARRANTIES OF MERCHANTABILITY OR FITNESS FOR ...

Page 18: ...ement de votre appareil 2 Conseils pour économiser l énergie 2 IMesures de sécurité importantes 3 Étapes initiales 5 Réglage de la commande de température 7 297079200 mai 2012 Charactéristiques du congélateur 8 Entretien et nettoyage 11 Panne de courant panne de congélateur 13 Avant de faire appel au service après vente 14 Garantie sur les gros appareils électroménagers 16 ...

Page 19: ...d de la pièce éloigné de la lumière du soleil et des conduits de chauffage ou appareils producteurs de chaleur Laissez les aliments chauds refroidir à la température de la pièce avant de les ranger dans le congélateur La surcharge du congélateur oblige le compresseur à fonctionner plus longtemps Les aliments qui congèlent trop doucement risquent de perdre leur qualité ou de se gâter Enveloppez cor...

Page 20: ...oser ni utiliser d essence ou d autres vapeurs ou liquides inflammables à proximité de cet appareil ou de tout autre appareil électroménager Lisez les étiquettes du produit concernant les risques d inflammabilité et autres avertissements AVERTISSEMENT Mise au rebut instructions avant d utiliser congélateur Dangers d enfermement des enfants Les risques d enfermement et de suffocation des enfants ne...

Page 21: ...ongélateur ne soit accidentel lement débranché ne le branchez pas dans une prise commandée par un interrupteur mural ou un cordon de tirage Ne pincez pas ne tordez pas ne nouez pas le cordon d alimentation AVERTISSEMENT Éviter tout risque de feu ou de choc électrique Ne pas utiliser de cordon prolongateur ni fiche d adaptation N enlever aucune des broches du cordon AVERTISSEMENT Veuillez lire tout...

Page 22: ...nuiront PAS au fonctionnement du congélateur Il n est pas recommandé d ajouter des générateurs de chaleur additionnels pour le compresseur Allouez suffisamment d espace autour de l appareil pour permettre une bonne circula tion d air Laissez un espace de 101 6 mm 4 pouces autour du congélateur afin de per mettre à l air de circuler de façon adéquate 1 3 3 3 3 AIR SPACE Installation 75 mm 3 po 25 m...

Page 23: ...porte figure 1 4 Retirer les vis de charnière inférieure figure 1 5 Retirer le couvre charnière supérieur en plastique 6 Enlever les vis de la charnière supérieure 7 Enlever la charnière supérieure de la caisse 8 Enlever la porte et la charnière inférieure de la caisse 9 Pour remettre la porte en place procéder inversement et bien serrer toutes les vis pour éviter que les charnières ne glissent Vi...

Page 24: ...é en usine afin d assurer une température adéquate de rangement de la nourriture Vous pouvez toutefois régler la commande de température selon vos besoins Si vous désirez une température plus froide tournez le bouton de commande vers COLDEST LE PLUS FROID puis attendez quelques heures afin que la température se stabilise Commande électromécanique Figure 1 Commande de température électronique stand...

Page 25: ...térieure s élève dangereusement L alarme de température est alimentée par l électricité domestique Elle ne fonctionnera pas si l électricité domestique est coupée Lorsque le congélateur est branché pour la première fois le voyant rouge de l alarme de température clignote Le voyant continuera de clignoter jusqu à ce que le congélateur ait atteint une température de congélation sûre Si un dysfonctio...

Page 26: ...ès à un article inclinez le dessus de l étagère panier vers le bas Retenue d aliments en vrac modèles verticaux Cette clayette située au fond du congélateur offre un compartiment séparé pout les petits objets de forme irrégulière ou les gros articles volumineux Soulevez la retenue par le devant et sortez la Diviseur de panier certains modèles verticaux Utilisez ces séparateurs pratiques pour que l...

Page 27: ...lenchées Ensuite rangez les articles désirés Diviseurs pour congélateurs horizontaux certains modèles Utilisez ces diviseurs pratiques pour arranger comme vous le voulez une variété de bacs de rangement de différente taille en bas de votre congélateur horizontal Utilisez les étiquettes autocollantes que vous trouverez dans votre sachet de documentation pour vous aider à vous souvenir où se trouve ...

Page 28: ... sous le congélateur Placez un récipient creux sous le tuyau de vidange L eau du dégivrage va s y écouler Vérifiez de temps à autre que l eau ne déborde pas Un demi pouce adaptateur de tuyau de jardin peut être utilisé pour vidanger le congélateur directement dans un égout Si votre modèle n est pas équipé avec un adaptateur celui peut être acheté à la plupart des magasins de matériel Remettez le b...

Page 29: ...oude dans 1 litre 1 pinte d eau tiède Rincez et séchez Essorez bien votre chiffon ou votre éponge pour nettoyer autour des commandes ou des pièces électriques Lavez les pièces amovibles avec une solution de bicarbonate de soude comme cidessus ou de l eau tiède additionnée de détergent doux Rincez et séchez N utilisez jamais de tampon à récurer métallique brosse produit nettoyant abrasif ou solutio...

Page 30: ...courant les aliments resteront congelés au moins 24 heures si le congélateur reste fermé Si la panne continue placez sept ou huit livres de glace sèche dans le congélateur toutes les 24 heures Cherchez dans les pages jaunes les fournisseurs sous Glace sèche Laiteries ou Fabricants de crème glacée Portez toujours des gants et soyez prudent lors de la manipulation de glace sèche Si le congélateur s ...

Page 31: ...mandé Le congélateur fonctionne davantage si de l air chaud y pénètre Ouvrez le couvercle moins souvent Assurez vous que le couvercle soit bien fermé Tournez la commande pour choisir un réglage plus chaud Attendez quelques heures pour permettre à la température de se stabiliser Nettoyez ou remplacez le joint Si le joint d étanchéité du couvercle fuit le congélateur doit fonctionner plus longtemps ...

Page 32: ...ure est chaude et le niveau d humidité est élevé Le couvercle se ferme peut être mal Le couvercle est ouvert trop souvent ou trop longtemps Le niveau d accumulation de givre et de su intement interne augmente Ceci est normal Consultez la section PROBLÈMES DE COUVERCLE Ouvrez le couvercle moins souvent AU HUMIDITÉ GIVRE À L EXTÉRIEUR DU CONGÉLATEUR De l humidité s accumule sur les parois extérieure...

Page 33: ...ar l entremise d un réparateur autorisé ou les causes étrangères comme l abus l alimentation électrique inadéquate ou les cas de force majeure AVIS DE NON RESPONSABILITÉ SUR LES GARANTIES IMPLICITES LIMITATIONS DES RECOURS L UNIQUE RECOURS DU CLIENT EN VERTU DE CETTE GARANTIE LIMITÉE EST LA RÉPARATION OU LE REMPLACEMENT DU PRODUIT COMME DÉCRIT PRÉCÉDEMMENT LES DEMANDES BASÉES SUR DES GARANTIES IMP...

Reviews: