background image

6

Washing Procedures

Follow the guidelines below for preparing the wash load.

Read the 

Washer Operating Instructions

, pages 17-18, for operating your

specific model.

Always read and follow fabric care and laundry product labels.

 To reduce the risk of fire, electrical shock, or injury to persons, read

Important Safety Instructions

, pages 2-4, before operating this washer.

1. Sort laundry into loads that can be washed together.

Sort items by recommended water temperatures, wash time, and agitate/spin

speeds.

Separate white, light, and colorfast items from dark and noncolorfast items.

Separate items which shed lint from items which attract lint. Permanent
press, synthetic, knit and corduroy items will pick up lint from towels, rugs
and chenille bedspreads.

Separate heavily soiled items from lightly soiled items.

Separate lacy, sheer and loosely knit items from sturdy items.

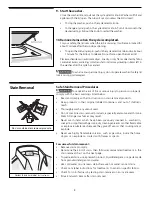
2. Prepare items for washing.

Empty pockets.

Brush off lint and dirt. Shake out rugs and beach towels.

Close zippers, fasten hooks, tie strings and sashes, and remove nonwashable
trims and ornaments.

Remove pins, decorative buttons, belt buckles, and other objects which
could be damaged. This also helps protect other items in the wash load.

Mend rips and tears to prevent further damage during washing.

Place delicate items such as bras, shoulder pads, hosiery, and belts in a mesh
bag to prevent tangling during the wash cycle.

Turn knit items inside out to prevent pilling.

3. Pretreat stains and heavy soil.

See 

Stain Removal

, pages 7-8, for details.

4. Add a measured amount of detergent to the wash tub before

adding the laundry load.

Follow detergent manufacturer's directions. The amount required depends on

type of detergent, load size and soil level, and water hardness.

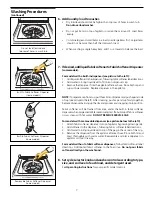
5. If desired, add liquid bleach to Bleach Dispenser 

(some models).

Before adding the wash load, add liquid bleach to bleach dispenser located

in left front corner under the lid:

3/4 cup (180 ml) for small loads

1 cup (240 ml) for large loads

1-1/4 cups (300 ml) for extra-large loads.

Then add 1 cup (240 ml) water to flush the dispenser.

Do not use powdered bleach in the bleach dispenser.

For models without a bleach dispenser,

 dilute the recommended amount of

liquid chlorine bleach in 1 quart (.95 L) water. Add it to wash water after

a few minutes of agitation. 

Do not pour bleach directly on wash load.

Bleach Dispenser (some models)

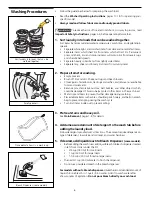
Place delicate items in a mesh bag.

Empty pockets.

Sort laundry into loads that can be

washed together.

Summary of Contents for 131781700

Page 1: ...2 ...

Page 2: ...e wash water These substances give off vapors that could ignite or explode Under certain conditions hydrogen gas may be produced in a hot water system that has not been used for 2 weeks or more HYDROGEN GAS IS EXPLOSIVE If the hot water system has not been used for such a period before using the washer turn on all hot water faucets and let the water flow from each for several minutes This will rel...

Page 3: ... grow teach them the proper safe use of all appliances Destroy the carton plastic bag and other packing materials after the laundry center is unpacked Children might use them for play Cartons covered with rugs bedspreads or plastic sheets can become airtight chambers Keeplaundryproductsoutofchildren sreach Topreventpersonal injury observe all warnings on product labels Before the laundry center is...

Page 4: ...s are moving Before loading unloading or adding items push in the cycle selector knob and allow the tub to coast to a complete stop before reaching inside To prevent injury do not reach into the dryer if the drum is moving Wait until the dryer has stopped completely before reaching into the drum A thermal limiter switch automatically turns off the dryer motor in the unlikely event of an overheated...

Page 5: ... which could be damaged This also helps protect other items in the wash load Mend rips and tears to prevent further damage during washing Placedelicateitemssuchasbras shoulderpads hosiery andbeltsinamesh bag to prevent tangling during the wash cycle Turn knit items inside out to prevent pilling 3 Pretreatstainsandheavysoil See Stain Removal pages 7 8 for details 4 Addameasuredamountofdetergenttoth...

Page 6: ...snappingitintoposition Fabric softener will be flushed from area under the built in fabric softener dispenserwhenLargeLoadWaterLevelisselected Ifabuild upoffabricsoftener occurs clean with hot water DO NOT REMOVE SERVICE CAP Formodelswitharemovabledispenser seepicturebelowtotheleft 1 Attachfabricsoftenerdispensertotopofagitatorbypressingdowngently 2 Add softener to the dispenser following fabric s...

Page 7: ...erty comply with the basic warnings listed below Read and comply with all instructions on stain removal products Keep products in their original labeled containers and out of children s reach Thoroughly wash any utensil used Do not combine stain removal products especially ammonia and chlorine bleach Dangerous fumes may result Never wash items which have been previously cleaned in washed in soaked...

Page 8: ... from fabric Pretreat Wash using hottest water safe for fabric For heavy stains and tar apply nonflammable dry cleaning fluid to back of stain Replace towels under stain frequently Rinse thoroughly Wash using hottest water safe for fabric Some inks may be impossible to remove Washing may set some inks Use prewash stain remover denatured alcohol or nonflammable dry cleaning fluid Wash with chlorine...

Page 9: ...in pocket Overloading the washer Not enough detergent Undissolved detergent has left residue Static cling is attracting lint Load washed too long Pilling is normal with synthetic and permanent press fabrics This is due to abrasion from normal wear Undissolved detergent Some nonphosphate granular detergents can combine with hard water minerals to form a residue Overloading the washer Agitation time...

Page 10: ...ean and in place 3 Loadthedryer Theaverageloadwillfillthedrum1 3to1 2full Itemsneedroomtotumble freely for even drying and less wrinkling Do not overload dryer Whendryinglargeitems dryonly2or3atatime Fillouttheloadwithsmall and medium sized items For delicate or very small loads add 2 lint free towels for better drying less wrinkling and to prevent grease stains caused by fabric softener sheets Do...

Page 11: ...oap and Detergent Association Use the drying rack to dry items which should not be tumbled Greasy oily stains Lint Pilling Fibers break off ball up and cling to fabric Shrinking Wrinkling Fabric softener sheet Overloading Overdrying causes static electricity Lint screen not clean when cycle began Lint is attached to pills Pilling is normal with synthetic and permanent press fabrics This is due to ...

Page 12: ...m ofthedooropening Removebypullingstraightup Removethelintandreplace the screen Occasionallyawaxybuild upmayformonthelintscreenfromusingdryer added fabric softener sheets To remove this build up wash the lint screen in warm soapy water Dry thoroughly and replace Do not operate the dryer without the lint screen in place Ifthedryerdrumbecomesstainedfromnoncolorfastfabrics cleanthedrumwith a damp clo...

Page 13: ... and turn items inside out Do not overload washer Stop washer and reduce load This is usually normal If sound continues washer is probably out of balance Stop washer and redistribute wash load Move laundry center so it rests firmly on solid floor Additional floor bracing may be needed Adjust leveling legs See INSTALLATION INSTRUCTIONS for details See INSTALLATION INSTRUCTIONS for removing shipping...

Page 14: ... and pressure increase Fully open hot and cold faucets Water pressure must be at least 30 psi 260 kPa Avoid running water elsewhere while washer is filling Straighten hoses Select higher water level load size Do not overload washer When control is set at highest fill level dry load level should not be higher than top row of circular holes in wash tub Measure hot water temperature at nearby faucet ...

Page 15: ...erload See Drying Procedures page 10 Remove items as soon as cycle ends See Drying Procedures page 10 Follow fabric care label instructions Dryer does not start Dryer runs but won t heat Drying cycle takes too long outside of the dryer feels too hot or smells hot Excessivewrinkling Electrical power cord is not securely plugged in or plug may be loose House fuse blown or circuit breaker tripped The...

Page 16: ...electricaland orgascodes 3 Properconnectiontoagroundedpowersupplyofsufficientvoltage replacementofblownfuses repairoflooseconnections ordefectsinhousewiring 4 Expensesformakingtheapplianceaccessibleforservicing suchasremovaloftrim cupboards shelves etc whicharenot a part of the appliance when it was shipped from the factory 5 Damagestofinishafterinstallation 6 Replacementoflightbulbsand orfluoresc...

Reviews: