Freund Fermax iLOFT User Manual Download Page 8


BY  


Activated


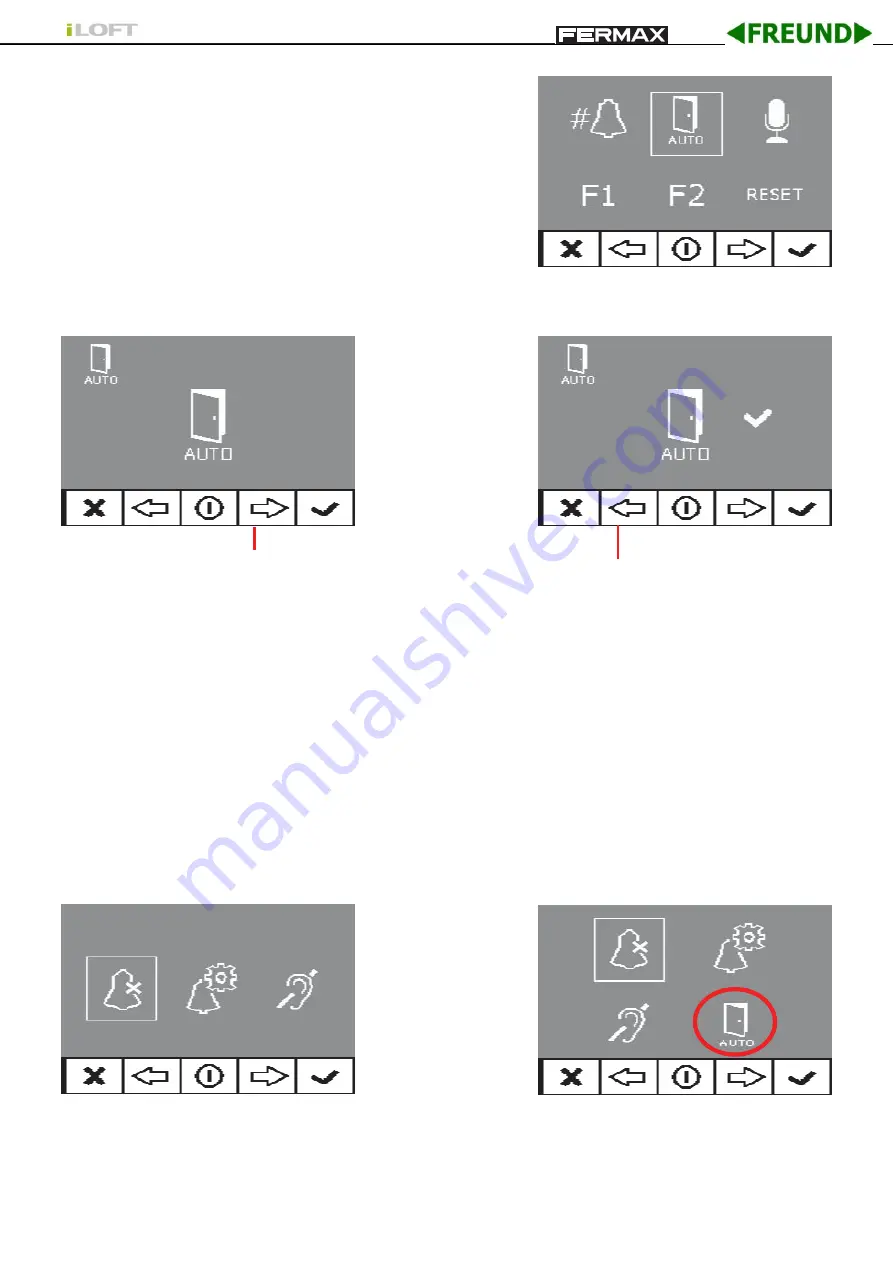
Automatic Opening (Doormatic)


The automatic open function is disabled by default (not 
availble  to  the  user)  and  the  installer  must  enable  it,  if 
desired,  from  the  administrator  menu,  accessing  the 
specified option.


By selecting this option you can access the submenu that allows you to enable or disable  
the doormatic mode.


Deactivated


you can enable the doormatic


mode by pressing the right arrow 

the left arrow disables the door-


matic mode


Notes:


- If activated or not, the doormatic option is available or not available in the user menu.


- There is also an option to connect a timer to the doorbell (if this is not being used) so that 

the automatic opening function is activated and deactivated each day at certain times. If 
that entrance is activated for a period of greater than 30 seconds it determines that the 
automatic  door  function  should  be  activated.  When  this  doorbell  feature  is  deactivated 
this function will also be deactivated.


User Menu: Doormatic function 
DISABLED by the installer


User Menu: Doormatic function 
ENABLED by the installer


Pag 10


(*) 

Function available depending on model.


(*)


(*)


Summary of Contents for Fermax iLOFT

Page 1: ...tor itself 9 Automatic Opening Doormatic 10 Conversation Mode Configuration 11 F1 auxilliary Function 11 F2 auxilliary Function 12 Adjustments Audio Video 13 Video Brightness Contrast Colour 13 Audio...

Page 2: ...h 158 x 108 x 45 mm 6 2 x 4 2 x 1 7 Universal Box Dimensions Height x Width x Depth 174 x 114 x 50 mm 6 8 x 4 5 x 2 Note this monitor can be installed in a universalbox Depth the Monitor depth stated...

Page 3: ...mmarised in the list below Command based opening of door Call to guard Call volume regulation Call disconnection Do not disturb Ringtone selection 7 options Doorbell Programming via the terminal and v...

Page 4: ...L P1 V M V M 184 3 V M V M R1 75 M V V M 75 Ohm Detail of connection of the video cables on the monitor connector L MV Pag 6 Detail of connection of the VIDEO cables on the monitor connector 1 when t...

Page 5: ...2 Press the call to residence button Again a confirmation is made with a different call tone Note The time between steps 1 and 2 must be less than 2 and half minutes Option 2 From the Monitor You can...

Page 6: ...how the following Note When the terminal has not been programmed the blue led will flash very slowly 3 Programme the call number Each time the button corresponding to hundreds tens or single units is...

Page 7: ...ressing F1 F2 simultaneously for 5 seconds Once in the ADMINISTRATOR menu select the first option Administrator Menu The icons viewed on screen are controlled via the corresponding buttons on the moni...

Page 8: ...Notes If activated or not the doormatic option is available or not available in the user menu There is also an option to connect a timer to the doorbell if this is not being used so that the automati...

Page 9: ...it input Initially configured by default as an output and sends a negative If the other option is selected in conjunction with an MDS VDS decoder version V10 26 or above a panic alarm can be sent to t...

Page 10: ...ode by pressing the right arrow the left arrow disables the lift control mode Resetting the Parameters You have the option to reset the parameters to default values by selecting the option on the inst...

Page 11: ...u LOCK RELEASE key increase brightness CAM key decrease brightness CAM MENU Lock Releases When in brightness a single click on the MENU takes it to the contrast level adjustment Short Press on the MEN...

Page 12: ...enu When in the audio settings menu LOCK RELEASE key increase volume CAM key decrease volume CAM MENU Lock Releases Conversation mode Simplex with the audio channel open Simultaneously press the F1 F2...

Page 13: ...monitor hands free and with a full colour screen that allows you to communicate with the entry panel see the caller and open the entrance door if you wish With the onscreen menuyou have new features t...

Page 14: ...to select an independent melody for the calls from the entry panel secondary entry panel doorbell 1 Main Panel Pag 16 First of all the call volume appears for the selected call which may be changed by...

Page 15: ...onding icon and upon pressing OK you exit the screen The Do Not Disturb mode is indicated with the blinking of a red led light for one second To deactivate it reselect the same option and the red led...

Page 16: ...e is activated with the greed led light If it is not activated the red led light remains lit indicating standby mode activate deactivate There is also an option to connect a timer to the doorbell if t...

Page 17: ...ned on Note The default internal timer for the monitor is 90 seconds With the monitor on standby press and hold this button for 1 second to go into User configuration mode See the Programming User Men...

Page 18: ...down for 2 seconds to sequentially select between the main camera and the secondary camera if there is one Note If the channel is busy an error tone BEEP will sound and auto start will not activate n...

Page 19: ...this moment on each time you press the button the output audio channel is activated constant blue led light and when releas ing it it activates the input audio channel blue flashing led light the oper...

Page 20: ...ormatic Do not disturb Doormatic STATUS LED On Very slow flashing 0 1 ON 5 OFF Slow flashing 1 ON 0 5 OFF Do not use cleaning products which contain acids vinegar or are abrasive in nature EN Pag 22 1...

Page 21: ...mperature 5 40 C Humidity 5 95 OSD Menu Resolution TFT 3 5 Hor 480 Line TV Ver 234 Line TV Video signal Composed signal 1 Vpp 75 7 Mhz Flush mounted Dimensions 197 x 131 x 60 mm 7 7 x 5 1 x 2 3 Surfac...

Reviews: