background image

11

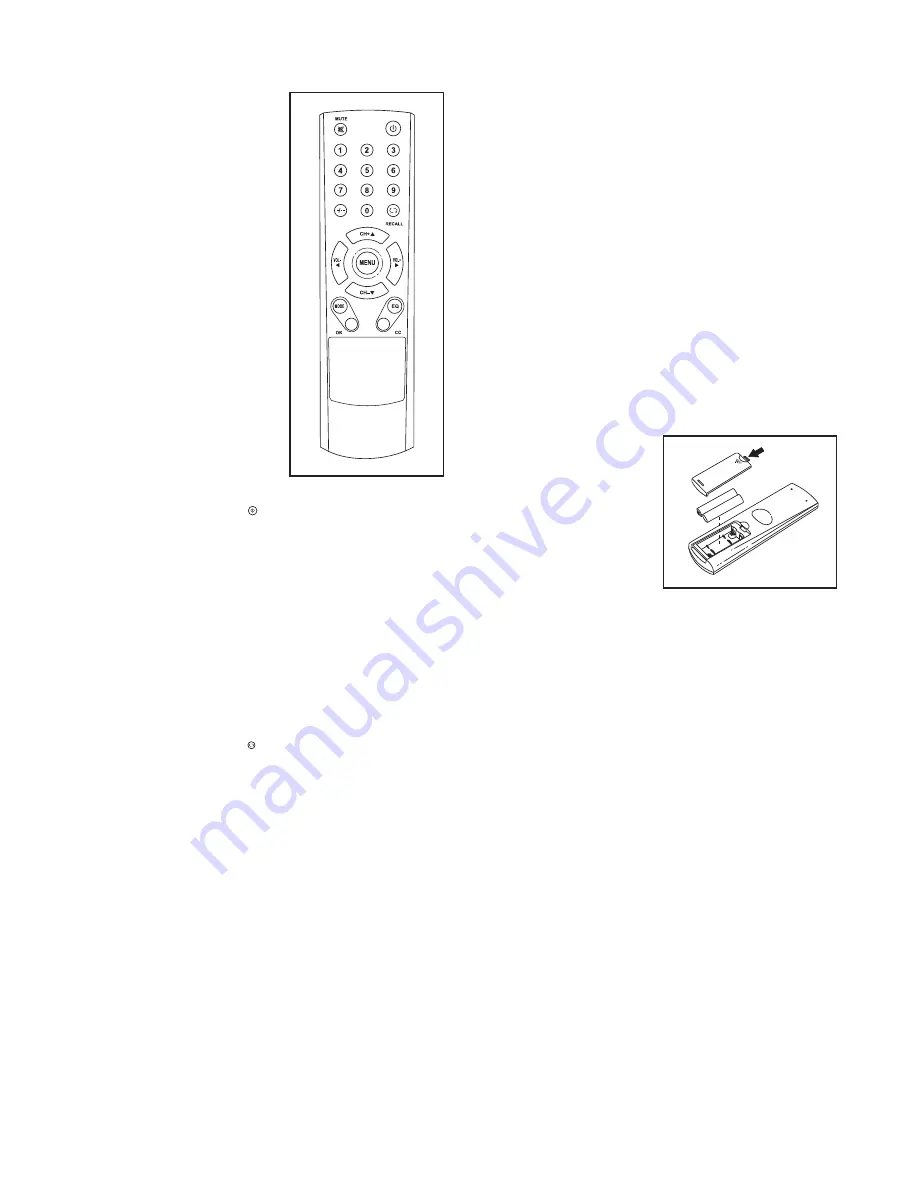
HOW TO USE THE REMOTE CONTROL

It is highly recommended 

that only fitness club staff 

be permitted to use the 

remote control, which will 

make setup easier. All user 

controls are located on the 

top of your fitness equipment 

console.

The first time you use the 

remote control, insert batter-

ies (see HOW TO REPLACE 

THE BATTERIES IN THE 

REMOTE CONTROL at the 

right). 

Next, stand on your fit-

ness equipment and hold 

the remote control near the 

digital TV. Point the remote 

control directly at the TV.

 Press the Power button (   ). After a few moments, the 

digital TV will turn on or turn off.

 Press the volume (Vol) increase or decrease button to 

adjust the volume.

 Press the Mute button to turn on or turn off the TV’s 

audio output.

 Press the numbered channel buttons and the dash 

button (-/--) or the Channel (CH) increase or decrease 

button to select a channel.

 Press the Recall button (   ) to view the previous 

channel.

 Press the Menu button to view the main menu or to exit 

a menu. See pages 12 and 13 for information about 

the menu.

Press the CH and Vol arrow keys to navigate in the 

menu. Press the OK button to make a selection in the 

menu.

 Press the EQ button to change the sound mode. See 

step 3 on page 12 to adjust audio settings.

 Press the CC button repeatedly to turn on or turn off 

closed captioning. See step 5 on page 12 to adjust 

closed captioning settings.

 Press  the  Mode button repeatedly to select the input 

source. Make sure that the source is set to TV.

HOW TO REPLACE THE BATTERIES IN THE 

REMOTE CONTROL

To replace the batteries, 

first locate the battery 

cover on the back of the 

remote control. Push 

down on the clip on the 

battery cover and pull off 

the battery cover.

 Next, remove the old batteries from the remote control, 

and insert two new AAA batteries; alkaline batteries 

are recommended. Do not use old and new batteries 

together or alkaline, standard, and rechargeable bat-

teries together. Make sure to insert the batteries as 

shown in the drawing. Then, press the battery cover 

onto the remote control.

Summary of Contents for FMTV74810.0

Page 1: ...fore using this equipment Keep this manual for future reference Model No FMTV74810 0 QUESTIONS If you have questions or if parts are damaged or missing please see HOW TO CONTACT CUSTOMER CARE on the b...

Page 2: ...ICON IP Inc IMPORTANT PRECAUTIONS 3 ASSEMBLY 4 HOW TO CONNECT YOUR FITNESS EQUIPMENT 6 HOW TO CONNECT THE DIGITAL TV 7 HOW TO USE THE DIGITAL TV 8 MAINTENANCE AND TROUBLESHOOTING 14 HOW TO CONTACT CU...

Page 3: ...sk of electric shock do not remove the cover or the back of the digi tal TV There are no user serviceable parts inside Refer servicing to qualified service personnel 8 Upon completion of any service o...

Page 4: ...hillips screwdriver To avoid damaging parts do not use power tools ASSEMBLY 1 Remove the four Screws A from the Console Back Cover B and remove the Console Back Cover from the Console Back C A 1 B C 2...

Page 5: ...connections on the back of the Console 4 Attach the digital TV D to the Console G with four 5 16 x 1 Screws H and four 5 16 Star Washers I Be careful not to pinch any wires 5 Attach the TV Console Ba...

Page 6: ...A CATV cable must be connected to your fitness equip ment for cable TV stations to be viewed Locate the cable jack on your fitness equipment and connect a CATV cable to the cable jack HOW TO CONNECT...

Page 7: ...nals through an antenna you must have an antenna capable of receiving digital signals Cable television has not been affected HOW TO CONNECT AN EXTERNAL SOURCE USING A CATV CABLE 1 Connect one end of a...

Page 8: ...al that came with your fit ness equipment Note The buttons at the top of the console are for use with the TV or a remote TV To learn about how to operate the digital TV see page 9 To use the entertain...

Page 9: ...the channel must be changed on the satellite TV box VCR or DVD player To select the desired cable channel press the Chan increase and decrease buttons or the Key Pad button Note If you press the Key...

Page 10: ...Settings button to select cus tomized channels Select your transmitter type from the drop down list Then select a channel Touch the Add button to create multiple transmitter and or channel settings To...

Page 11: ...s the Menu button to view the main menu or to exit a menu See pages 12 and 13 for information about the menu Press the CH and Vol arrow keys to navigate in the menu Press the OK button to make a selec...

Page 12: ...ngs and personalize the audio settings 4 Adjust the digital TV settings The gear icon menu allows you to set the Parental Controls the Time settings the Closed Caption settings the Menu Settings and t...

Page 13: ...l of the channels available in your area When no signal is detected on a channel the chan nel will be skipped When a signal is detected the channel will be saved into memory and the next channel will...

Page 14: ...or optimal reception See HOW TO CONNECT AN ANTENNA on page 7 c Check for the problems listed below and follow the applicable instructions Ignition black spots or horizontal streaks that appear or a pi...

Page 15: ...15 NOTES...

Page 16: ...se note the model number serial number and name of the product see the front cover of this manual before contacting Customer Care In the United States and Canada Call 1 800 201 2109 Mon Fri 8 a m 5 p...

Reviews: