


Part No. 409256 R0619A
Printed in Taiwan © 2019 ICON Health & Fitness, Inc.
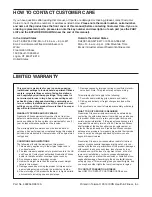
HOW TO CONTACT CUSTOMER CARE
If you have questions after reading this manual, or if parts are damaged or missing, please contact Customer
Care at one of the phone numbers or addresses listed below. Please note the model number, serial number,
and name of the product (see the front cover of this manual) before contacting Customer Care. If you are
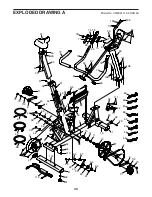
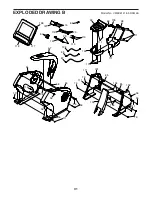
ordering replacement parts, please also note the key number and description of each part (see the PART
LIST and the EXPLODED DRAWING near the end of this manual).
In the United States
Call: 1-800-201-2109, Mon.–Fri. 6 a.m.–6 p.m. MT
Email: [email protected]
Write:
Freemotion Fitness
1500 South 1000 West
Logan, UT 84321-9813
United States
Outside the United States
Call: 001-800-527-5417 or 001-435-786-3521,
Mon.–Fri. 6 a.m.–3 p.m. USA Mountain Time
Email: [email protected]
This product is warranted for use in non-dues-paying
institutional settings to include hotels, apartment fitness
centers, corporate fitness centers, fire/police stations,
and hospital/physical therapy settings. This product is
not warranted for use in large, heavy-use settings such
as health clubs, colleges/universities, community cen-
ters, or military installations; use of this product in such
settings or use of this product for more than 6 hours per
day will void this warranty.
WARRANTY PERIODS AND COVERAGE
Freemotion Fitness warrants this product to be free from
defects in workmanship and material under normal use and
service conditions. Parts and labor are warranted for one (1)
year, unless otherwise specified on the invoice.
The warranty period commences on the invoice date of
purchase. Any parts repaired or replaced during this warranty
period will be warranted for the remainder of the original war-
ranty period.
CONDITIONS AND LIMITATIONS
The following will void the warranty on this product:
1. This warranty applies only to the original owner and is
non-transferable.
2. The labor warranty applies only to products sold in the US
and Canada. Contact your authorized Freemotion Fitness
dealer for details on labor coverage in your country.
3. Any misuse, abuse, or improper service.
4. Users who weight more than the maximum user weight
listed in this manual.
5. Damage caused by moving the product or improper stor-
age including moving or storing the product on its side.
6. Use or storage of the product outdoors or in high-humidity
environments including spa and pool areas.
7. Damage caused by improper wiring or insufficient electri-
cal current. Note: This product may not have wiring.
This warranty shall not apply to the following:
1. Cosmetic items including grips, decals, and labels.
2. Pick-up and delivery or freight charges involved with a
repair.
3. Any problem as a result of improper assembly or delivery.
WHAT TO DO IF SERVICE IS REQUIRED
Freemotion Fitness warranty service may be obtained by
contacting the authorized dealer from which you purchased
this product. Make sure to retain your original invoice and
serial number information. If this product experiences a fail-
ure under the warranty terms set forth, Freemotion Fitness
shall provide at their option either repair, replacement, or
refund of the purchase price. Freemotion Fitness compen-
sates service providers for warranty trips within their service
area. You may be charged additionally for service calls
beyond this service area.
Freemotion Fitness is not responsible or liable for indirect,
special, or consequential damages arising out of or in con-
nection with the use or performance of the product; damages
with respect to any economic loss, loss of property, loss
of revenues or profits, loss of enjoyment or use, or cost of
removal or installation; or other consequential damages.
Some regions do not allow the exclusion or limitation of con-
sequential damages. Accordingly, the above limitation may
not apply to you. This warranty gives you specific rights, and
you may have other rights that vary from region to region.
TO CONTACT FREEMOTION FITNESS
See HOW TO CONTACT CUSTOMER CARE above.
LIMITED WARRANTY
Summary of Contents for u 8.9b
Page 27: ...27 NOTES...


