background image

13

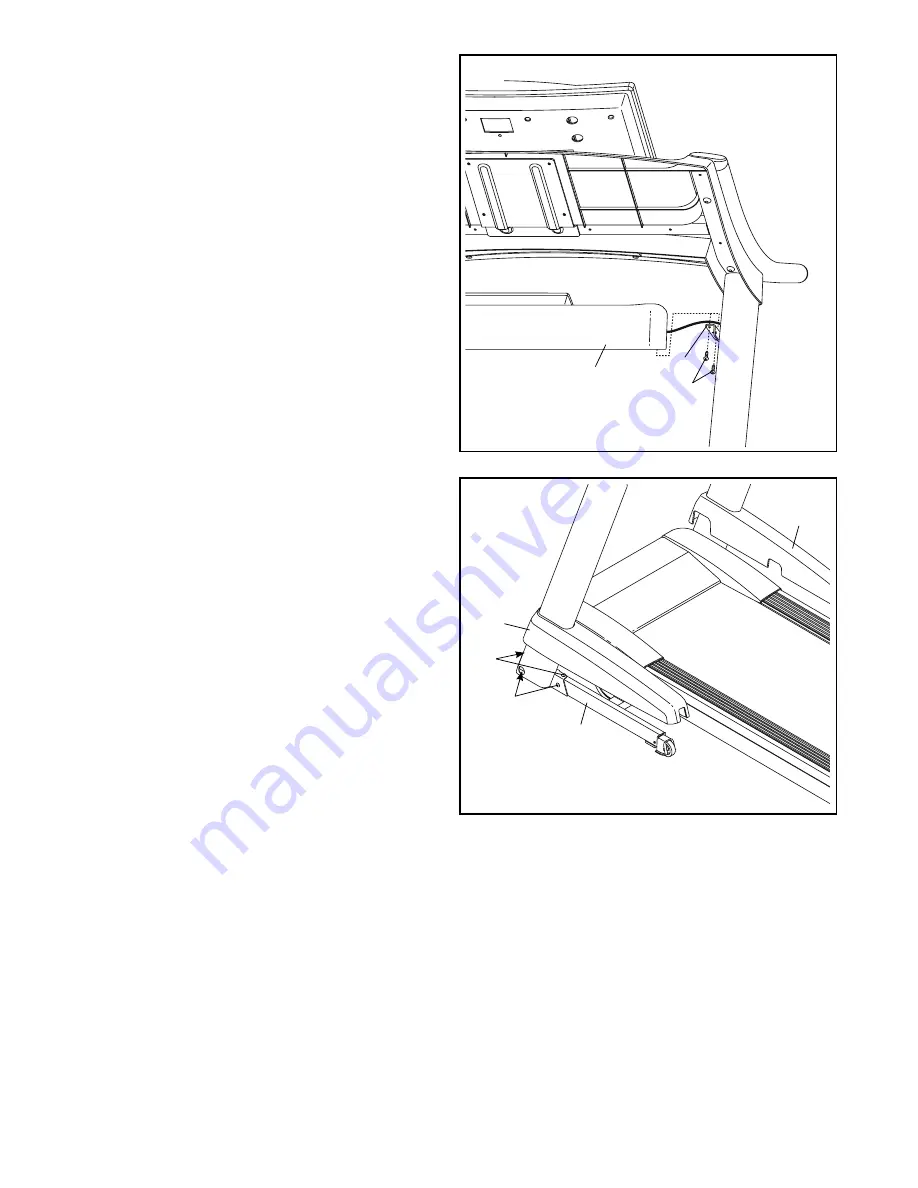
11.     Attach the Fan Tray (30) to the Tray Brackets 

(105) with four #8 x 3/4" Screws (1) (only one 
side is shown). 

Start all four Screws, and then 

tighten them. 

Then, insert any excess wire from 

the Fan Tray into the Right Upright (not shown).

105

11

30

1

12.  Firmly tighten the four 3/8" x 2 3/4" Screws (7) 

and the four 3/8" x 1 1/4" Screws (8) (only one 
side is shown).


 Press the Left Base Cover (92) onto the Base 
(97) until it snaps into place. 

The Right Base 

Cover (93) will be pressed into place in a 
later step.

12

93

8

92

97

7

Summary of Contents for 790 Interactive

Page 1: ... in this manual before using this equipment Save this manual for future reference USER S MANUAL ACTIVATE YOUR WARRANTY To register your product and activate your warranty today go to www iconservice com registration CUSTOMER CARE For service at any time go to www iconservice com Or call 1 800 999 3756 Mon Fri 6 a m 6 p m MT Sat 8 a m 4 p m MT Please do not contact the store ...

Page 2: ...ST 42 EXPLODED DRAWING 44 ORDERING REPLACEMENT PARTS Back Cover LIMITED WARRANTY Back Cover WARNING DECAL PLACEMENT FREEMOTION is a registered trademark of ICON IP Inc This drawing shows the locations of the warning decals If a decal is missing or illegible call the telephone number on the front cover of this manual and request a free replacement decal Apply the decal in the location shown Note Th...

Page 3: ...ell phone chargers into the surge suppressor or into an outlet on the same circuit 12 Use only a surge suppressor that meets all of the specifications described on page 17 To purchase a surge suppressor see your local FREEMOTION dealer call the telephone number on the front cover of this manual or see your local electronics store 13 Failure to use a properly functioning surge suppressor could resu...

Page 4: ... if you experience pain while exercising stop immediately and cool down 28 Do not store the television in temperatures below 40 F 40 C or above 140 F 60 C Do not operate the television in temperatures below 23 F 5 C or above 90 F 32 C 29 To protect the treadmill and television dur ing lightning storms unplug the power cord from the wall outlet and disconnect the cable system This will prevent dama...

Page 5: ...tion 810 21 j or your local codes and ordinances 38 Note to CATV system installer This reminder is provided to call the CATV system install er s attention to Article 820 40 of the NEC or your local codes and ordinances that provide guidelines for proper grounding and in par ticular specifies that the cable ground shall be connected to the grounding system of the building as close to the point of c...

Page 6: ...ve questions after reading this manual please see the front cover of this manual To help us assist you please note the product model number and serial number before contacting us The model number and the location of the serial num ber decal are shown on the front cover of this manual Before reading further please review the drawing below and familiarize yourself with the labeled parts BEFORE YOU B...

Page 7: ... number following the key number is the quantity used for assembly Note If a part is not in the hardware kit check to see if it is pre attached Extra hardware may be included 8 x 3 4 Screw 1 12 3 8 Star Washer 12 4 3 8 Nut 11 2 5 16 Star Washer 10 8 3 8 x 2 3 4 Screw 7 4 3 8 x 1 3 4 Bolt 6 1 3 8 x 2 Bolt 3 1 8 x 1 2 Ground Screw 9 1 3 8 x 1 1 4 Screw 8 4 5 16 x 2 Screw 4 4 5 16 x 1 1 2 Screw 5 4 1...

Page 8: ... a mild non abrasive cleaner To identify small parts see page 7 Assembly requires the following tools the included hex key one adjustable wrench one Phillips screwdriver one pair of scissors To avoid damaging parts do not use power tools 1 Make sure that the power cord is unplugged Attach the Left Wheel Cap 96 to the left side of the Base 97 with two 8 x 3 4 Screws 1 Attach the Right Wheel Cap not...

Page 9: ...nd wire A in the hole in the side of the Left Upright Insert two 3 8 x 2 3 4 Screws 7 and two 3 8 x 1 1 4 Screws 8 with two 3 8 Star Washers 12 into the Left Upright 89 Note It may be helpful to put the head of the Screw that goes into the indicated hole on the end of the Hex Key 112 and then insert it into the hole Partially tighten the 3 8 x 2 3 4 Screws 7 and the 3 8 x 1 1 4 Screws 8 until the ...

Page 10: ...right 89 with two 8 x 3 4 Screws 1 Start both Screws and then tighten them Make sure to use the bracket holes shown Attach the other Tray Bracket not shown to the Right Upright not shown Hold the Fan Tray 30 near the Left Upright 89 Insert the fan wire through the hole in the side of the Left Upright and pull it out of the top as shown Set the Fan Tray 30 on the Tray Brackets 105 only one is shown...

Page 11: ... connector and try again IF YOU DO NOT CONNECT THE CON NECTORS PROPERLY THE CONSOLE MAY BECOME DAMAGED WHEN YOU TURN ON THE POWER Then remove the wire tie from the Upright Wire Connect the wire from the Fan Tray 30 to the wire from the console assembly Console Assembly Console Wire Wire Tie 89 30 84 84 Console Wire 7 8 Connect the Upright Coaxial Cable 115 to the coaxial cable from the console ass...

Page 12: ... Wires Wire 10 5 Console Assembly 10 Identify the Left Handrail 87 which is marked Left Have a second person hold the Fan Tray 30 away from the Tray Brackets 105 Be careful not to pull on the wire from the Fan Tray Attach the Left Handrail 87 to the console assembly with two 5 16 x 2 Screws 4 and two 5 16 Star Washers 10 as shown Start both Screws and then tighten them Attach the Right Handrail no...

Page 13: ...Then insert any excess wire from the Fan Tray into the Right Upright not shown 105 11 30 1 12 Firmly tighten the four 3 8 x 2 3 4 Screws 7 and the four 3 8 x 1 1 4 Screws 8 only one side is shown Press the Left Base Cover 92 onto the Base 97 until it snaps into place The Right Base Cover 93 will be pressed into place in a later step 12 93 8 92 97 7 ...

Page 14: ...h 53 to the bracket on the Frame 56 with a 3 8 x 1 3 4 Bolt 6 and a 3 8 Nut 11 13 53 11 Large Barrel 56 6 11 3 97 14 Lower the Frame 56 see HOW TO LOWER THE TREADMILL FOR USE on page 36 If one of the Rear Leveling Feet 60 doesn t sit flat on the floor turn the Rear Leveling Foot until it touches the floor and then tighten the 1 2 Rear Leveling Foot Nut 15 against the Frame 56 Make sure that both R...

Page 15: ...the walking belt see pages 38 and 39 17 Place the treadmill near the coaxial cable from your wall or device Connect the coaxial cable to the Upright Coaxial Cable 115 Press the Right Base Cover 93 onto the Base 97 until it snaps into place 16 Hold the TV assembly near the console assem bly and connect the wires Attach the TV assembly to the back of the con sole assembly with four 1 4 x 1 2 Screws ...

Page 16: ...atures above 122 F 50 C or below 14 F 10 C Do not excessively bend or stretch the sensor when using or storing the heart rate monitor To clean the sensor use a damp cloth and a small amount of mild soap Then wipe the sensor with a damp cloth and thoroughly dry it with a soft towel Never use alcohol abrasives or chemicals to clean the sensor Hand wash and air dry the chest strap TROUBLESHOOTING If ...

Page 17: ...d into a surge suppressor and plug the surge suppressor into an appropriate outlet that is properly installed and grounded in accordance with all local codes and ordinances The outlet must be on a nominal 120 volt circuit capable of carrying 15 or more amps To avoid overloading the circuit do not plug other electrical devices except for low power devices such as cell phone chargers into the surge ...

Page 18: ...na capable of receiving digital signals Cable television has not been affected HOW TO CONNECT AN EXTERNAL SOURCE USING A CATV CABLE 1 Connect one end of a 75 ohm CATV cable to the 75 ohm output jack on your external source 2 Plug in the power cord of your external source See your external source user s manual for proper grounding instructions 3 Connect the 75 ohm CATV cable to the 75 ohm ter minal...

Page 19: ...d of your device See your DVD or Blu ray player or other device s user s manual for proper grounding instructions 3 Connect the other end of the HDMI Cable to the HDMI input jack on the 15 Digital TV as shown at the left 4 If desired apply the included tie blocks as shown at the left First remove the paper covering the adhesive on the back of a tie block Then apply the adhesive on the tie block in...

Page 20: ...s the speed and incline of the treadmill as it guides you through an effective exercise session In addition you can set a time distance calo rie or pace goal When you use the manual mode you can change the speed and incline of the treadmill with the touch of a button As you exercise the console will display instant exer cise feedback You can also measure your heart rate using the handgrip heart ra...

Page 21: ...or the console to be ready for use HOW TO USE THE TOUCH SCREEN The console features a tablet with a full color touch screen The following information will help you become familiar with the tablet s advanced technology The console functions similarly to other tablets You can slide or flick your finger against the screen to move certain images on the screen such as the displays in a workout see step...

Page 22: ... drop down menu for a list of options then touch the location where you pur chased your product Touch the words MEDICAL DISCLAIMER read the medical disclaimer touch the I Accept button and check the medi cal disclaimer checkbox Then touch the Confirm Activation Code button Enter the requested personal information When you have entered all of the information touch the Finish button Then touch the H...

Page 23: ...ing of 3 5 mph press the 3 button and then immediately press the 5 button To stop the walking belt press the Stop button To restart the walking belt press the Start button 4 Change the incline of the treadmill as desired To change the incline of the treadmill press the Incline increase and decrease buttons or one of the numbered Quick Touch Incline Decline buttons Each time you press one of the bu...

Page 24: ...o hold the contacts for about 15 seconds 7 Turn on the fan if desired The fan features several speed settings Press one of the numbered Fan buttons to select a fan speed Press the Off button to turn off the fan 8 When you are finished exercising remove the key from the console Step onto the walking platform and touch the home button or the back button on the screen or press the Stop button on the ...

Page 25: ...or incline settings for the next segment The workout will continue in this way until the last segment ends The walking belt will then slow to a stop and a workout summary will appear on the screen After you view the workout summary touch the Finish button to return to the main menu You may also be able to either save or publish your results using one of the options on the screen If the speed or in...

Page 26: ...A moment after you touch the button the walking belt will begin to move Hold the handrails and begin walking The workout will function in the same way as the manual mode see pages 23 and 24 The workout will continue until you reach the goal that you set The walking belt will then slow to a stop and a workout summary will appear on the screen After you view the workout summary touch the Finish butt...

Page 27: ...ess one of the iFit Live buttons on the console To switch users within the account touch the user button near the lower right corner of the screen Before some workouts will download you must add them to your schedule on iFit com For more information about the iFit Live work outs please see www iFit com When you select an iFit Live workout the screen will show the name duration and distance of the ...

Page 28: ...ch into the reset position and insert the key into the console However when you remove the key the screen will show a demo presentation To turn on or turn off the display demo mode first touch the Demo Mode button Next touch the On checkbox or the Off checkbox Then touch the back button on the screen 6 Enable or disable the key Note This feature may not be enabled on your treadmill You can disable...

Page 29: ...e USB port on the side of the console The update should begin automati cally Do not plug any USB devices into the USB port on the side of the 15 digital TV The screen will show the progress of the update When the update is complete the treadmill will turn off and then turn back on If it does not press the power switch into the off position Wait for several seconds and then press the power switch i...

Page 30: ...know your network name SSID If your network has a password you will also need to know the password An information box will ask if you want to connect to the wireless network Touch the Connect button to connect to the network or touch the Cancel but ton to return to the list of networks If the network has a password touch the password entry box A keyboard will appear on the screen To view the passw...

Page 31: ...TERNET BROWSER Note To use the browser you must have access to a wireless network including an 802 11b n router with SSID broadcast enabled hidden networks are not supported To open the browser touch the globe button near the lower left corner of the screen Then select a website To return to the previous web page press the back button on the console or touch the Browser Back but ton on the screen ...

Page 32: ...ted and used as the input source the channel must be changed on the satel lite TV box VCR DVD player or Blu ray player 4 Adjust the volume as desired Press the Vol increase and decrease buttons to adjust the volume When the buttons are pressed a graphic will appear on screen to show which volume setting is selected 5 Mute the TV if desired Press the Mute button to silence the TV s audio output Pre...

Page 33: ... the electronic program guide Note The electronic program guide is only avail able when viewing ATSC digital television Press the Display button to view information about the current program and the broadcast or cable signal Press the CC button repeatedly to turn on or turn off closed captioning See step 6 on page 35 to adjust closed captioning settings Press the Source button repeatedly to select...

Page 34: ...nd per sonalize the audio settings 4 Adjust the channel settings The Channel menu allows you to save channels in the TV memory and select settings for chan nels Note You can only access this menu if TV is selected as the input source First scroll to the bottom of the Channel menu and highlight Auto Channel Search Press the Enter button to start the auto scan The television will begin scanning all ...

Page 35: ...enus or the clock settings To enter the closed caption submenu highlight Closed Caption and press the Enter button In the closed caption submenu adjust the caption display caption type and the digital preset and style Select Menu Language to change the language used in the menus Select Clock to adjust the TV clock s time zone auto setting time setting day of the week setting and daylight saving ti...

Page 36: ...he treadmill may require two people 1 Hold the frame and one of the handrails and place one foot against a wheel 2 Pull back on the handrail until the treadmill will roll on the wheels and carefully move it to the desired location CAUTION Do not move the treadmill without tipping it back do not pull on the frame and do not move the treadmill over an uneven surface 3 Place one foot against a wheel ...

Page 37: ...hen press the switch back in SYMPTOM The power turns off during use a Check the power switch see the drawing above If the switch has tripped wait for five minutes and then press the switch back in b Make sure that the power cord is plugged in If the power cord is plugged in unplug it wait for five minutes and then plug it back in c Remove the key from the console and then reinsert it d If the trea...

Page 38: ...s overtightened treadmill per formance may decrease and the walking belt may become damaged Remove the key and UNPLUG THE POWER CORD Using the hex key turn both idler roller screws counterclockwise 1 4 of a turn When the walking belt is properly tightened you should be able to lift each edge of the walking belt 2 to 3 in 5 to 7 cm off the walking platform Be careful to keep the walking belt center...

Page 39: ...ened SYMPTOM The iFit Live mode does not function correctly a If the iFit Live mode is not functioning correctly make sure that the treadmill has the most current firmware available see step 3 on page 29 SYMPTOM The treadmill will not connect to the wireless network a Make sure that the wireless settings on your con sole are correct see step 4 on page 30 b Make sure that the settings for your wire...

Page 40: ...ntal streaks that appear or a picture that flutters or drifts Usually this is caused by interference from automobile igni tion systems neon lamps electric drifts or other electric appliances Try changing the position of the treadmill or other electric appliances to correct the problem Ghosts Ghosts are caused by the television signal following two paths one is the direct path and the other is refl...

Page 41: ...ic Exercise If your goal is to strengthen your cardiovascular system you must perform aerobic exercise which is activity that requires large amounts of oxygen for prolonged periods of time For aerobic exercise adjust the intensity of your exercise until your heart rate is near the highest number in your training zone WORKOUT GUIDELINES Warming Up Start with 5 to 10 minutes of stretch ing and light...

Page 42: ...1 Latch Warning Decal 44 1 Walking Platform 45 1 Walking Belt 46 2 Belt Guide 47 2 Front Cushion 48 4 Wire Tie 49 1 Drive Roller Pulley 50 1 Magnet 51 1 Reed Switch Clamp 52 1 Reed Switch 53 1 Storage Latch 54 1 Drive Motor 55 1 Motor Belt 56 1 Frame 57 1 Right Fame Cover 58 2 Platform Cushion 59 2 Platform Grommet 60 2 Rear Leveling Foot 61 1 Idler Roller 62 1 Right Foot Rail 63 1 Short Hex Key 6...

Page 43: ...8 x 5 8 Screw 112 1 Hex Key 113 8 Cushion Tube 114 2 3 8 Flat Washer 115 1 Upright Coaxial Cable 116 4 M4 2 x 12mm Screw 117 1 TV Bracket Cover 118 1 8 x 3 8 Screw 119 4 1 4 x 1 2 Screw 120 1 TV 121 1 TV Remote Control 122 2 1 4 x 1 1 4 Screw 123 2 TV Support Bracket User s Manual Note Specifications are subject to change without notice For information about ordering replacement parts see the back...

Page 44: ... 62 47 37 42 40 39 42 42 42 42 47 60 69 27 27 27 27 27 27 35 35 27 35 35 1 66 1 60 13 1 1 65 13 35 35 35 42 42 41 42 66 32 32 32 32 32 1 1 1 1 13 13 13 13 13 15 27 35 32 15 35 32 58 58 108 109 109 109 109 109 108 109 13 13 13 13 13 13 13 13 13 13 13 63 113 113 109 113 113 113 35 32 109 43 EXPLODED DRAWING A Model No SFTL19511 1 R0813A ...

Page 45: ...45 72 9 80 81 78 1 9 1 1 79 34 74 73 76 17 34 75 73 76 71 14 33 33 77 78 1 1 83 24 24 82 36 1 1 1 13 13 1 36 36 EXPLODED DRAWING B Model No SFTL19511 1 R0813A ...

Page 46: ...6 89 97 98 1 100 18 96 98 7 12 8 90 81 7 12 84 84 92 93 13 98 8 34 9 91 101 13 13 34 34 7 7 91 85 86 87 88 70 70 1 1 105 105 30 1 1 110 1 1 114 1 19 115 115 EXPLODED DRAWING C Model No SFTL19511 1 R0813A ...

Page 47: ...2 38 95 99 19 1 1 1 1 1 1 1 1 1 103 1 1 1 1 10 10 4 4 10 4 4 10 5 5 1 1 5 5 106 106 10 10 107 122 122 123 123 10 10 2 9 1 1 19 1 1 19 111 118 117 94 120 121 104 116 119 119 EXPLODED DRAWING D Model No SFTL19511 1 R0813A ...

Page 48: ...ranty does not extend to freight damage to the product This warranty will automatically be voided if the product is used as a store display model if the product is purchased or transported outside the USA if all instructions in this manual are not followed if the product is abused or improperly or abnormally used or if the product is used for commercial or rental purposes No other warranty beyond ...

Reviews: