background image

GB

5

25

1. "Show splash screen": Deactivate this function to prevent the display of the

start screen when starting the program.

2. "Start program on Windows start": Starts the Freecom Personal Media Suite

in the background with every Windows start. You will know this by the icon

of the Freecom Personal Media Suite in the system tray.

Important: We recommend to leave the function "Start program

on Windows start" activated under all circumstances in order to

be able to use all the functions of the Freecom Personal Media

Suite (e.g. "Autorun", "SYNC on Freecom drive plug-in")!

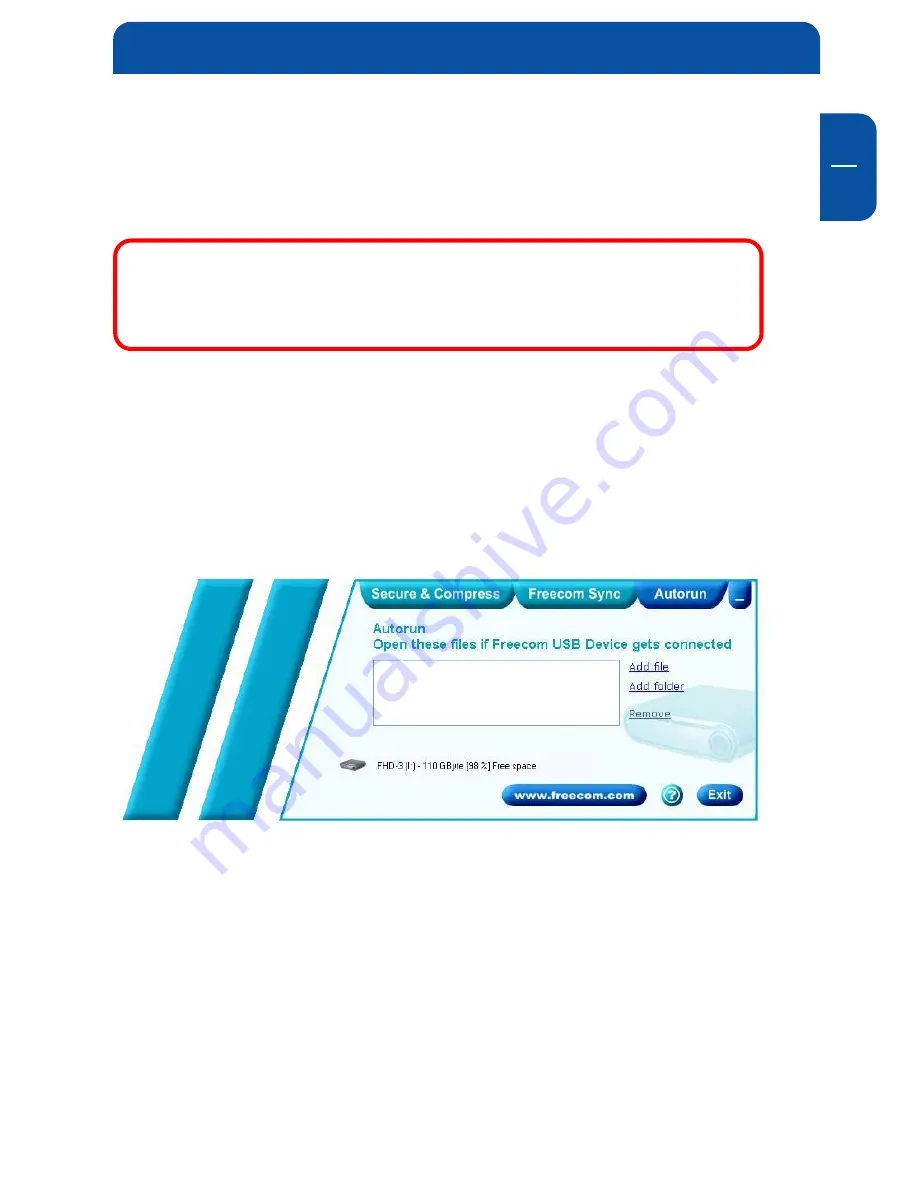
5.2 Autorun

The "Autorun" function enables you to open or start documents, files or

programs automatically when your Freecom FHD-3 is connected to your PC.
Automatically start, for example, the last document you were working on, MP3

play lists, your favourite film and much more. These files do not have to be on

your FHD-3 for this.

5.2.1 Adding files / folders

1. Open the Freecom Personal Media Suite and select the "Autorun" tab.
2. Add files, folders and programs to the Autorun list by either clicking on "Add

file" and selecting the corresponding file or by pulling the files into the

Autorun list field using drag&drop.

3. For folders, please select "Add folders" or pull a folder into the Autorun list

field using drag&drop.

4. Alternatively, you can create a new folder on your FHD-3 using the "Add

folder" function by clicking on "Create new folder", naming the folder and

selecting it.

The User Interface of the Freecom Personal Media Suite

Summary of Contents for FHD-3

Page 1: ...USB 2 0 USB 2 0 FireWire version Rev 426 ...

Page 2: ... out of the use of or inability to use this Freecom product even if Freecom has been advised of the possibility of such damages We reserve the right to upgrade our products in keeping with technological advances Dear user Thankyouforchoosingthe Freecom FHD 3externalharddrive Foroptimaluse and performance we advise you to read this manual carefully before using this product Freecom Technologies Ger...

Page 3: ...nal Media Suite software page 8 Chapter 2 Hardware installation page 12 Chapter 3 Driver installation FHD 3 USB 2 0 version page 15 FHD 3 USB 2 0 FireWire version page 18 Chapter 4 Daily use of the FHD 3 with Freecom Personal Media Suite software page 22 Chapter 5 The User Interface of the Freecom Personal Media Suite page 24 Chapter 6 Partitioning your FHD 3 page 39 Chapter 7 Troubleshooting page...

Page 4: ...CD ROM drive for installing drivers and or software USB 2 version Available USB 2 0 or USB 1 1 port USB 2 FireWire version Available USB 2 0 or USB 1 1 port and or FireWire interface Internet connection for online warranty registration and driver software updates and downloads Software Requirements Windows 98 SE Windows ME Windows 2000 Windows XP USB2 0isdownwardscompatibletoUSB1 1 Toachieveoptima...

Page 5: ...ronics within the drive enclosure it will damage the drive and will cause the drive to malfunction Do not use the FHD 3 in a dusty environment Dust inside the enclosure may damage the internal electronics and result in drive malfunction Only use the power adapter that was supplied with the FHD 3 Opening the FHD 3 will void the warranty Note Since USB 2 0 is backwards compatible with USB 1 1 the FH...

Page 6: ...o playback and all applications that need fast file access Foryourconvenience theFreecomFHD 3hasbeenpartitioned 1partition and pre formatted FAT32 file system The FAT32 format ensures maximum inter changeabilityoftheFHD 3betweendifferentcomputers Shouldyouchooseto format the FHD 3 in another file system e g NTFS please be aware of possible problems when connecting the FHD 3 to another computer tha...

Page 7: ...r desk for instance TheKensingtonsystemisoneoftheworld smost used anti theft hardware lock systems Options FireWire Cable for FHD 3 Additional Cable USB Additional Power Adapter See www freecom com for these and other Freecom products or contact your local Freecom reseller dealer Recommended sequence of installation 1 Install Freecom Personal Media Suite software 2 Connect the interface cable and ...

Page 8: ...mFHD 3hastobeconnected to your PC 1 1 Installation of the Freecom Personal Media Suite 1 InserttheFHD 3Software ManualCDintoyourCDdrive TheFreecomstart menu opens In case the software does not open automatically please click on Start in the main directory of the CD 2 Click on Install Software and select Freecom Personal Media Suite The installation of the Freecom Personal Media Suite starts now Fo...

Page 9: ... the target folder and program folder in the start menu in which the Freecom Personal Media Suite symbol is to appear 4 Default target folder is C Programs Freecom Personal Media Suite You can select a different target folder for the program files by selecting another folder on your hard drive Installation of the Freecom Personal Media Suite software ...

Page 10: ...ws It is recommended to select both options for better operation of the Freecom Personal Media Suite 6 Click on Next to start the installation All necessary program files are now written on the hard drive of your computer 7 In the last window you will be asked whether you want to start Freecom PersonalMediaSuitenow Itisrecommendedtoselectthisoptionsothatyou can configure the software for your FHD ...

Page 11: ...m Personal Media Suite from your computer please proceed as follows 1 In the Start menu please click on Programs Freecom Personal Media Suite 2 Select Uninstall Freecom Personal Media Suite The software is now removed from your computer Installation of the Freecom Personal Media Suite software ...

Page 12: ... Hardware Installation 1 ConnecttheinterfacecabletotheFreecom FHD 3 2 Connect the cable of the power supply to the FHD 3 and the power supply itself to the socket 3 Connect the interface cable to the inter face port of your computer ...

Page 13: ...edtoaUSB 2 0 port Connect the FHD 3 to the computer only on the USB or FireWire interface USB 2 0 FireWire version Remark if your drive is connected to the computer via FireWire You can connect further devices on the second FireWire socket if your drive is connected to the computer via FireWire For optimal performance the FHD 3 should always be connected to a USB 2 0 port or FireWire port Hardware...

Page 14: ...ion as in chapter 3 described Windows ME 2000 XP Under Windows ME 2000 XP a separate Freecom driverisnotrequired ThedriversforWindowsME Windows2000andWindows XP will be installed automatically by the operating system after plugging in the Freecom FHD 3 into the USB port of the computer Your Freecom FHD 3 is fully backwards compatible with USB 1 1 ...

Page 15: ...version Driver installation USB under Windows 98 SE Note Your Freecom FHD 3 is fully backwards compatible with USB 1 1 The installation for USB 1 1 is the same as described below for USB 2 0 1 Insert the Freecom Manual and driver CD into the CD ROM drive 2 Connect your Freecom FHD 3 to the USB connector of your notebook or computer 3 The AddNewHardwareWizard opensanda USB2 0Device USB2 0PCI Host C...

Page 16: ...D 3 GB 3 16 4 In the next window select Search for the best driver for your device Recommended Click on Next 5 Make sure that the checkbox CD ROM drive is activated in the next window Continue by clicking on Next ...

Page 17: ...inds a Freecom Freecom FHD 3 By clicking on Next the necessary files will be installed Afterwards click on Finish tocompletetheinstallation Congratulations You vejustfinishedto install the Freecom FHD 3 and the external hard drive is almost ready to use ...

Page 18: ...is fully backwards compatible with USB 1 1 The installation for USB 1 1 is the same as described below for USB 2 0 1 Insert the Freecom Manual and driver CD into the CD ROM drive 2 Connect your Freecom FHD 3 to the USB connector of your notebook or computer 3 The AddNewHardwareWizard opensanda USB2 0Device USB2 0PCI Host Controller or a USB2 IDE Controller USB 1 1 connector is found Click on Next ...

Page 19: ...r Installation 4 In the next window select Search for the best driver for your device Recommended Click on Next 5 Make sure that the checkbox CD ROM drive is activated in the next window Continue by clicking on Next ...

Page 20: ...letter Note FireWire is only supported by Windows 98 SE and above If you are using an older version you must first update Windows 1 The driver database is loaded automatically after you have connected the FireWire cable to the PC 2 Only when you need Now place the Windows 98 Installation CD in your internal CD ROM drive 3 The Hardware assistant window appears on the screen Click on Next 4 Select t...

Page 21: ...Next 7 Click on Finish in the next window 8 In order for the changes to take effect you must restart your computer Note You can plug the drive in and unplug it at the FireWire port while the PC is running The drive will be recognized automati cally under My Computer when it is reconnected hot plug play ...

Page 22: ... chapter 4 3 Creating a new SYNC folder 4 2 The SYNC button and status of LEDs TheFHD 3isequippedwithaSYNCbuttonwhichenablesyoutosynchronisefiles between your computer and the FHD 3 and vice versa The synchronisation process occurs simply by the push of a button The SYNC button only works if the Freecom Personal Media Suite Software is installed on your computer For information regarding software ...

Page 23: ...ED ring on FHD 3 on LED ring flickers Access to the FHD 3 LED button on SYNC button pressed LED ring flickers Data transfer Synchronisation Daily use of the FHD 3 with Freecom Personal Media Suite software LED ring LED button ...

Page 24: ...elected folder 4 User menu 5 Connected FHD 3 drive letter available memory capacity 6 Link to www freecom com Click on this to access the Freecom homepage Here you can find further information about your FHD 3 7 Quick Help for Freecom Personal Media Suite 8 Minimises Freecom Personal Media Suite in the system tray 5 1 Configuration To open the configuration menu please right click on the Freecom P...

Page 25: ...or programs automatically when your Freecom FHD 3 is connected to your PC Automatically start for example the last document you were working on MP3 play lists your favourite film and much more These files do not have to be on your FHD 3 for this 5 2 1 Adding files folders 1 Open the Freecom Personal Media Suite and select the Autorun tab 2 Addfiles foldersandprogramstotheAutorunlistbyeitherclickin...

Page 26: ...ersonal data is therefore impossible 5 3 1 Add Select Folders 1 Open the Freecom Personal Media Suite and select the tab Secure Compress 2 Clickon Changefolder andselectthefolderonyourFreecomFHD 3whose content is to be compressed and encrypted 3 Alternatively you can create a new folder to be encrypted on your FHD 3 using the Change folder function by clicking on Create new folder naming the folde...

Page 27: ...r using the drag drop function Each file is now compressed and then encrypted 3 The first time you will be requested to enter and confirm a password Select Save password on this computer if you do not want to be requested to enter a password again 4 Alternatively you can also right click on the files or folders and select the Secure Compress folder in the context menu under Send to 5 3 4 Decryptin...

Page 28: ...the deletion a security request is carried out whether you really want to delete the folder 5 3 6 Changing the password 1 Open the Freecom Personal Media Suite and select the tab Secure Compress 2 Click on Change password The following window opens 3 Please enter your current password in the top input field Enter your new password in the middle input field and confirm it in the bottom input field ...

Page 29: ...is data can be processed on any number of other computers Example You create a document at work and want to work on it at home Freecom Personal Media Suite is installed on your PC at work CopythedocumentfromthePCatworktoyourFreecomSYNCfolderonyour FHD 3 Open the document at home directly out of the Freecom SYNC folder Work on it and save it in the Freecom SYNC folder Connect the Freecom FHD 3 to y...

Page 30: ...der 1 OpentheFreecomPersonalMediaSuiteandselectthetab FreedomSYNC 2 Click on Open folder in order to open the SYNC folder 2 If the Freecom Personal Media Suite is already open and has been started minimisedinthetaskbar youcanalsoopentheSYNCfolderthrougharight click on the taskbar symbol of the Freecom Personal Media Suite 5 4 4 Adding files into the SYNC folder 1 Open the SYNC folder 2 Pull the re...

Page 31: ...com driveplug in inthe tab Freedom SYNC YourfilesarenowsynchronisedeachtimewhenyouconnectyourFreecomFHD 3 to your computer Freecom Personal Media Suite has to be started This function is activated as standard when a SYNC folder is created 3 Starting the synchronisation manually a Open the Freecom Personal Media Suite and click on the tab Freedom SYNC b Select a SYNC folder if you have not yet done...

Page 32: ...eletion a security request is carried out whether you really want to delete the folder 5 4 8 Every day use After you have installed all software created the SYNC folder and configured thesoftwareandFHD 3youcanstartusingFreecomSYNCtosynchronizeallyour data with the FHD 3 You can use the SYNC function for instance to make backupsofimportantfiles totakefilesfromworktoyourhomeorontheroad Usage of the ...

Page 33: ... the SYNC button or open the context menu on the SYNC icon in the taskbar and click on Start synchronization 3 A status window appears and the SYNC LED on the FHD 3 starts blinking Please select Update if you wish to synchronize the file or otherwise select Cancel If you choose not to synchronise the file Cancel you will be able to synchronize this file during the next synchronization The User Int...

Page 34: ...ne indicatingthatthisfilewillnotbesynchronized Youwill be able to synchronize this file during the next synchronization 5 5 1 Handling deleted files Deleting files on either the primary computer or the SYNC folder on the FHD 3 results in a red X next to the file during the next synchronization This indicates that the file has been deleted and that its counterpart will be deleted too Please select ...

Page 35: ...ynchronization IfyouwanttodeleteafileoneithertheprimarycomputerorintheSYNCfolder anddonotwanttoaffectitscounterpart itisnecessaryto SplitFromOriginal the files Please follow the instructions 1 Select the file or folder you want to delete 2 Choose Properties in the context menu 3 Select Update and Split From Original 4 Select Yes The User Interface of the Freecom Personal Media Suite ...

Page 36: ...rnetworkorlocalcomputer Simply sendto yourimportantfilesanddirectoriestotheSYNC folderontheFHD 3andupdate your backup from time to time by pressing just one single button This is extremely easy and very fast because the SYNC tool only backups changed files via the fast USB 2 connection Thebestthingis evenwhenyournetworkorlocalcomputerisnotworking you can take your FHD 3 to any other computer equip...

Page 37: ... 3 5 5 4 Home use Attheoffice thereisalwaysabackupofyourimportantbusinessdata Buthow about your data at home All the memories stored in digital photo s made during your last holiday Or the first pictures and movies of your children You donotwanttoloosethose TheFHD 3isidealformakingasafetybackup which stores your data independently from your computer Simply send to your importantfilesanddirectories...

Page 38: ...he SYNC folder Click with the rightmousebuttononthefilesandfolders whichcontainthepicturesorvideos you want to be in a safe place and select Send to SYNC folder Done Now all your valuable data has been copied to the FHD 3 Every time you push the SYNC button all changed or added deleted files and folders from the selected folders will be synchronized with the data on the FHD 3 ...

Page 39: ...verview File systems supported by different operating systems FAT FAT32 NTFS Windows 98SE yes yes not supported Windows ME yes yes not supported Windows 2000 yes yes yes Windows XP yes yes yes Maximum size of a partition FAT FAT32 NTFS Windows 98SE 2 GB 60 GB 1 2 n a Windows ME 2 GB 2 TB 2 n a Windows 2000 4 GB 3 32 GB 16 TB Windows XP 4 GB 3 32 GB 16 TB File system Operating system File system Op...

Page 40: ...se follow the steps below to adapt the FHD 3 for your needs 6 3 Partitioning your FHD 3 under Windows 98SE Windows ME Windows 98SE only The fdisk version which is installed together with your operating system does not recognize the correct size of hard disks larger than 64 GB Windows 98SE ME For large partitions fdisk will not display the partion size correctly Please ignore this as the partitioni...

Page 41: ...the wrong drive will lead to a loss of your data 7 ChooseOption 3 DeletepartitionorLogicalDOSDrive bypressing 3 and Return 8 Your FHD 3 comes formatted as primary partition Select option 1 Delete Primary DOS Partition by pressing 1 and Return 9 Select the partition to be deleted by pressing its number and Return 10 Enter the drive label and press Return 11 Confirm with Y and Return to delete the p...

Page 42: ...ter 1 Click on the Start button 2 Select Run 3 Enter fdisk and confirm with OK 4 Answerthequestion Doyouwishtoenablelargedisksupport bypressing the Return key FAT32 is now activated 5 Choose Option 5 Change current fixed disk drive by pressing 5 and Return 6 Select the hard disk by its number where the Usage contains no value but onlyapercentsymbol Selectthenumberofthecorrespondingharddiskand conf...

Page 43: ...ecked 9 If only one partition is required then answer Y to the question Do you wishtousethemaximumavailablesizeforaPrimaryDOSpartition Ifmore than on partition is required go to the next section Create two or more partitions on the FHD 3 under Windows 98 Windows ME Now the whole disk will be partitioned as one primary partition Wait until the drive integrity check is completed 10 Press the ESC key...

Page 44: ...k options 5 Select Option 1 Create DOS partition or Logical DOS drive by pressing 1 and confirm with Return 6 Select Option 2 Create Extended DOS Partition by pressing 2 and confirm with Return Wait until the drive integrity check is completed 7 Enter either the size or a percentage value for the partition size or press Return to accept the default value 8 Press ESC to return and wait until the dr...

Page 45: ...e 4 After you have completed your selection click on Start Attention Selecting the wrong drive will lead to a loss of your data Please ensure that the correct drive is selected 5 Confirm the next message with OK 6 Afterformattingisfinishedyoucanperformadiskscan Todoso followthe instructionsoftheWindowsHelpsystem Ifyoudon twanttoscanyourdisk just close the message window Repeatthesestepsforeachpart...

Page 46: ...ct DeletePartition andconfirmbyclickingon Yes Thepartitionwill be deleted now 6 4 2 Creating a partition on the FHD 3 under Windows XP 2000 Thefollowingstepswillguideyouthroughtheprocessofcreatingpartitionson your FHD 3 After this procedure your Freecom FHD 3 will be ready for use and it will be allocated a drive letter 1 Click with the right mouse button on the My Computer icon on your desktop 2 ...

Page 47: ...rd The New Partition Wizard opens Click on Next 6 Select Primary partition and click on Next 7 Now you can adjust the size of your partition Click on Next if only one partition is to be created See next chapter Creating two or more partitions on the FHD 3 under Windows XP 2000 how to create more than one partition Partitioning your FHD 3 ...

Page 48: ...tions Click on Next 9 Select the formatting option Choose either FAT32 or NTFS the Allo cation Unit Size should remain on Default Finally select Perform Quick Format and click on Next 10 Clickon Finish tocompletethepartitioningofyourFHD 3 YourFHD 3will be formatted now and is ready to use afterwards ...

Page 49: ...ick with the right mouse button on the My Computer icon on your desktop 3 Select the option Manage 4 Select the option Storage Disk Management 5 Right click on the unallocated space of your FHD 3 and select the option New partition Windows 2000 Create partition The New Partition Wizard Windows2000 CreatePartitionWizard opens Clickon Next 6 Select Extended partition and click on Next Partitioning y...

Page 50: ...Freecom FHD 3 GB 6 50 7 Now you can adjust the size of your partition Enter the size and click on Next 8 Click on Finish to create the Extended partition The unallocated space now changed to Free space ...

Page 51: ... 6 51 9 Right click on Free Space and select New Logical Drive Windows 2000 Create Logical Drive The New Partition Wizard Windows 2000 Cre ate Partition Wizard opens Click on Next Partitioning your FHD 3 ...

Page 52: ...n Next 12 Assign a drive letter and click on Next 13 Select the formatting option Choose either FAT32 or NTFS the Allo cation Unit Size should remain on Default Finally select Perform Quick Format and click on Next 14 Click on Finish to complete partitioning Your partition will be formatted now and is ready to use ...

Page 53: ...ugh memory on the target drive FHD 3 during synchronization Solution InstalltheFreecomFreecomPersonal Media Suite software and safely re move and reconnect the FHD 3 Follow the instructions on chapter 5 4 2 Creating a new SYNC folder ConnecttheFreecomFHD 3toyour computer Checkallconnectionsbetweenthe Freecom FHD 3 the power supply and the computer Safely remove and reconnect the Freecom FHD 3 You ...

Page 54: ...y software programs data or removable storage media c any damage resulting from adaptations changes or adjustments which may have been made to the product without the prior written consent of Freecom d attempted repair by any party other than autho rized by Freecom and e accidents lightning water fire or any other such cause beyond the reason able control of Freecom With respect to all services pr...

Reviews: