background image

Fredenstein MixCube

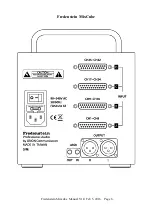
course, you could look on the back panel to see how many DB25's are occupied.

3) Colors galore. The MixCube uses color to indicate several functions. Normally individual 

channel and mix LEVEL BARS are yellow when not muted, grey when muted and blue 
when selected for level and pan changes. 

4) Colors are also used for 0 dB and -10 dB reference lines on the LEVEL BARS and the 0 

dBu lines on the meter.

5) There are 3 additional indicators at the bottom left corner; a red dot that turns on if there is a 

MIDI or USB invalid message which stays red for a few seconds, then turns grey to show 
there had been an invalid message. There is a green dot that blinks when the MixCube stores
the current settings in local memory related to bringing back settings after powering down. 
There is also a blue dot that indicates any MIDI or USB messages.

MENU Functions

1) Press the PAN knob. The display changes to MENU mode. Use the PAN knob to cycle 

through the list of functions. Select one and push the PAN knob (MENU) again to engage 
that function. 

2) AUDIO MENU. There are 4 items that are designed as mixing conveniences. You can  raise 

or lower the level all of the channels by 3 dB or 10 dB. This can be useful when used in 
combination with the Mix level to set the optimum output and possibly the best “sweet spot”
that can be the result of individual channel levels hitting the buss.

3) STORE/RECALL MENU.  To store a Setup, press the PAN knob (MENU) again. The 

display changes to highlight the number in blue. Rotate the PAN knob to select a location to 
store into and press the PAN knob (MENU) again. The display will indicate “DONE !” then 
go back to the STORE/RECALL menu. To exit, rotate the PAN knob to highlight the 
“EXIT” text and press the knob again, which brings you back to the Main Menu, rotate the 
knob to highlight the EXIT there and press the knob again to return to the Mix screen.

4) SETUP MENU. Enable USB Interface or Enable MIDI Interface. Select one or the other 

depending on which cables you want to control the MixCube, push the knob and the display 
changes to “Disable USB Interface” or ” Disable MIDI Interface” so you can change back if 
and when you want.

5) To exit the MENU mode use the PAN knob to select “EXIT” and press the PAN knob to 

return to the normal mix screen.


Fredenstein Mixcube  Manual V1.0  Feb 5, 2016    Page 5

Summary of Contents for MixCube

Page 1: ...MixCube Operating Manual...

Page 2: ...AES59 standard as used originally used by Tascam and Digidesign Output connectors are XLR3 male The MixCube can be remote controlled with MIDI or USB This allows the MixCube to be controlled with sta...

Page 3: ...e to creative automated level changes within the mix And this brings up another of the real benefits of the MixCube You can insert any of your outboard gear between your DAC and the MixCube s inputs w...

Page 4: ...Fredenstein MixCube Fredenstein Mixcube Manual V1 0 Feb 5 2016 Page 3...

Page 5: ...hat channel It is a soft mute with no pops or clicks 6 Use the SOLO button to cut all other channels Adjusting the Output Mix Master Buss or Fader Groups 1 Press the MIX button 2 Use the CHANNEL knob...

Page 6: ...There are 4 items that are designed as mixing conveniences You can raise or lower the level all of the channels by 3 dB or 10 dB This can be useful when used in combination with the Mix level to set t...

Page 7: ...Fredenstein MixCube Fredenstein Mixcube Manual V1 0 Feb 5 2016 Page 6...

Page 8: ...ROU P GROU P GROUP GR OUP PUSH TO MUTE PUSH TO ZERO PUSH L C R STEP PUSH L C R STEP COMPUTER GR OUP 2 GROU P 3 GROU P 4 CUT GROUP 1 GROUP 2 GROUP 3 GROUP 4 2 10 18 26 3 11 19 27 4 12 20 28 5 13 21 29...

Page 9: ...e 8 ANALOG TO DIGITAL CONVERTER TO MONITORS DIGITAL INTERFACE DAC OUTPUTS l O l O MONITOR CONTROLLER DIGITAL INTERFACE DAC OUTPUTS ADC INPUTS A INPUTS MONITOR OUTPUTS TO POWERED SPEAKERS HEADPHONES IN...

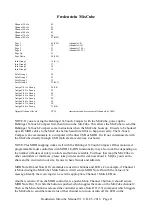
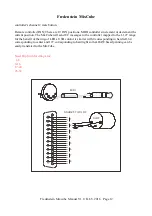
Page 10: ...10Kohms Output Impedance 44 Ohms 2 x 22 Ohms MIDI jacks on the MixCube are 3 5 mm Tip Ring Sleeve TRS Din Pin 2 TRS Tip Din Pin 3 TRS Sleeve Din Pin 4 TRS Ring DB25 Inputs D Sub 25 DB25 Function Funct...

Page 11: ...6 Pan CC15 Channel 7 Pan CC16 Channel 8 Pan CC17 MIX Balance CC18 Channel 1 etc Pan Preset 0 C 2 cycles or steps through Left Center Right Channel 2 Pan Preset 1 Channel 3 Pan Preset 2 Channel 4 Pan...

Page 12: ...to a computer with either USB or MIDI It will not communicate with the MixCube directly through USB both are slave devices not hosts NOTE This MIDI mapping works well with the Behringer X Touch Compa...

Page 13: ...or the benefit of the ring of LEDs USB control is similar with 0 corresponding to hard left 64 corresponding to center and 127 corresponding to hard right so that DAW based panning can be easily trans...

Page 14: ...Contact Info Fredenstein Professional Audio by Orion Communication 7F 1 No 582 Ruei Guang Rd Neihu District Taipei 114 Taiwan Phone 886 2 2657 2618 Email info fredenstein com Web www fredenstein com...

Reviews: