TH4C Installation Guide
p. 46
TH4C Advanced Configuration
© Safe Fleet | May 2019 | All rights reserved
Document Number: XE-SNB2-TH4CPM-R0A
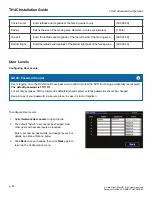
ITEM
DESCRIPTION
VALUE [DEFAULT]
Front Default
Display
Select the default monitor display setting
: all cameras (# UP) or a single
camera (choose the Channel it is connected to).
[# UP], Channel
01...
Display
Switch
Enable or disable switched display
.
Select
ON
if you want to switch the monitor display from the default setting to
another camera feed based on an Alarm, a Signal, or a specified time, as per
the options detailed below (these parameters are unavailable when Display
Switch is OFF).
[OFF], ON
Switch To
When Display Switch is ON, select the camera feed to activate based on
the Alarm, Signal, or Timer setting described below
.
You can choose to display a single camera (by Channel number), all
connected cameras (# UP), or to show each active camera feed in sequence
(Sequence - applies only to the Timer option described below).
Channel 01...,
[# UP], Sequence
Switch On
Set the trigger type that will activate the camera feed selected in the
Switch To setting and cause it to display in the monitor output
.
Then, from the pull-down menu below, select a specific Alarm, Signal, or
Timer setting.
Alarm, [Signal],
Timer
Alarm (Signal
or Timer)
For Alarm or Signal trigger types
, choose the specific Alarm/Signal to
activate the selected camera view in the monitor output display when
Display
Switch
is
ON
. For example, the
ALM1
setting switches monitor output to the
view selected in the
Switch To
option for the duration of ALM1.
For the Timer trigger type
, select the amount of time each active video
channel displays during rotation. For example, 10sec changes channels
between valid camera inputs every 10 seconds.
[ALM 1]...
[Signal 1]...
[3 sec.], 5 sec, 10
sec. 30 sec.
Menu Options
Summary of Contents for TH4C
Page 2: ......


