


ASSEMBLY INSTRUCTIONS
–
Level 1 Continued
1
1
2
3
4
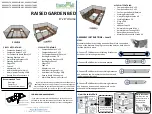
Step 2
: Layout the Boards for the first level according to the number of the
board in Step 1.
Note:
It is especially important to layout Boards
3
&
4
in the exact orientation
shown in the diagram below.
The gate Board (
Board 1
) on level 1 is kept uncut to act as a level surface for the
gate to swing on. You can choose to cut this Board if you want it to be apart of the
swinging gate.
IMPORTANT
: If you connect any brackets incorrectly, they can be removed by
inserting a flathead screwdriver into the opening of the snap-lock plugs, pushing into
the nub and twisting upwards.
Step 3:
When connecting the boards for the first level, insert the stacking
stakes upside down so the stake is pointing to the sky. This will allow you to
adjust the shape of your frame before driving the stakes into the ground.
Step 3a:
With the first level stacking stakes still facing the sky, use bracketed
2ft boards to ensure that the cross Boards will fit by placing the board over
the stacking stakes on the cross-board positions shown below.
1
1
1
4
1
3
1
2
2
2
Step 4:
Once you finish with the adjustments of your base level frame,
remove the Boards sitting on level 2 and hammer the stacking stakes on level
1 into the ground.


