Foxun SX-GES24 Operating Instructions Manual Download Page 5

Operating Instructions

5

TYPICAL

TYPICAL

TYPICAL

TYPICAL AAAAPPLICATION

PPLICATION

PPLICATION

PPLICATION

1)

1)

1)

1) One

One

One

One to

to

to

to One

One

One

One

Transmitter

Transmitter

Transmitter

Transmitter

Receiver

Receiver

Receiver

Receiver

CONNECT

CONNECT

CONNECT

CONNECTING

ING

ING

ING AND

AND

AND

AND OPERAT

OPERAT

OPERAT

OPERATING

ING

ING

ING

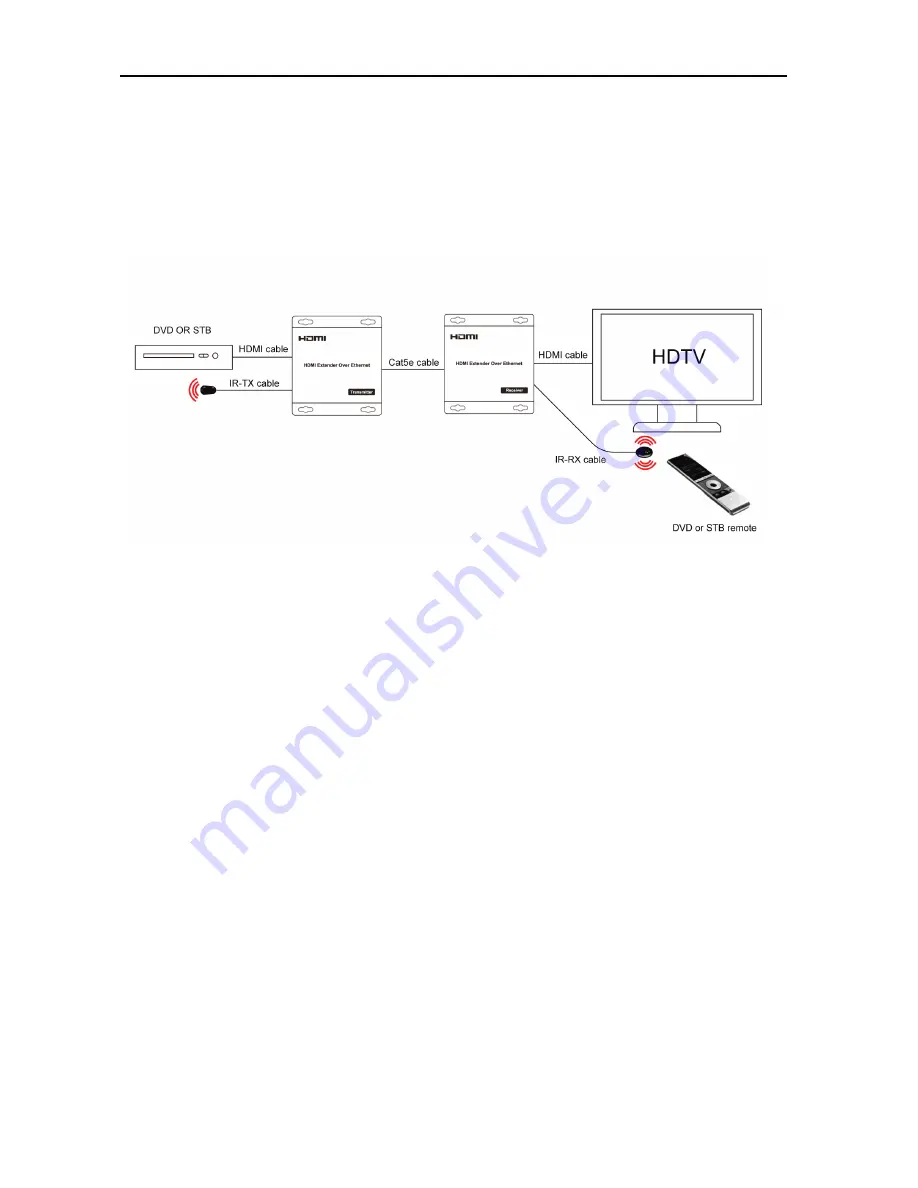
1) Connect the HDMI signal sources (Such as DVD, STB etc) to HDMI Transmitter.
2) Connect CAT5e or 6 cables to both the Ethernet of the transmitter and Ethernet port of the Receiver.

(The cables must follow the standard of EIA-TIA 568B).

3) Connect the HDMI output (Such as HD-LCD, HD-DLP) into the Receiver.
4)

Connect the power supply into

Power port.

5) Connect the IR TX receiving cables into IR TX port on the back panel and affix the emitter onto the
source IR windows.
6) Connect IR-RX cable into IR-RX port on the receiver and affix the IR receiver in direct line of site with
the handheld remote control.It is recommended to affix the receiver on the display frame /bezel

or the

display stand.
Attention: Insert/Extract cables gently.

Summary of Contents for SX-GES24

Page 1: ...S Compliant HDCP Uses off the shelf gigabit IP switches for extension and distribution Extends 1080p HDMI signals up to 120m over a single UTP Cat5e 6 cable Flexible and scalable HDMI 1080p Video Wall...

Page 2: ...smitter Receiver HDMI Extender 2 Power adapter DC 5V 1Ax2PCS 3 IR TX cable IR RX cable 4 Operating Instructions 5 Operating Temperature Range 5 to 35 23 to 95 Operating Humidity Range 5 to 90 RH No Co...

Page 3: ...ANEL PANEL PANEL PANEL DESCRIPTIONS DESCRIPTIONS DESCRIPTIONS DESCRIPTIONS Transmitter Panel 1 Indicator of power input 2 Status of signal connection 3 HDMI input 4 Ethernet port 5 IR TX port 6 Reset...

Page 4: ...Operating Instructions 4 Receiver Panel 1 Indicator of power input 2 Status of signal connection 3 HDMI output 4 Ethernet port 5 IR RX port 6 Reset button 7 Power input port...

Page 5: ...AT5e or 6 cables to both the Ethernet of the transmitter and Ethernet port of the Receiver The cables must follow the standard of EIA TIA 568B 3 Connect the HDMI output Such as HD LCD HD DLP into the...

Page 6: ...ith SX EX22 for one to more connection 2 when one TX connect to many RX or many TX connect to many RX IP and MAC address must be different IP 192 168 168 XX XX 1 255 MAC 00 0b 78 XX XX XX XX 01 FF 3 A...

Page 7: ...AND OPERATING 1 For more to more connection SX EX22 has to work with HDMI smart matrix SX GES24 2 Connect HDMI TX ports with SX GES24 ports also connect HDMI RX ports with SX GES24 ports for SX GES24...

Page 8: ...IP address field with 192 168 168 11 0 255 and Subnet mask with 255 255 255 0 After that press OK to save the configuration Step 2 turn on the device the red light becomes lighting waiting about 10 s...

Page 9: ...segment with IP Switch Login in IE 192 168 168 254 5 5 5 5 Input Input Input Input and and and and Output Output Output Output setting setting setting setting of of of of Switch Switch Switch Switch...

Page 10: ...you can set it as below picture 6 6 6 6 Set Set Set Set your your your your Username Username Username Username and and and and Password Password Password Password in in in in your your your your devi...

Page 11: ...ce Select Upgrade Firmware in System tools you can upgrade the device s software Restore Restore Restore Restore equipment equipment equipment equipment default default default default Settings Settin...

Page 12: ...a marked change in performance e The unit has been dropped or the cabinet damaged 2 Servicing Servicing Servicing Servicing Personnel Personnel Personnel Personnel Do not attempt to service the unit b...

Reviews: