background image

OVIS-01 User Manual by forwardx.com 


10 


iii.


Autonomous Follow and Obstacle Avoidance 

1.


Start & Connect 

Press the button on the lever handle for 3 seconds till the LED light indicates blue 

to start your OVIS. Then, press the button on the wrist band for 3 seconds till the LED 

light becomes blue and blinks to start the band. 

After starting the wrist band, the  LED light on  your OVIS  also starts blinking, 

indicating that your OVIS is being automatically connected with wrist band. When they 

are connected, both LED lights become breathing in blue. 

2.


Autonomous follow 

Press the button on the lever handle or wrist band  for several seconds to start 

follow function and the LED light on the lever handle become breathing in green (It’s 

normal that the hub would make some noise and the height of the case would change 

slightly when OVIS is started.) 

3.


Indicator Light-off Mode, please set it on APP. 

4.


Switch between manual and follow mode 

While following, hold the lever handle and the LED light turns from green to blue, 

indicating that follow is stopped. 

OVIS is switched to manual mode when the driving wheels arise (It’s normal that 

the hub would make some noise and the height of the case would change slightly when 

the mode is switched). 

In manual mode, press the button on the lever handle for several seconds or press 

the button on your wrist band, and your OVIS will switch to follow mode again. 

5.


Fail to start autonomous following 

If you fail to start follow function according to the instructions in 2.2, please walk 

Summary of Contents for OVIS-01

Page 1: ...OVIS 01 User Manual by forwardx com 1 User Manual Note This manual only contains information about the product and its functions as well as how to use it ...

Page 2: ... OVIS smart suitcase Please read through this user guide before using it To get warranty service please follow the instructions notices and warnings in this manual Damage caused by misuse may not be covered by warranty Please keep this manual and your warranty card well ...

Page 3: ... 8 II Quick Start 8 i Unpacking your OVIS 9 ii Quick Start 9 iii Autonomous Follow and Obstacle Avoidance 10 1 Start Connect 10 2 Autonomous follow 10 3 Indicator Light off Mode please set it on APP 10 4 Switch between manual and follow mode 10 5 Fail to start autonomous following 10 6 Safety Alarm 11 7 Power Off 12 8 Low Battery 12 III OVIS APP 12 i APP Introduction 12 ...

Page 4: ... Status 13 1 Normal Situations 13 2 Abnormal Situations 14 ii FAQ 15 iii Specifications Parameters 17 V Safety Guideline and Legal Statement 20 i Notices 20 ii Warnings 21 iii Disclaimer 23 iv Intellectual Property Rights 23 v Federal Communication Commission Interference Statement 25 vi Industry Canada statement 27 ...

Page 5: ...wrist band will alarm you when your OVIS is away from you Fourth camera remote control Record the wonderful moments in your travel Fifth removable battery mobile charger The battery of your OVIS can easily be removed and can also function as a mobile charger with two USB charging sockets Furthermore OVIS is even friendlier than you expect due to its safety large storage space and flexibility Your ...

Page 6: ... Camera F B side Track Sensor G A side Track Sensor H Lever I Handle on the Suitcase J Aluminum Frame K Case L Follow Sensor M TTSA Code Lock N C side Track Camera O C side Track Sensor P Rear Hinge Q Attached Bag R Smart Drive Wheel S D side Track Camera T D side Track Sensor Note Please do not stare at the LiDAR directly by naked eyes 2 TSA Lock Instructions ...

Page 7: ...ted How to open lock 1 Set to your correct combination Follow the arrow direction push the small button together with the big slider to the end to open the lock The word OPEN will be seen 2 Follow the arrow direction Push the big slider to the end set your combination to random to lock it The word LOCK will be seen Notice TSA Lock can be unlocked by U S Transportation Security Administration with ...

Page 8: ... A Power button of the wrist band B Indicator 4 Battery A USB OUT A B USB OUT B C Power Socket D Charge Socket E Battery Button Press to check its electricity E Battery Indicator II Quick Start Have you checked your OVIS Start your wonderful experience ...

Page 9: ...on time How to check the battery of your wrist band Press the power button of the wrist band for several seconds If the indicator turns red and breaths please charge the wrist band While charging the indicator will turn orange in breathing If it is fully charged the indicator will turn to constant orange How to check the battery of your OVIS Press the battery button for several seconds If only one...

Page 10: ...on and the LED light on the lever handle become breathing in green It s normal that the hub would make some noise and the height of the case would change slightly when OVIS is started 3 Indicator Light off Mode please set it on APP 4 Switch between manual and follow mode While following hold the lever handle and the LED light turns from green to blue indicating that follow is stopped OVIS is switc...

Page 11: ...is about 2 5m away from you in following mode or about 5m away in manual mode indicator blinks in red wrist band vibrates OVIS makes alarm sound Cancel Alarm Please walk to your OVIS If you are within 2 5m around it it will automatically cancel alarm and return to follow mode If the alarm is not canceled when you are within 2 5m around it please double press the button on wrist band to cancel alar...

Page 12: ...r and may follow you for 15 minutes Second Remind When the indicator on lever handle lights off your OVIS battery is running down OVIS will gradually stop and the drive wheels will move back OVIS will make sound alarm for 5 seconds and your wrist band will keep vibrating When the battery of wrist band is low First Remind When your wrist band is in low battery the band will keep vibrating and the i...

Page 13: ...And you can only use the following functions with the APP video guide troubleshooting remote control photography album GPS and footprint TSA code record ii Major Functions The APP needs to be upgraded continuously please understand For function descriptions please refer to the latest information released by ForwardX IV OVIS LED Status FAQ and Specifications i OVIS LED Status 1 Normal Situations Op...

Page 14: ... handle or press the button on handle for several seconds Blue breathing Blue breathing Switch Remote Control Mode 2 Abnormal Situations Problem Lever handle status Wrist band status Solution on the APP Follow Failure Constant red light Constant red light Vibrating 1 Remind Severe Problem by pop up window 2 Show the solution in User Guide 3 Enter the interface of FAQ 4 Enter the interface of custo...

Page 15: ...t wear or start the wrist band Wear your wrist band and start it The LED on both wrist band and lever should indicate blue and be breathing OVIS fails to follow you while following OVIS can avoid obstacles but it may be blocked if there are too many obstacles Pull OVIS away from obstacles You may have pressed the button on wrist band accidentally Double press the button on the wrist band and follo...

Page 16: ... if there are not many obstacles and stop alarming If there are too many obstacles please walk to your OVIS and keep in safety distance If the wrist band is still alarming please press the button on your wrist band for three times quickly and continuously to cancel alarming OVIS falls Raise your OVIS and starts following again LED on both smart hand and OVIS blink in red The function of firmware i...

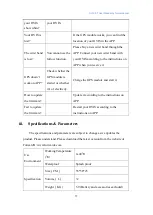
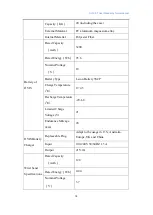
Page 17: ...PS module is started or whether it s of electricity Charge the GPS module and start it How to update the firmware Update it according to the instructions on APP Fail to update the firmware Restart your OVIS according to the instructions on APP iii Specifications Parameters The specifications and parameters are subject to change as we updates the product Please understand Please download the latest...

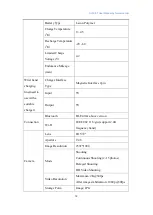
Page 18: ... Energy Wh 93 6 Nominal Voltage V 18 Battery Type Li ion Battery 5S2P Charge Temperature 0 45 Recharge Temperature 20 60 Limited Charge Voltage V 21 Endurance Mileage km 20 OVIS Battery Charger Replaceable Plug Adapt to the usage in U S Australia Europe UK and China Input 100 240V 50 60HZ 1 5A Output 21V 2A Wrist band Specifications Rated Capacity mAh 120 Rated Energy Wh 0 44 Nominal Voltage V 3 7...

Page 19: ... suitable charger Charger Interface Type Magnetic Interface 2pin Input 5V Output 5V Connection Bluetooth BLE4 0 above version Wi Fi IEEE 802 11 b g n support 2 4G frequency band Camera Lens FOV72 Aperture f 2 8 Image Resolution 2592 1944 Mode Shooting Continuous Shooting 2 15 photos Delayed Shooting HD Video Shooting Video Resolution Maximum 2K 30fps After image stabilization 1080p 30fps Storage F...

Page 20: ...or the repair 2 Please lift your OVIS using the case handle when climbing stairs or steps otherwise your OVIS may be turned over or damaged 3 Please put your OVIS down on the ground when it s on moving cars in uneven or incline places otherwise your OVIS may be turned over or damaged 4 Please use manual mode in crowded environment to avoid damage or collision 5 Do not put your OVIS in humid airles...

Page 21: ... Rh and 75 Rh otherwise your OVIS may not work normally 16 Please use only the enclosed accessories and components including but not limited to battery wrist band and wrist band charging cable power adapter and plug adapter If the enclosed accessories or components are damaged or lost please contact with our after sale service Please do not use accessories and components provided by any third part...

Page 22: ...ou may cause fire electric shock or product damage 7 Do not connect or disconnect the power adapter by wet hands Otherwise you may cause electric shock or product damage 8 Do not plug foreign object in the USB socket high voltage charge discharge socket or any other socket of OVIS Metal or other foreign object plugged in the socket may cause product damage fire or electric shock 9 Do not dissemble...

Page 23: ...this product The user shall understand and observe including but not limited to the operation instructions in this manual The company is not liable for any indirect special punitive incidental or consequential damages and losses including not limited to profit loss indirect loss incidental loss data loss taxes or other economic benefits loss This manual contains as many features of the product as ...

Page 24: ... modification Some graphic contents in this manual are owned by third parties whose rights are recognized by ForwardX No one shall use the name brand trade mark or patent of ForwardX in any way without prior authorization in writing from THE COMPANY All product information and technologies are owned by ForwardX except for those cited by other parties No part of this content may be reproduced distr...

Page 25: ...ction against harmful interference in a residential installation This equipment generates uses and can radiate radio frequency energy and if not installed and used in accordance with the instructions may cause harmful interference to radio communications However there is no guarantee that interference will not occur in a particular installation If this equipment does cause harmful interference to ...

Page 26: ...onsible for compliance could void the user s authority to operate this equipment This transmitter must not be co located or operating in conjunction with any other antenna or transmitter Radiation Exposure Statement This equipment complies with FCC radiation exposure limits set forth for an uncontrolled environment This equipment should be installed and operated with minimum distance 20cm between ...

Page 27: ...utorisée aux deux conditions suivantes 1 l appareil ne doit pas produire de brouillage et 2 l utilisateur de l appareil doit accepter tout brouillage radioélectrique subi même si le brouillage est susceptible d en compromettre le fonctionnement This Class B digital apparatus complies with Canadian ICES 003 Cet appareil numérique de la classe B est conforme à la norme NMB 003 du Canada This device ...

Page 28: ...re Statement This equipment complies with IC radiation exposure limits set forth for an uncontrolled environment This equipment should be installed and operated with minimum distance 20cm between the radiator your body Déclaration d exposition aux radiations Cet équipement est conforme aux limites d exposition aux rayonnements IC établies pour un environnement non contrôlé Cet équipement doit être...

Reviews: