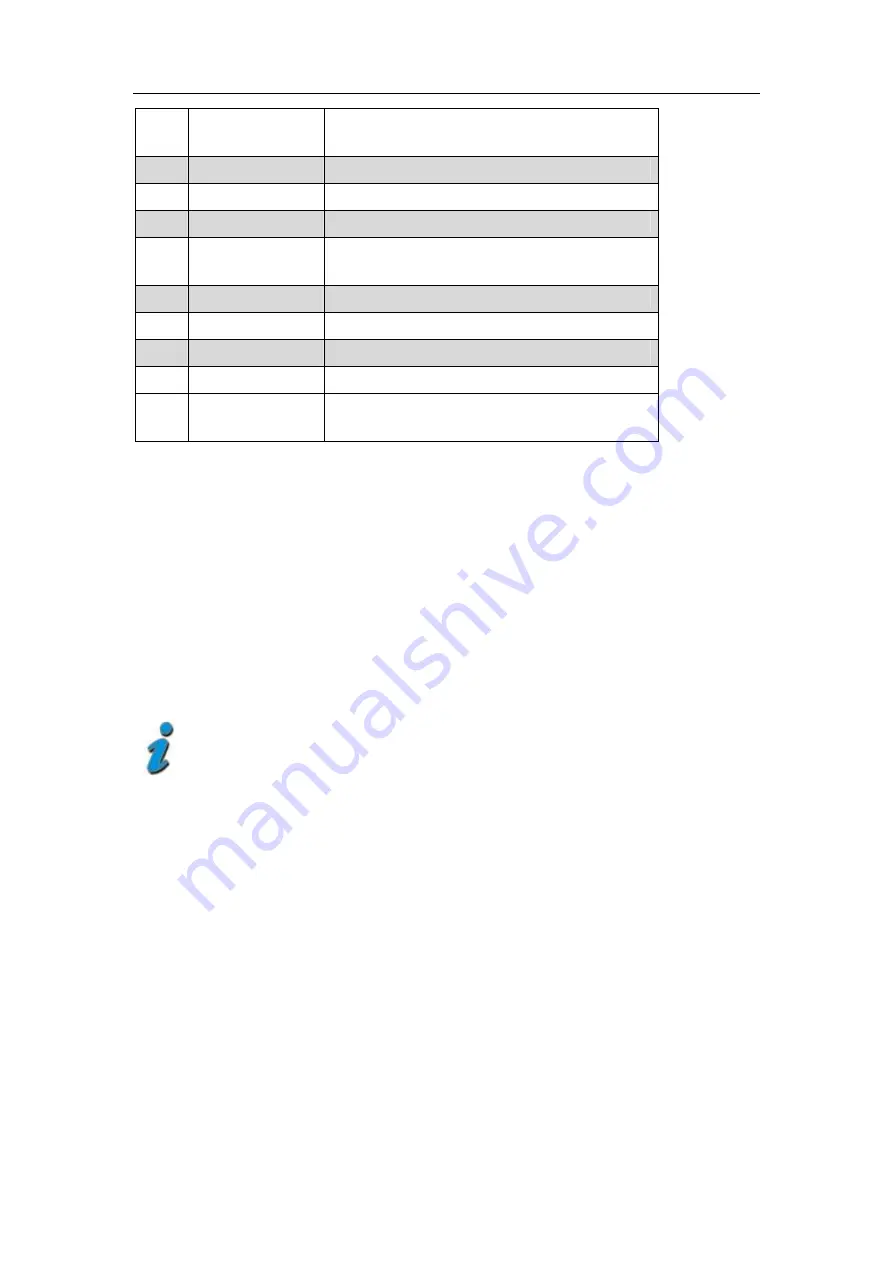
background image

STM8800 

        8 |ENG                                                 


FIND 

FIND menu: for a quick and easy alignment of 

a satellite antenna 

Menu 

Display the main menu 

10 

AV 

Switch AV input or out put setup 

11 

ANGLE 

Display the calculation menu 

12 

SYSTEM 

Configuration of all system parameter. 

Display current AV setup. 

13 

POWER 

Switch on the power on at 2-3 second 

14 

SCAN 

Display the auto scan menu 

15 

OFF 

Switch off the power   

16 

T/R 

Switch the TV or Radio program display 

17 

SPTRUM   

Display  the  menu  of  spectrum  (for  spectrum 

meter only) 


Start of operation 

Battery 

Before the first operation with the measuring device charge the battery completely. (see also 

chapter “Lithium-Ion battery” on page 10). 


Load the accumulator during the first loading procedure at least 5 

hours.   

The maximum battery charging time is approximately 12 hours. 

Switch-on the Device 

ð


Press 2-3 seconds the red power button on the meter. 


Summary of Contents for STM-8800

Page 1: ...FULL HD Combo Finder Meter STM 8800 HD DVB S2 S DVB T2 T Spectrum Meter User manual ...

Page 2: ...thium ions battery 9 Charging the battery 9 Storing of the batteries 9 System setting 10 Language Setup 10 Factory Default 11 Factory reset 11 Factory reset 11 Satellite finding 12 Finding channels manual 12 Lining satellite aerial up 13 T T2 finding 14 Finding channels manual 14 Lining T T2 antenna up 15 Installation 16 Satellite setting 16 Dish Set up 16 DiSEqC Setup 17 USB 19 File Viewer 19 Upd...

Page 3: ...STM8800 3 ENG Angle calculation 21 Spectrum 21 AV Setup 21 Disposal 24 Technical specifications 25 Warrenty 26 ...

Page 4: ...B connector which allows you to update software A carrying case serves as protection and for the transport It cares for better readability of the display at sunshine Safety instructions Attention Please read the safety instructions carefully before operating the device Please follow all warnings and instructions on the equipment and in the operating manual Safety of persons Ensure that nobody can ...

Page 5: ...antennas and satellite systems It is exclusively for this purpose and should only be used for this purpose Use the equipment only for the purpose which is described in this manual Follow all information in this manual particularly the safety instructions on page 4 Any other usage is rated as not properly and can result in damage or even injury There will be no liability for damages caused by a non...

Page 6: ... Connect this port to the satellite atn cable RF IN Not connect DC 14V Power supply port AV OUT Connect this port to TV S CVBS via AV cable HDMI Connect this port to TV HDMI port via HDMI cable AV IN Connect the port to other s CVBS Cable ...

Page 7: ... Off the measuring devise is switched off In charge Green The battery is charged Red The battery is full charged 4 LOCK LED LED lights when a signal is received 5 FUNCTION keys F1 shortcut key F2 shortcut key F3 shortcut key F4 shortcut key 5 1 22K 13V 18V L EDs Lights if 22K 13V 18V signals are received 6 6 1 Navigation cross OK Navigation through menus switching programs volume control OK button...

Page 8: ...ay the auto scan menu 15 OFF Switch off the power 16 T R Switch the TV or Radio program display 17 SPTRUM Display the menu of spectrum for spectrum meter only Start of operation Battery Before the first operation with the measuring device charge the battery completely see also chapter Lithium Ion battery on page 10 Load the accumulator during the first loading procedure at least 5 hours The maximu...

Page 9: ...he device is charged if it is switched off è Turn the device off if it is not already off è Connect the Euro main cable with the external AC adapter è Connect the external AC adapter to the power grid è Connect the AC adapter to the low voltage port at the bottom è The battery is charged as soon as you connect the AC adapter to the meter The Power LED shows the battery status Red the battery is ch...

Page 10: ...onfirm your selection using the OK button Figure 2 System setting language Setup Press the SYSTEM button to change the menu language _ Select the point Language setup _ Choose your desired language using the or button _ After your selection press the EXIT button and follow the instructions on ...

Page 11: ...fault Press the SYSTEM button to change the menu language _ Select the point Factory Default _ Press OK to make the factory setting Factory reset Attention All programs and settings configured by you will be reset to delivery status ...

Page 12: ...llite finding In this menu you have the option to search for single channels or using the display for lining a satellite dish up ð Press the FIND button to display the Satellite Finding menu ð ð Figure 4 Satellite Finding ...

Page 13: ...th and quality In addition C N FEC and a BER MER are displayed In addition an acoustic signal is represented Notice The satellite call sign see Figure 4 registers which satellite you receive at the moment At some satellites as for example Türksat a wrong satellite call sign is cosent on single transponders hence the announcement can be falsified Therefore we recommend to leave the setting on the p...

Page 14: ...manual Figure 6 T T2 Finding è Press the T T2 Finder button to display the menu T T2 finding è Press the or button to select Scan method at Manual Auto è Press the or button to select Kind of service at All services Only free services Only encrypted services è Press the or or 0 9 NUMBERIC button to select Select channel frequency at 177 5MHz 858MHz è Press the or button to choose Bandwidth at 6MHz...

Page 15: ...gth and quality In addition C N SNR PowerLevel and a BER after BER are displayed In addition an acoustic signal is represented Notice The satellite call sign see Figure 7 registers which frequency you receive at the moment At some frequency as for example 474MHz 8M a wrong frequency call sign is cosent on single transponders hence the announcement can be falsified Therefore we recommend to leave t...

Page 16: ... value the better The BER value behind 10E is important The higher the better The value should be minimal 10E 4 The optimum is 10E 6 Installation Satellite setting _ Press the MENU button to display the main menu _ Press the or button to move the cursor _ Select the point INSTALLATION and press the OK button Figure 5 Satellite setup _ Select the point Dish Setup and press the OK button ...

Page 17: ...9750 10600 Univ LNB2 9750 10750 UNICABLE 5150 9750 10750 11300 10700 _22K AUTO ON OFF _LNB power LNB Tension Off Auto 13V 18V _DiSEqC Level DiSEqC 1 0 _DiSEqC 1 0 Switch Input 1 2 3 4 _DiSEqC 1 2 To enter the DisEqc1 2 Menu _SCAN you can scan the channels at this menu by press SCAN key _Finder To enter the finder menu _ANGLE To enter the Angle menu _Press F2 to enter the DiSEqC1 2 menu _Select Sat...

Page 18: ... positon _F2 To Expert motor settings _ Select the point Satellites Setup and press the OK button Figure 6 Satellites Setup _Select Satellite Satellite select _Name Satellite name _Orb pos Deg Satellite Degree _West East control the antenna turn to West or East _F1 press F1 to enter the Dish setup menu _F2 Add the new satellite _F3 Remove this satellite _Finder To enter the Finder menu _ANGLE Calc...

Page 19: ...the NIT Search button press the or button choose the NIT search at the ON OFF _ In the Kind of service button press the or button choose the Kind of service mode at the All services Only free services Only encrypted services _ In the TV Radio button press the or button choose TV Radio mode at the TV Only Radio Only TV Radio USB _ Press the USB button to display the Updating and Backup Data menu ...

Page 20: ...STM8800 20 ENG Figure 11 USB _Press the File viewer to play usb file _ Press the Updating button or use the updating the sw _ Press the Backup Data to backup data Figure 12 SW updating ...

Page 21: ... to display the Calculation menu _ Press the or button or use the NUMERIC keys to change the configuration of the selected menu point Figure 11 Angle Calculation _ Press the or button to select the following points Satellite Longitude Location Latitude Hemisphere Angle calculation ...

Page 22: ...r the completion of all values select Angle Calculation and press the OK button _Azimuth shows the azimuth of the chosen satellite _Elevation shows the angle of elevation of the chosen satellite _Polarity shows the polarity angle of the chosen satellite Spectrum Analyzer In this menu you can control the transponders over the whole spectrum è Press the finder menu to enter the S S2 Menu è choosing ...

Page 23: ... enter the AV Setup _Display format Press or button to choose the display format at 4 3 16 9 _Scaling method Press or button to choose the Scaling method at Pillar Letterbox Fullscreen zoom Fullscreen CCO Let TV scale _HDMI signal Press or button to choose the HDMI signal at 1808i 720p 480 576i 480 576p _SDTV standardt Press or button to choose theSDTV standard at PAL NTSC SECAM PAL M PAL N PAL N ...

Page 24: ...ardous to health and environment Therefore dispose of the device and the batteries immediately according to the prevailing statutory regulations Never throw the batteries in normal household waste Figure 16 WEEE Symbol Used devices contain valuable materials that should be recycled Electronic equipment is not household waste in accordance with directive 2002 96 EC OF THE EUROPEAN PARLIAMENT AND TH...

Page 25: ...0 Demodulator Front end modul QPSK 8PSK Symbol rate 1 5 Mbps bis 45 Mbps SCPC und MCPC Spectral inversion Auto conversion T2 Tuner input F type connector IEC 169 24 Frequency range 110 MHz 862 MHz RF Input Output impedance 75Ω Unbalance Demodulator Front end modul QPSK 16QAM 64QAM 256QAM FFT mode 1K 2K 4K 8K 16K 32K Channel Bandwidth 6MHz 7MHz 8MHz Corde Rate 1 2 3 5 2 3 3 4 4 5 5 6 Guard Internal...

Page 26: ...modul QPSK 16QAM 64QAM FFT mode 2K 8K Channel Bandwidth 6MHz 7MHz 8MHz Corde Rate 1 2 2 3 3 4 5 6 7 8 Guard Internal 1 4 1 8 1 16 1 32 SCPC und MCPC Spectral inversion Auto conversion System resource Processor FUJITSU MB86H60 Clock Frequency 324MHz DDRII System 64Mbyte DDRII Video 64Mbyte FLASH 16MByte Vide decoder Data rate up to 15 Mbit s Resolution 1080i 720p 576p 480p Video format PAL NTSC SEC...

Page 27: ...Video L Autio R Audio Power supply Supply voltage 14 V Li oN battery 3000 mA Charger 90 240 V Supply voltage charger 175 250 V 50 60 Hz Dimensions Length x width x height Gross weight 0 5 Kg Temperature Operating temperature 0 C to 40 C Storage temperature 40 C to 65 C Warranty ...

Reviews: