Chapter 3 - Hardware Installation
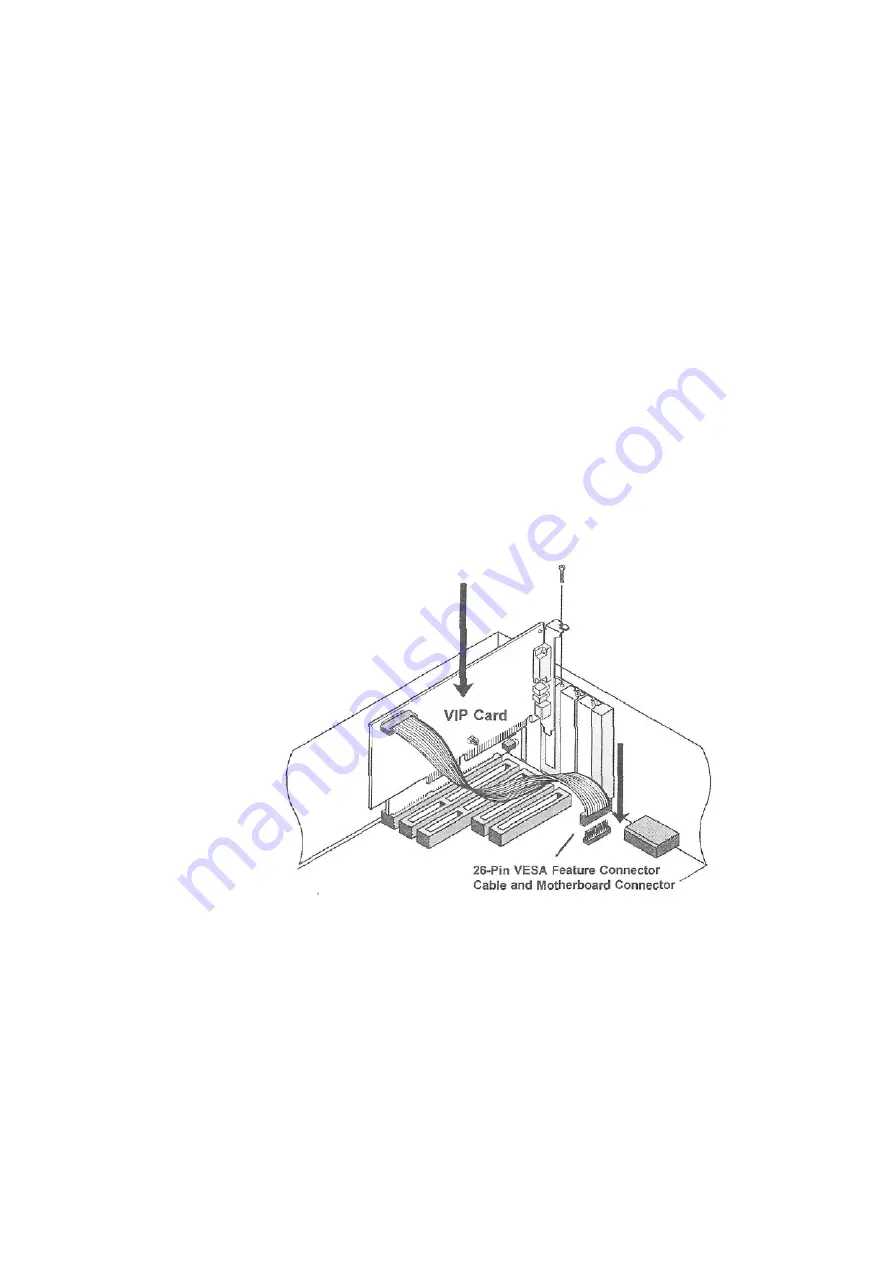
STEP 4 - Insert the VIP Card
□ Pick up the VIP Card and align it with the adapter slot you previously selected.
The end with the mounting cover and external connectors should line up with
the slot covering opening on the PC.
□ Insert the VIP Card into the selected slot and seat the edge connector fully by
pressing down evenly and firmly on the VIP Card until it snaps into place.
□ Fasten the VIP Card's mounting bracket to the computer chassis using the
screw you removed from the expansion slot cover previously.
□ Attach the free end of the VESA Feature Connector Cable to your computer's
Feature Connector. Make sure that "Pin 1" on the cable (indicated by the red
stripe) is attached to "Pin 1" on the connector (typically marked "1" on the
board) and that the cable is properly aligned on the connector. The illustration
below shows a typical motherboard connection.
Note: If your computer is equipped with a video adapter card, the cable would
instead be attached to the video card's VESA Feature Connector (see figure on page
3-2).
3-5
Summary of Contents for VFX1
Page 1: ......
Page 2: ...User s Manual...
Page 3: ...VFX1 HEADGEAR Virtual Reality System T M...
Page 4: ...FORTE Technologies Inc...
Page 10: ...SAFETY FIRST...
Page 15: ...Quick Install...
Page 17: ...viii...
Page 18: ...VFX1 HEADGEAR User s Manual...
Page 20: ...VFX1 HEADGEAR User s Manual x...
Page 24: ...VFX1 HEADGEAR User s Manual...
Page 27: ...Chapter 1 Introduction Figure 1 2 Putting on The VFX1 HEADGEAR...
Page 28: ...Figure 1 3 Removing The VFX1 HEADGEAR 1 5...
Page 29: ...VFX1 HEADGEAR User s Manual Using the CyberPuck...
Page 31: ...Turning the CyberPuck ON and OFF...
Page 33: ...1 6...
Page 35: ...VFX1 HEADGEAR User s Manual 1 8...
Page 39: ...2 2...
Page 40: ...CHAPTER 3 Hardware Installation Installing the VIP Card...
Page 42: ......
Page 45: ...VFX1 HEADGEAR User s Manual...
Page 47: ...3 4...
Page 57: ...VFX1 HEADGEAR User s Manual 4 6...
Page 69: ...VFX1 HEADGEAR User s Manual 5 12...
Page 80: ......


