FORM FIT HD 5M08 Installation Instructions Manual Download Page 3


Rev0.Oct 21, 2015


    Page 

3

 of 

6


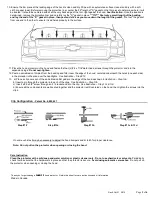
10. Ensure the trim piece at the leading edge of the hood is clean and dry. Wipe with an automotive surface cleaner and dry with a soft 

cloth or paper towel. Before removing the protective liner, center the 55

” length of “D” gasket on the trim piece to determine where it will 

be located. It should be centered and sit at the very back edge of the trim, right against the hood. 

See illustration. 

Once the location is 

determined, remove the protective liner and carefully lay the 

“D” gasket in place. 

***TIP*** Peel only a small length of the backing 

and lay the end of the “D” gasket in place, then peel and stick as you move down the length of the gasket. 

“Wet out” the gasket 

from one end to the other to ensure it is adhered properly to the surface.  


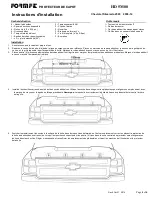
11. Place the hood protector on the hood and fasten the four (4)


# 8 x 7/16

”wafer head screws through the protector and into the 

expansion plugs. 

Do not over-tighten. 

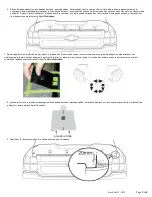
12. Peel an anti-abrasion film pad from the backing and fold it over the edge of the hood, centered underneath the holes (one each side) 

in the protector in the area over the headlights.  

See Illustration – Step #12. 

13.   a) Place a clip over each of the anti-abrasion film pads on the edge of the hood as shown in 

Illustration – Step 13a

  b) Insert a pin through the protector into each of the clips.  

See Illustration – Step 13b. 

c)  Insert a #6 x 5/8

’’ screw through an ‘L’- bracket and into the clip.  

See Illustration – Step 13c & 13d.  

d) Ensure all the components are well seated together and the protector is still centered on the hood, then tighten the screws into the 
clips. 


Clip Configuration 


On some vehicles it may be necessary to adjust the hood bumpers and/or latch for proper clearance. 
 

Note: Do not pull on the protector when opening or closing the hood. 


Care Instruction                         
Clean the protector with a mild soap and water solution or plastic cleaner only.  Do not use chemicals or solvents.

 Periodically 

check to make sure that the hardware is in place and that the protector is secure.  

Avoid using automatic car washes.

  Do not pull on 

the protector when opening or closing the hood. 


Thank you for purchasing a 

form fit

 hood protector.  Retain this sheet for care instructions and kit information. 


Made in Canada 


Step #13b 

Step #12 

Step #13a 

Step #13c & 13d 

- Patent No. 6,892,427


Summary of Contents for HD 5M08

Page 1: ...ng tape on the grill to mark the location of the adhesive backed pedestals Mark the masking tape with a pencil at the location as shown 5 Temporarily tape the pedestals to surface of the hood in their determined positions Confirm correct placement by placing the hood protector on top of the four pedestals When positioned correctly the four 4 holes in the center area of the protector will align wit...

Page 2: ...t of the pedestals will be easier See Illustration 7 Remove the protective film from the bottom of the pedestal and adhere to the hood surface by contacting the leading edge of the pedestal with it s location at the back of the grill surround and rotating into place on the hood surface Wet out surface of the pedestal to ensure complete contact of the adhesive with the surface of the hood See Illus...

Page 3: ... the holes one each side in the protector in the area over the headlights See Illustration Step 12 13 a Place a clip over each of the anti abrasion film pads on the edge of the hood as shown in Illustration Step 13a b Insert a pin through the protector into each of the clips See Illustration Step 13b c Insert a 6 x 5 8 screw through an L bracket and into the clip See Illustration Step 13c 13d d En...

Page 4: ...e 4 pièces supplémentaires de ruban adhésif sur la grille pour marquer l emplacement des adhésives piédestaux Marquez le ruban adhésif avec un crayon à l emplacement indiqué 5 Scotcher temporairement les socles à la surface de la hotte dans leurs positions déterminées Confirmez placement correct en plaçant la protection de la hotte au dessus des quatre socles Lorsqu il est positionné correctement ...

Page 5: ...ocles sera plus facile Voir l illustration 7 Retirer la pellicule de protection du bas du socle et d adhérer à la surface du capot en communiquant avec le bord d attaque du piédestal avec son emplacement à l arrière de l encadrement de grill et de rotation en place sur la surface du capot Humide de surface du socle pour assurer un contact complet de l adhésif avec la surface de la hotte Voir l ill...

Page 6: ...tion Étape 12 13 a Placez un clip sur chacun des plots de films anti abrasion sur le bord du capot comme indiqué dans l illustration Etape 13a b Insérez une épingle à travers le protecteur dans chacun des clips Voir Illustration Etape 13b c Insérer un 6 x 5 8 vis à travers un support L et dans le clip Voir Illustration Etape 13c et 13d d assurer que tous les composants sont bien assis ensemble et ...

Reviews: