INSTALLATION INSTRUCTIONS
BMW X3 HOOD PROTECTOR 2004-10
PART NUMBER :
HD 3A04
Hardware Kit
Tools Required
3 – 3M Anti-abrasion Film Pads
Phillips Screwdriver
2 – Large Bumpons
Tape Measure
3 – Clip Bodies
Knife/ Scissors
3 – Pins
3 – #6 x 5/8” Flat Head Screws
3 – ‘L’ Brackets
1 – Alcohol Wiping Pad
2 – Two Part Mounting Pedestals – 4 Total Pieces
– 2 are already installed on the protector
Installation
1.
Be sure that the hood is clean and dry inside and out. Release the hood, but do not open it.
2.
Use the pedestal-mounting template provided, to position the pedestals on the hood. Cut out area on the template that represents pedestals and
position on the hood by cutting the lines that represent the hood edges. Clean the hood in the area cut out in the paper template with the alcohol
wiping pad. Allow to dry.
3.
Peel the protective backing from the tape on the back of the pedestal and press the pedestal into place on the hood with the aid of the paper template.
Be sure the open end of the pedestal is facing forward. Press down firmly on each mounting pedestal to make sure they are properly adhered. Repeat
for the other side.
4.
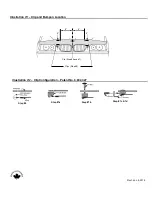
Install the bumpons as shown in Illustration #1. Attention: The bumpons must be installed on the hood, not on the protector!!! If the bumpons are
installed on the protector, they will wear through the paint.
5.
Position the protector on the hood by engaging the hooks on the pedestals attached to the protector with those on the pedestals installed on the hood.
Make sure that the protector is centered.
6.
Peel and fold an anti-abrasion film pad in half over the edge of the hood, underneath the middle holes in the protector. See Illustrations #1 & #2 – Step
#6.
7. a) Place a clip over each of the anti-abrasion film pads on the edge of the hood as shown below in Illustration #2 – Step #7a.
b) Insert a pin through the protector into each of the clips. See Illustration #2 – Step #7b.
c) Insert a #6 x 5/8’’ screw through an ‘L’- bracket and into the clip. See Illustration #2 – Step #7c & 7d.
d) Make sure all the components are well seated together, the protector is centered on the hood, then tighten the screws into the clips.
8. Repeat steps #4 and #5 for the other two (2) holes.
9.
On some vehicles it may be necessary to adjust the hood bumpers and/or latch for proper clearance.
Note: Do not pull on the protector when opening or closing the hood.
CARE INSTRUCTIONS
Clean the protector with a mild soap and water solution or plastic cleaner only. Do not use chemicals or solvents. Periodically check to make sure
the bumpons are in place and the protector is secure. Avoid using automatic car washes. Do not pull on protector when opening or closing the hood.
Pedestal Template


