background image

Appliance features | 

4

3.

Power connector

4.

Indicator lights

5.

WLAN ports

6.

VGA port (C1 model only)

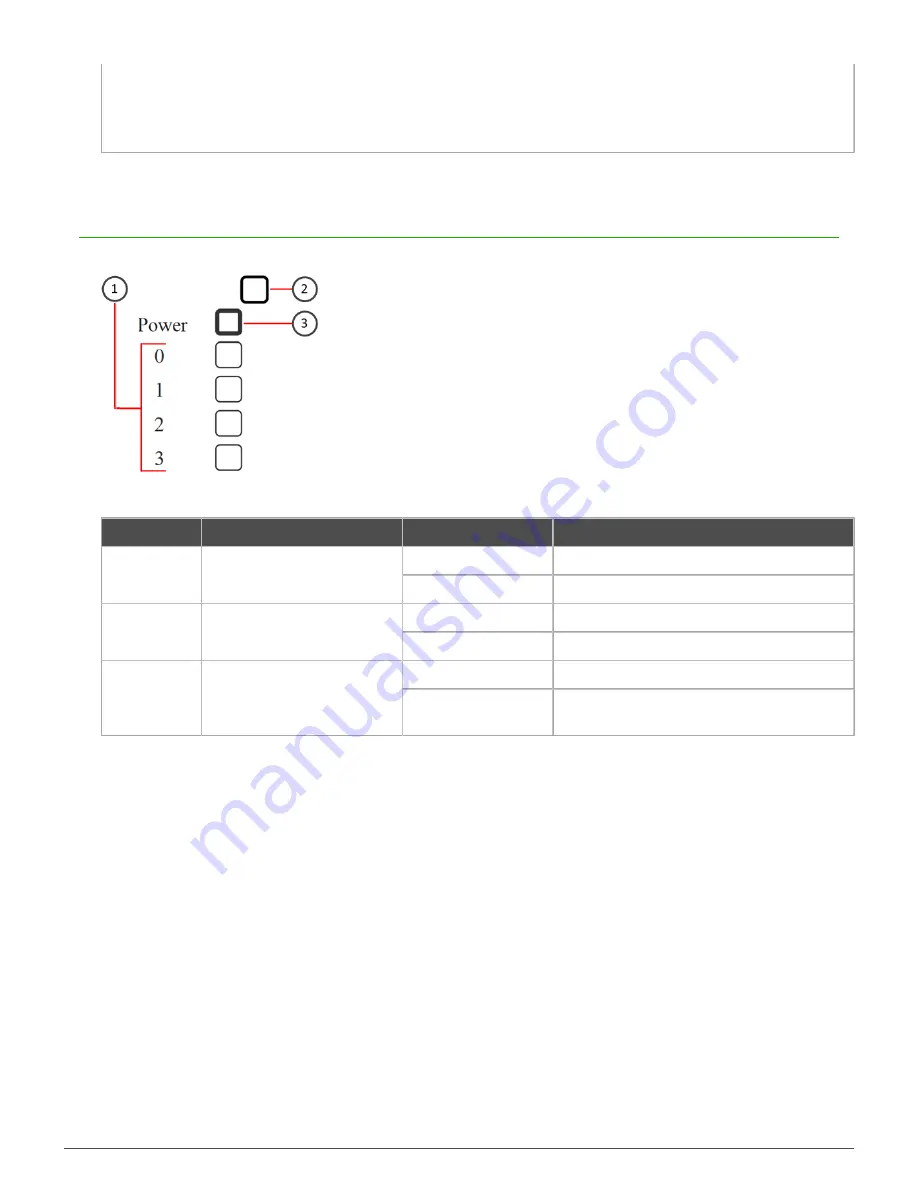
Indicator lights

The indicator lights show the appliance connection and activity status.

Figure 3: 320X appliance back panel indicator lights

Number

Indicator

Status

Definition

Unlit

No link.

1

Ethernet ports 0–3

Green

Link OK.

Unlit

The heating system is off.

2

Heating

Red

The heating system is on.

Unlit

No power is supplied.

3

Power

Green

Power is supplied to the power supply unit

and the system is operating normally.

The heating indicator light shows the status of the built-in heating system. The heating system is fully automatic

and the status does not affect using the appliance. The appliance can be switched on or off regardless of the

heating system status. See 

Safety precautions

.

Summary of Contents for Stonesoft 320X

Page 1: ...Stonesoft Next Generation Firewall Hardware Guide Model 320X Revision C...

Page 2: ...fety precautions 5 Electrical safety precautions 5 Power supply safety precautions 6 3 Install the appliance 7 Mount the appliance 7 Connect antennas and cables 8 4 Compliance information 11 Applied t...

Page 3: ...r lights Front panel The front panel contains the Ethernet ports and the USB ports Figure 1 320X appliance front panel 1 USB ports 2 Ethernet ports 0 3 Back panel The back panel contains connection po...

Page 4: ...ernet ports 0 3 Green Link OK Unlit The heating system is off 2 Heating Red The heating system is on Unlit No power is supplied 3 Power Green Power is supplied to the power supply unit and the system...

Page 5: ...it heats the internal parts of the appliance until the internal temperature rises above 0 C The status of the heating system does not affect the use of the appliance The appliance s back panel has an...

Page 6: ...ppliance must be used in a restricted access location and users must be well trained to operate it The outlet for the appliance must be installed near the appliance and be easily accessible The applia...

Page 7: ...ll or place the appliance on a horizontal surface such as a desk or rack shelf The appliance delivery includes mounting brackets and screws for attaching the brackets to the appliance Figure 4 320X ap...

Page 8: ...use autonegotiation fixed settings are not allowed at gigabit speeds Connect network and management cables Connect the appliance to your networks The management connection allows you to view the syste...

Page 9: ...all the WLAN antennas 1 Connect the two WLAN antennas to the two WLAN ports on the back panel of the appliance Tighten the knurled nuts at the base of the antennas to secure them firmly to the applian...

Page 10: ...S to ensure continuous operation and minimize the risk of damage to the appliance in case of sudden loss of power 1 Connect the power cable to the power connector on the back panel of the appliance 2...

Page 11: ...e policy on the engine Applied technologies The appliance uses these technologies Radio spectrum Sub bands 2400 2483 5 MHz 5150 5250 MHz 5250 5350 MHz and 5470 5725 MHz Safety Dual band products Elect...

Page 12: ...oint support website at https support forcepoint com There you can access product documentation Knowledge Base articles downloads cases and contact information Copyright 1996 2016 Forcepoint LLC Force...

Reviews: