background image

8

w w w. f o r c e 1 r c . c o m

QUICK-START GUIDE

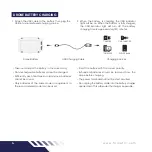
• Insert the drone battery and turn the drone on 

by pressing and holding the power button on the 

bottom of the drone.

• The transmitter will beep once to indicate it’s turned 

on and beep a second time when it’s paired with the 

drone. The red light will almost immediately turn solid.

• If you turn the transmitter on before you turn the 

drone on, the transmitter will beep twice and the 

red light will flash until you turn the drone on and the 

transmitter pairs with the drone.

• Once the drone and transmitter are paired, the light 

on the transmitter and the drone LEDs turn solid to 

indicate pairing was successful.

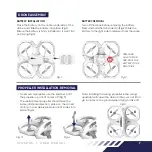
• Push the throttle and joystick to the inner bottom 

corners at the same time to calibrate the drone 

(Fig.7).  The  drone  lights  will  flash  green  and  once 

successful the front LEDs will turn blue and the back 

LEDs will turn white.

• 

Press  the  1-Key  lift/land  button  and  the  drone  will 

immediately start lifting (Fig.8).

• 

When you are done flying. Press the 1-Key lift/land 

button again to land the drone. (Fig.8).

NOTE:

Follow the Preflight Checklist steps below if your drone 

doesn’t start or isn’t performing properly.

• 

Before  flying  your  drone,  carefully  review  the  quick 

start guide above and the rest of the flight controls 

and functions outlined in this manual.

• See the troubleshooting guide on 

pg.14 and pg.15

• Make sure your drone and remote control batteries 

are fully charged.

• Make sure the connection between the drone and 

transmitter is solid.

• Make sure the propellers are installed correctly and 

the motors are working normally after unlocking.

Fig.6

Fig.7

Fig.8

Summary of Contents for UFO5000

Page 1: ...14 3 SPEED LED STUNT DRONE USER MANUAL...

Page 2: ...ents To avoid deformation overheating and damage store it out of direct sunlight and in a cool dry place Note According to Part 15 or the FCC Rules this device has been tested and meets the limits or...

Page 3: ...pets 5 If the battery is not going to be used for a period of time remove the battery from the drone to prevent potential damage or battery leakage and store in a fire safe lithium battery bag 6 The...

Page 4: ...harging Sources Take out and put the battery in the correct way Non rechargeable batteries cannot be charged Different types of batteries or old and new batteries cannot be mixed Only batteries of the...

Page 5: ...IES USB CHARGER 4 x PROPELLERS 2 x A 2 x B SCREWDRIVER SPANNER INSTRUCTION MANUAL BOX CONTENTS DRONE OVERVIEW FRONT PROPELLER A CLOCKWISE PROPELLER A CLOCKWISE PROPELLER B COUNTER CLOCKWISE PROPELLER...

Page 6: ...G PRESS AUTOROTATION 1 KEY LIFT LAND LONG PRESS DIRECTION TRIM HEADLESS MODE LONG PRESS EMERGENCY STOP Open the battery cover and insert 3 AAA batteries as shown below not included LED MODE BUTTON LON...

Page 7: ...n Fig 2 Slide the battery to the right side to release it from the drone To remove a propeller use the spanner to lift the propeller up until it comes off Fig 3 The replacement propeller should have t...

Page 8: ...om corners at the same time to calibrate the drone Fig 7 The drone lights will flash green and once successful the front LEDs will turn blue and the back LEDs will turn white Press the 1 Key lift land...

Page 9: ...to fly the drone down Push the DIRECTION CONTROL STICK up to fly the drone forward and pull DIRECTION CONTROL STICK down to fly the drone backward Move the DIRECTION CONTROL STICK to the left and move...

Page 10: ...and hold the DIRECTION TRIM button and push the direction stick to the right When the drone drifts right while flying press and hold the DIRECTION TRIM button and push the direction stick to the left...

Page 11: ...ig 12 Note Only execute flips when you have plenty of airspace The drone can only perform flips when it is at least 7 feet in the air The drone will drop in altitude when performing the flip This func...

Page 12: ...e speed mode may be changed during flight FUNCTIONS ROTATION Long press the rotation button to start the automatic rotation function Fig 13 If you want to end the rotation just push the direction cont...

Page 13: ...power is low This means you have 30 seconds to land your drone before you lose power FUNCTIONS HEADLESS MODE Headless Mode allows you to fly your drone without knowing its orientation because it will...

Page 14: ...e that the battery is inserted properly 2 Charge the batteries use fully charged batteries 3 Insert the battery again and ensure that they are connected properly The motor does not respond to the thro...

Page 15: ...peller s The drone continues to spin after making trim adjustments or the left right yaw speed is not consistent 1 The propellers are damaged 2 The drone battery level is too low 1 Replace the damaged...

Page 16: ...LEARN MORE ABOUT FORCE1 www force1rc com 3 SPEED LED STUNT DRONE...

Reviews: