background image

24 

12CI400A • 12HI400A

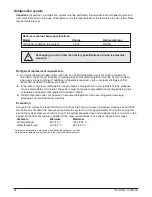
Refrigerant replacement requirements

1.  Non-contaminated refrigerant removed from any Follett refrigeration system can be recycled and 

returned to the same system after completing repairs. Recycled refrigerant must be stored in a clean, 

approved storage container. If additional refrigerant is required, virgin or reclaimed refrigerant that 

meets ARI standard 700-88 must be used.

2.  In the event of system contamination (for example, a compressor burn out, refrigerant leak, presence 

of non-condensibles or moisture), the system must be repaired, evacuated and recharged using virgin 
or reclaimed refrigerant that meets ARI standard 700-88.

3.  Follett Corporation does not approve of recovered refrigerants. Improper refrigeration servicing 

procedures will void the factory warranty.

Evacuation 
Evacuate the system to a level of 500 microns. When the 500 micron level is reached, close valves and both 
manifold and shut down the vacuum pump. Allow the system to sit for approximately 20 minutes. During this 
period the system pressure should not rise. If the system pressure rises and stabilizes there is moisture in the 
system and further evacuation is needed. If the pressure continues to rise check the system for leaks.

Ambients 

Minimum Maximum

Air temperature

1


50 F/10 C  

100 F/37.8 C

Water temperature

2


40 F/4.4 C  

90 F/32.2 C

1


Ambient air temperature is measured at the air-cooled condenser coil inlet.

2


Ambient water temperature is measured in the ice machine float reservoir.

R400 ice machine charge specifications
Model 

Charge 


Refrigerant type

12CI400A, 12HI400A (air-cooled)                     19 oz 


R404A


Recharging of unit at other than factory specifications will void ice machine   
warranty.

!

Refrigeration system

Important: All service on refrigeration system must be performed in accordance with all federal, state and 
local laws that pertain to the use of refrigerants. It is the responsibility of the technician to ensure that these 
requirements are met.

Summary of Contents for Symphony 12CI400A-L

Page 1: ...r available with or without drain pan Following installation please forward this manual to the appropriate operations person 12 Series Ice and Water Dispensers Order parts online www follettice com 12CI400A LI countertop ice only dispenser 12CI400A SI countertop ice only dispenser with SensorSAFE infrared dispensing 208595R21 801 Church Lane Easton PA 18040 USA Toll free 877 612 5086 1 610 252 730...

Page 2: ...e dispenser models with lever dispensing 25 Troubleshooting the dispenser models with SensorSAFE infrared dispensing 26 Ice machine troubleshooting chart 27 Ice machine troubleshooting chart 28 Disassembly and replacement instructions 29 Panel removal 31 Fan removal 31 Thermostat and ice transport tube replacement 32 Replacement parts 33 Dispenser exterior 33 Wheelmotor and drive system 34 Dispens...

Page 3: ...roblem Before you begin After uncrating and removing all packing material inspect the equipment for concealed shipping damage If damage is found notify the shipper immediately and contact Follett Corporation so that we can help in the filing of a claim if necessary Check your paperwork to determine which model you have Follett model numbers are designed to provide information about the type and ca...

Page 4: ...mp 90 F 32 C Max 40 F 4 C Min Best performance below 21 C 70 F Water pressure 70 P S I 5Bar Max 10 P S I 0 7 Bar Min Plumbing 12CI400A 12HI400A Dispenser drain 3 4 FPT 3 4 FPT Water inlet 3 8 FPT 3 8 FPT Note Water shut off recommended within 10 ft 3m of dispenser Drain to be hard piped and insulated Maintain at least 1 4 per foot 20mm per 1m run of slope Ventilation clearances 6 153mm on right si...

Page 5: ...m 102mm 39mm 305mm 305mm 366mm 407mm 21mm 2 51mm 16 14 4 12 0 8 1 5 12 15 9 18 4 1 26mm Fig 1 Counter information 0 437 12 mm diameter Installation Before you begin All dispensers must be installed level in both directions to ensure proper operation Service and ventilation clearances 6 153 mm on right side of dispenser 6 153 mm at top for ventilation and 12 305 mm at top recommended for service Co...

Page 6: ...nts Fig 2 Bottom exiting utilities countertop units Fig 4 bottom panel assembly 1 Carefully tip dispenser back to expose underside and block up in place 2 Screw legs shipped taped to drain pan of dispenser into dispenser bottom taking care to seat legs securely against underside of dispenser 3 Attach bottom panel and hardware to bottom of dispenser with supplied screws Fig 4 4 Position unit in des...

Page 7: ... of sufficient strength fasteners not included see Fig 6 5 Rough in water and drain lines Fig 10 6 Lift dispenser onto support bracket positioning unit so that hook on back of dispenser is captured by support bracket angle Fig 7 7 Install two 2 supplied 3 8 16NC screws through bottom of support bracket into bottom of dispenser Fig 5 Slotted holes in support bracket allow you to adjust and level th...

Page 8: ...all mounting dimensions bottom of dispenser outline of dispenser Caution Do NOT rest dispenser weight on bottom of support bracket minimum distance to sink front 19 375 49 3 cm 32 82 6 cm 22 625 57 5 cm 23 5 59 5 cm 18 5 47 0 cm 18 45 7 cm max SUPPORT BRACKET Fig 7 Wall mount side view Installing wall mount dispensers ...

Page 9: ... shown water and drain tubing 407 mm 3 254 mm 3 5 3 77 mm 1 25 32 mm MAX 77 mm 89 mm 77 mm MIN 0 88 23 mm MIN 16 10 3 3 77 mm wall nut support bracket screw bottom panel 3 4 FPT drain 3 8 OD push in water inlet Fig 8 Wall mount unit bottom panel assembly Fig 9 Wall mount bottom view Fig 10 Front view of wall mount bracket utility location Side view of utilities exiting wall ...

Page 10: ...ks Follett s SensorSAFE infrared dispensing maximizes sanitation and minimizes the possibility of cross contamination by eliminating physical contact between the cup or container and dispenser Sensors in the panel use reflected infrared light to detect the presence of the container and send a signal to a control board which then activates the appropriate components for ice or water dispensing The ...

Page 11: ...Frequency Drain Line weekly Drain Pan Drip Pan weekly Exterior as needed Condenser monthly air cooled only Dispenser and Components semi annually Ice Machine semi annually Transport Tube semi annually Ice Storage Area Bin semi annually Ice machine and dispenser must be cleaned and sanitized prior to start up Weekly CAUTION Do not use solvents abrasive cleaners metal scrapers or sharp objects to cl...

Page 12: ...x 4 Turn compressor switch on electrical box of ice machine to OFF position 5 Remove water reservoir cover and close water supply valve or block up reservoir float 6 Drain water from reservoir by releasing evaporator drain tube from float reservoir bracket removing plug from drain tube and releasing unclamping pinch clamp if equipped 7 Plug drain hose replace drain line in reservoir bracket and po...

Page 13: ...e from storage hopper 27 Ensure power is disconnected Remove ice storage hopper cover 28 Remove center thumbscrew locking plate two wingnuts and backing plate from front of storage hopper see Page 29 29 Remove threaded rod agitator baffle and wheel in this sequence see Page 29 30 Remove and disassemble if applicable dispense chutes 31 Thoroughly wipe hopper lid dispense wheel baffle inside of stor...

Page 14: ...aporator This ice is continuously removed by a slowly rotating 12 RPM auger The auger carries the ice upward into the cavity formed by the top bearing housing and the compression loop where it is compressed to remove excess water When the ice reaches the desired hardness it rotates within the cavity and is forced through a discharge port and compression nozzle and into the ice transport tube The d...

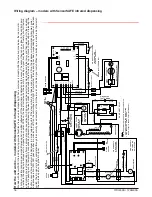
Page 15: ...OMPRESSOR BLACK 14 WHITE 16 FAN START RELAY YELLOW BLACK GEAR MOTOR BLUE BLACK 18 BLACK 19 WHITE 15 BLACK 20 VAC LINE RED 20 RED 20 24 VAC GREEN 12 WHEEL 4 GREEN BLACK 24 1 21 RED BLACK 25 WHITE 26 BLACK WHITE 8 7 BLACK 13 6 5 SAFETY SWITCH HIGH PRESSURE RED 46 4 3 2 1 WHITE 11 BLACK 10 GREEN 27 x SENSOR WATER DRIVE FAN L2 COMP L2 SOFTWARE I D L2 L2 L2 L1 L1 EARTH I D LABEL B E 2ND 60M WTR B T 20M...

Page 16: ...e normally closed contacts of the bin thermostat and the bin signal switch When ice builds up around the bin thermostat the contacts open cutting the bin signal 801 Church Lane Easton PA 18040 USA For service call Toll free 877 612 5086 or 1 610 252 7301 On the web www follettice com 208580R05 12 Series with SensorSAFE SOL WTR NEUTRAL CLN WM PWR WTR L1 GND ICE COMM SWITCH COMP MOUNTED ON WATER COM...

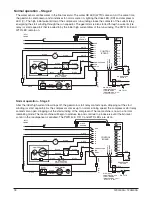
Page 17: ...0 seconds no reaction will occur GRD L1 L1 L2 L2 L2 L2 L2 COMPRESSOR FAN DRIVE DR C 20M 60M 2ND WTR B T B E RESET GRD G B W FAN BLACK WHITE BLACK BLACK R ORANGE S S L COMPRESSOR C RED BLACK BLACK WHITE INPUT POWER WATER SENSOR CONTROL BOARD BLACK 24V COMMON LINE VAC RED RED WHITE BLACK BIN T STAT BIN SIGNAL FROM DISPENSER JUNCTION BOX MCD400A WVS series blk wire is on 24V WHITE RED WHITE M 1 COMPR...

Page 18: ... PWR BLACK T O L BLACK RED HIGH PRESSURE SAFETY SWITCH M WHITE WHITE BLUE RELAY START T O L BLACK 4 2 3 YELLOW GEAR MOTOR START RUN GRD L1 L1 L2 L2 L2 L2 L2 COMPRESSOR FAN DRIVE DR C 20M 60M 2ND WTR B T B E RESET GRD G B W FAN BLACK WHITE BLACK BLACK R ORANGE S S L COMPRESSOR C RED BLACK BLACK WHITE INPUT POWER WATER SENSOR CONTROL BOARD BLACK 24V COMMON LINE VAC RED RED WHITE BLACK BIN T STAT BIN...

Page 19: ...2 COMPRESSOR FAN DRIVE DR C 20M 60M 2ND WTR B T B E RESET GRD G B W FAN BLACK WHITE BLACK BLACK R ORANGE S S L COMPRESSOR C RED BLACK BLACK INPUT POWER WATER SENSOR CONTROL BOARD 24V COMMON LINE VAC RED RED WHITE BLACK BIN T STAT BIN SIGNAL FROM DISPENSER JUNCTION BOX MCD400A WVS series blk wire is on 24V WHITE RED WHITE M 1 COMPRESSOR SWITCH PWR BLACK T O L BLACK RED HIGH PRESSURE SAFETY SWITCH M...

Page 20: ...eries blk wire is on 24V WHITE RED WHITE M 1 COMPRESSOR SWITCH PWR BLACK T O L BLACK RED HIGH PRESSURE SAFETY SWITCH M WHITE BLACK BLUE RELAY START T O L BLACK 4 2 3 YELLOW GEAR MOTOR START RUN WHITE GRD L1 L1 L2 L2 L2 L2 L2 COMPRESSOR FAN DRIVE DR C 20M 60M 2ND WTR B T B E RESET GRD G B W FAN BLACK WHITE BLACK BLACK R ORANGE S S L COMPRESSOR C RED BLACK BLACK INPUT POWER WATER SENSOR CONTROL BOAR...

Page 21: ...M 1 COMPRESSOR SWITCH PWR BLACK T O L BLACK RED HIGH PRESSURE SAFETY SWITCH M WHITE BLACK BLUE RELAY START T O L BLACK 4 2 3 YELLOW GEAR MOTOR START RUN WHITE GRD L1 L1 L2 L2 L2 L2 L2 COMPRESSOR FAN DRIVE DR C 20M 60M 2ND WTR B T B E RESET GRD G B W FAN BLACK WHITE BLACK BLACK R ORANGE S S L COMPRESSOR C RED BLACK BLACK INPUT POWER WATER SENSOR CONTROL BOARD 24V COMMON LINE VAC RED RED WHITE BLACK...

Page 22: ...iagnostic sequence Stage 10 If the water level in the float reservoir drops to an unacceptable level the WTR LED goes out shutting the ice machine off Also the BT LED comes on preventing the ice machine from restarting for twenty minutes If water is restored the WTR LED comes back on and flashes to alert the technician that water to ice machine has been lost The ice machine restarts at the end of ...

Page 23: ...ooled icemaker capacity 24 hrs Table 2 Compressor data Compressor current draw Air cooled Ambient air temp 60 F 15 6 C 70 F 21 1 C 80 F 26 7 C 90 F 32 2 C 100 F 37 8 C 6 3A 6 5A 6 7A 6 9A 7 1A Locked rotor amps 58 8 Table 3 Gearmotor data Gearmotor current 2 25A nominal Locked rotor amps 14A Ambient air temperature F C Icemaker inlet water temperature F C F C 50 10 70 21 90 32 60 16 174 23 174 23 ...

Page 24: ...el is reached close valves and both manifold and shut down the vacuum pump Allow the system to sit for approximately 20 minutes During this period the system pressure should not rise If the system pressure rises and stabilizes there is moisture in the system and further evacuation is needed If the pressure continues to rise check the system for leaks Ambients Minimum Maximum Air temperature1 50 F ...

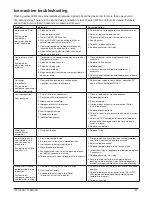
Page 25: ...ion Does not dispense ice 1 Power switch off or faulty 2 Faulty dispense switch 3 Wheel motor malfunction 1 Check switch turn on or replace if faulty 2 Replace switch 3 Check motor and capacitor and replace Dispense wheel rotates continuously Dispense switch contacts are burned out Replace dispense switch Ice machine runs continuously Faulty or incorrectly positioned bin stat Check for proper posi...

Page 26: ...uired see lens sensor troubleshooting ON OFF OFF If there is power on any output terminal 9WTR or WM on control board replace board Board guide LEDs when illuminated indicate the following PWR board power CLN cleaning no dispensing cycle ICE ice dispensing activated WTR water dispensing activated Terminals LI incoming power hot L2 neutral terminals WTR power terminal for water solenoid WM power te...

Page 27: ...1 Dirty air filter or condenser coil 2 Restricted air flow to condenser coil 3 Mineral coated evaporator 4 Improper exhaust air provisions 5 Faulty expansion valve 6 Low refrigerant charge 7 Superheat incorrect 8 Inefficient compressor 1 Clean or replace filter clean condenser 2 Remove obstruction 3 Clean evaporator 4 Provide proper exhaust air provisions per Follett installation manual 5 Replace ...

Page 28: ...n manual 5 Replace compressor Unit runs but not making ice System status compressor gearmotor fan motor running 1 Clogged or dirty air filter or condenser coil 2 Compressor not pumping 3 Low refrigerant charge 1 Clean or replace filter clean condenser coil 2 Replace compressor 3 Check for leaks repair evacuate and weigh in correct charge Compressor and fan motor will not run Gearmotor runs 1 Compr...

Page 29: ... this sequence Wheelmotor removal 1 Remove dispense wheel and drive bar see above 2 Remove four 4 hopper support plate mounting screws and washers Fig 11 1 3 Move hopper assembly 1 2 13 mm to left 4 Remove four 4 dispenser motor bracket mounting screws and washers Fig 11 2 5 Short shaft motors only loosen only two 2 lower screws on drive coupling and remove from motor shaft Fig 11 3 6 Remove four ...

Page 30: ...e compression nozzle from evaporator port Evaporator reassembly 1 Clean gearmotor boss output shaft and shaft well 2 Install drain pan and evaporator mounting base 3 Fill gear motor shaft well with food grade grease 4 Install condensate shield and seat against gear motor boss 5 Install bearing O ring in groove in evaporator mounting base 6 Lower bottom bearing assembly into evaporator mounting bas...

Page 31: ...oward back of unit and pull fan assembly toward front of unit c As fan assembly is being pulled toward front rotate assembly clockwise as shown above Fan removal Side panels Remove screw located on lower rear side Pull side panel toward front of unit and out of back panel Note Before removing right hand side remove side louver panel by lifting up and pulling forward on panel Front cover Pull botto...

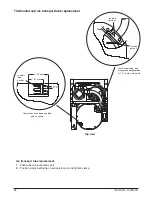
Page 32: ...eplacement Ice transport tube tube may extend a maximum of 1 4 6 mm into ice bin Top view 25 ice tube gasket ice tube retainer 50 TYP 3 76 mm capillary tube bracket Ice transport tube replacement 1 Push tube onto evaporator port 2 Position clamp behind lip on evaporator port and tighten clamp 2 51 mm ...

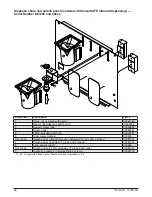
Page 33: ... inlet brass 502415 Not shown Fitting water inlet plastic 502924 7 Fitting water inlet brass 3 8 FPT 00137315 8 Lid top panel plastic serial numbers below D61292 502884 8 Lid top panel plastic serial numbers D61292 and above 00967091 9 Panel right side 502396 10 Panel left side 502395 11 Drain tube assembly wall mount w drain pan 502422 12 Drain tube assembly countertop 502391 13 Elbow water 3 8 1...

Page 34: ...Retainer ice tube 2 25 high 00152017 See page 32 Retainer ice tube 00977314 See page 32 Gasket ice tube 502405 See page 32 Gasket ice tube 00977322 9 Assembly hopper with Agion includes drain fitting 502413 10 Float valve and reservoir 500504 Not shown Bar spacer 502389 Not shown Fitting hopper drain includes nut 5 8 barb fitting 502381 11 Fitting hopper drain 3 4 MPT 3 4 barb fitting 207095 12 Sw...

Page 35: ...0682 3 Lever 00976845 4 Boot dispense switch button 502418 5 Screw panel 00982421 6 Switch dispense 00981217 7 Bracket lever support 00958793 8 Tube water solenoid 502420 9 Fitting bulkhead with nut 00976787 Not shown Splash panel ice only 00977850 10 Splash panel 00969980 11 Solenoid assembly includes fittings screws 00981209 1 Disclaimer Antimicrobial protection is limited to the treated compone...

Page 36: ... panel without drain pan includes 2 Ty raps and 2 lenses 00981357 7 Splash panel includes 2 Ty raps and 2 lenses 00981332 8 Lens sensor each 502690 Not shown Splash panel ice only includes 1 Ty raps and 1 lens 00981340 9 Solenoid assembly includes fittings screws 00981209 Ty rap is a registered trademark of Thomas Betts International Inc 7 8 8 2 2 1 1 6 5 4 3 5 Dispense chute and splash panel mode...

Page 37: ...th Agion 00981233 2 Chute clear water 502249 3 Lever 502417 4 Thumbscrew 501100 5 Switch dispense 502409 6 Boot dispense switch button mounts over the dispense button 502418 7 Fastener dispense chute assembly 502057 8 Screws dispense lever 501250 9 O ring 502427 10 Fitting 1 4 tube 502561 11 Fitting 3 8 tube 502562 12 Support bracket solenoid 502419 13 Valve solenoid water 502243 14 Tube water sol...

Page 38: ...bly includes solenoid fittings tube mounting bracket see page 37 for exploded view 502421 7 Lens sensor each 502690 8 Ty rap sensor mounting 203611 9 Splash panel with drain pan includes 2 203611 and 2 502690 502675 10 Fastener dispense chute assembly 502057 Not shown Splash panel without drain pan includes 2 503611 and 2 502690 502676 Not shown Splash panel ice only includes 1 503611 and 1 502690...

Page 39: ... REMOVED CAUTION HAZARDOUS MOVING OPERATE UNIT WITH PARTS DO NOT PANELS REMOVED OPERATE UNIT WITH 20 21 5 6 8 7 10 24 1 23 12 14 13 16 25 9 11 15 27 28 18 22 29 29 29 2 17 27 26 19 28 3 4 Rear view Right side view Left side view Top view lower section ...

Page 40: ...motor 501188 15 Overload compressor 115 V 60 Hz 502782 16 Compressor 115 V 60 Hz 502731 17 Water line with Agion evaporator 00141432 18 Tubing polypropylene reservoir supply sold by the foot 502079 19 Bracket float valve 502383 20 Tube ice transport 00168112 21 Insulation ice tube 12 305 mm required 501176 22 Bracket gearmotor mounting 307192 23 Cord and plug power 502776 24 Hi pressure cut out 50...

Page 41: ...588 3 Board control circuit 115 V 60 Hz 502331 4 Water sensor 502116 5 Switch on off compressor 502392 6 Switch rocker power 502209 7 Switch rocker bin signal 502209 8 Switch cleaning SensorSAFE models 502409 9 Control board SensorSAFE models 502242 10 Bin thermostat 500514 7 6 5 8 3 4 9 1 2 10 4 Side view Top view Electrical components ...

Page 42: ...rew Allen 1 4 20 x 1 2 set of 4 501080 11 Mounting base evap includes 501063 502733 12 Bolt mounting base 502227 13 Gearbox motor includes 307192 00142034 Not shown Mounting base gearbox 502729 15 Compression nozzle with single drain 502221 16 Drain pan evaporator 502727 17 Clamp compression nozzle and screw 502226 18 Tubing compression nozzle drain s sold by foot 500680 Not shown Grease Mobil FM ...

Page 43: ...e filter cartridge pre filter single 00130211 Not shown Water pre filter cartridge pre filter carton of 12 00954305 Carbonless high capacity filter system Not shown Carbonless high capacity water filter system one per ice machine Horizon and Maestro series ice machines 01050442 Not shown Carbonless high capacity water filter cartridge primary single 01050426 Not shown Carbonless high capacity wate...

Page 44: ...hurch Lane Easton PA 18040 USA Toll free 877 612 5086 1 610 252 7301 www follettice com SafeCLEAN SensorSAFE and Symphony are trademarks of Follett Corporation Follett and RIDE are registered trademarks of Follett Corporation registered in US ...

Reviews: