


6-1
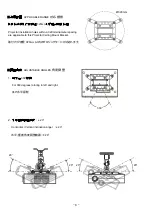
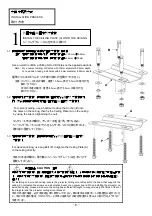
將投影機調整至最適位置後,請務必將投影機架上所有的螺絲與螺帽鎖緊固定,確保投影機架每個零件都緊密的結
合。
Adjust the Projector to the desired angle and position. Make sure all screws and bolts are tightened very firmly and
every part of the ceiling mount bracket is assembled very rigidly.
天吊り金具の各部品が確実に結合することを確保するため、プロジェクターがお好みの位置に調整した後、必ず使用さ
れたネジ及び、ナット全体をしっかりと締付けて固定してください。
6-2
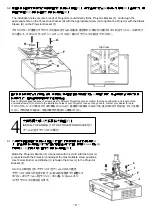
調整水平旋轉後,請鎖緊螺帽。
After horizontal adjustment, please tighten the nut.
水平回転させた後、ナットをしっかりと締付けてください。
6-3
調整投影機左右角度後,請鎖緊螺帽。
After adjusting the angle, please tighten the nut.
左右角度を調整した後、ナットをしっかりと締付けてください。
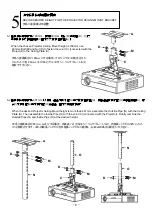
調整投影機角度與鎖緊各處螺絲。
ADJUST THE ANGLE OF PROEJCTOR AND RIGHTEN ALL SCREWS AND BOLTS
プロジェクター角度調整のち確実にネジを締付
6
鎖緊
TIGHTEN
しっかりと締付
鎖緊
TIGHTEN
しっかりと締付
- 10 -


