background image

four channel microphone preamplifier

p a g e  

5

The Red 1 provides four independent microphone

preamplifiers, each available as a separate channel. 

The design of the Red 1 also allows it to be used for

stereo recording - see the section 

Recording in Stereo

.

Controls

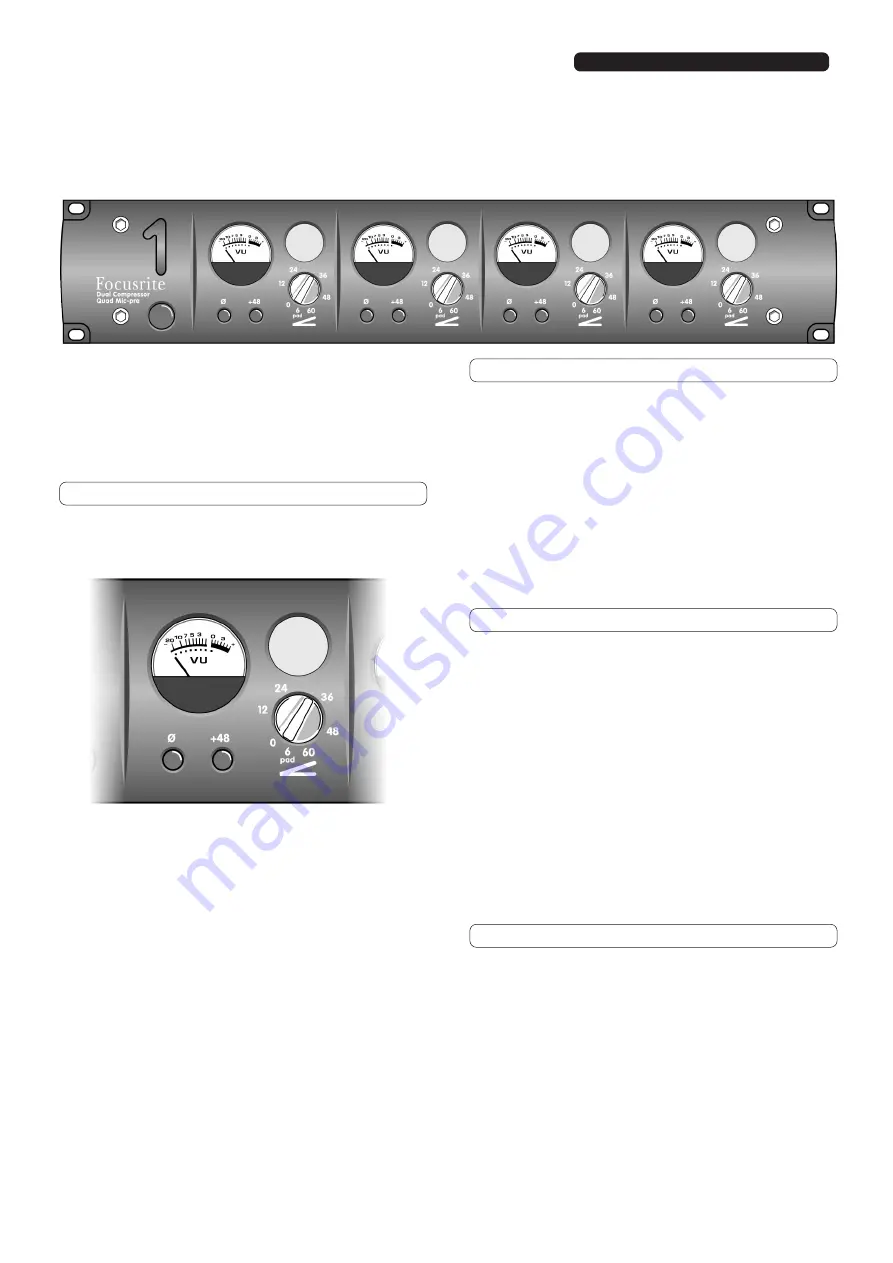
Each of the four channels on the Red 1 is identical,
and has the controls shown in the diagram.

The gain control is switched, and has 12 positions. The
first position gives -6 dB gain, in other words it
attenuates (reduces the volume of) the signal, and is
for use with microphones that have very high output
levels. Each subsequent position increases the gain by 6
dB, up to a maximum of  60 dB.

Ø is the phase button, and reverses the phase of the
channel when lit. 

+48 is the phantom power button. When lit, it provides
phantom power to the microphone connected to the
channel.

Setting the Gain

Use the meter and gain control to match the incoming
level and gain to the internal operating level. With an
input signal coming into the channel, watch the meter
as you use the gain control to modify the gain, and set
the gain control so that the meter registers between -4
VU and 0 VU. This sets the level to give the maximum
signal to noise ratio, whilst leaving room for any
sudden increase in performance level (it gives about 20
dB of usable headroom).

Setting the Phase

When recording a single source using more than one
microphone then you need to ensure that you do not
put your two close microphones out of phase with the
ambient microphone.

If you think two signals are out of phase, listen for
phase as follows:

1. On your monitor system, pan one signal to the left
and the other to the right.

2. Use the phase switch to reverse the phase on one of
the signals. When the two signals are in phase, the
signal sounds bigger

Recording in Stereo

Since the gain controls on the Red 1 are switched,

accuracy between channels is very closely matched.

When recording with a matched pair of stereo

microphones, put them through separate channels of

the Red 1 and set the gain controls for both channels

to the same position.

Red 1 

four channel microphone preamplifier

Summary of Contents for Red 1

Page 1: ...Red Range Manual featuring Red 1 3 7 8...

Page 2: ...ns of those people who buy and use them To ensure this is the case I would ask you to go online to www focusrite com and register your product This will help us to monitor customer reaction and also e...

Page 3: ...ective product This warranty is in addition to your statutory rights This warranty does not cover any of the following Carriage to and from the dealer or factory for inspection or warranty Consequenti...

Page 4: ...d Attack and Release Setting the Attack Rate Setting the Release Rate Make up Gain Gain Change 14 dB Limiter Using the Key Input Compressing and Limiting a Stereo Signal Compensating for a Quiet Signa...

Page 5: ...tor In this case the module is preset to the local supply voltage which is clearly marked on the rear of the module Check that the voltage is set correctly Power Consumption The processing modules dra...

Page 6: ...input signal coming into the channel watch the meter as you use the gain control to modify the gain and set the gain control so that the meter registers between 4 VU and 0 VU This sets the level to g...

Page 7: ...ults easily If this is the case try using samples instead if you have access to them or record your own track uncompressed and then play it back through the Red 3 There are two separate parts to the R...

Page 8: ...of the medium The Controls The ratio and threshold controls set the amount of compression applied to the signal The attack and release controls set the duration of the compression The make up gain se...

Page 9: ...signal returns below the threshold The release rate is probably the most important variable when recording rock music since it controls loudness Loudness is determined by the maintenance of high mean...

Page 10: ...h the key input Note that the key input signal is not output from the unit it is the original input that is compressed but compression is applied as if the key input signal were being compressed For e...

Page 11: ...nge so that you can monitor the effect of compression 2 Reduce the threshold and monitor the effect this has on the sound Listen to the reduction in the dynamic range Watch the meter to see the amount...

Page 12: ...meter The red switch to the left of the meter activates the mic level input and allows you to use the mic gain control next to it The green switch to the right of the meter activates the line level i...

Page 13: ...ts of the frequency spectrum Move the control until you start compressing the frequency range containing the sibilance or start amplifying the frequency range you want to restore with the exciter High...

Page 14: ...ou open the module Warning Do not attempt to investigate fuse failure in a Red 5 Power Amplifier without first consulting your dealer or the factory The fuses in a power amplifier are the safety devic...

Page 15: ...page 14 notes...

Page 16: ...Focusrite Audio Engineering Ltd Lincoln Road Cressex Business Park High Wycombe Bucks HP12 3FX England Phone 44 0 1494 462246 email sales focusrite com Website www focusrite com...

Reviews: