

The TN 47 tweeter has been designed
for flush mounting or surface
mounting positioning, using the two
fixing kits provided. The choice of
install position is extremely important
to deliver the best performance
and to maintain integration into the
system. This is a major factor for
high frequency SPL, and stability of
the acoustics, stereophonic imaging,
and overall staging. Please check the
drawing to understand this further.
The standard recommendation for an
ideal stereo system is to ensure the
tweeters “left” and “right” are installed
in the same positions. Also they are
approximately at equal distance to the
driver (vice-versa for the passenger).
The various positions advised should
be verified and comparisons made,
for ideal positioning.
The tweeter should always be
positioned ahead of the normal
listening
position.
The
main
preferences are the ends of the
dashboard
(fig. A, 1)
, close to the
windshield
(fig. A, 2)
. Normally
easy for installation. The location
close to the door mirror
(fig. A, 3)
is also regarded as a good position,
and normally only a light installation
is required. Last, another position,
high in the doors
(fig. A, 4)
is also
acceptable even if it is not considered
as the best for optimised staging.
It is imperative to check before any
installation is attempted, that enough
space is available (especially for flush-
mounting applications). Also make
sure that there will be no interference
with security devices air-bags, door
latches etc.
Installation and positioning
Tweeter installation
Tweeter installation
Woofer installation
Recommendations
K2 Power woofers have been
designed for a multitude of vehicles
installations. It is worth understanding
the basic requirements for installing
such products. These woofers are
capable of delivering enormous
amounts of energy, during their
positive / negative movement.
Therefore, it is imperative that they are
fixed securely to the desired location.
The fixing location should also be
strengthened where necessary.
Panels should be strengthened to
eliminate any unwanted vibrations.
Such vibrations will drastically reduce
the overall performance. These drive
units should be fixed and sealed to
the baffle or location panel. The use
of the foam gasket is advisable for
correct air sealing.
For added performance and to better
reduce such unwanted vibrations
and any other acoustical losses, we
recommend the use of “Plain Chant”.
Easily positioned behind the woofer,
on the metal-work of the vehicle,
“Plain Chant” soaks up vibrations as
well as acoustic reflections.
Beforehand
always
ensure
that
enough space is available for the
magnet assembly so that it doesn’t
interfere with safety mechanisms or
any other parts.
In the case of not using the grilles
supplied, it is important to ensure the
speakers fit correctly. Ensuring there is
enough depth behind the speaker has
already been explained, but thought
must also be given for the forward
movement of the cone and surround
assembly.
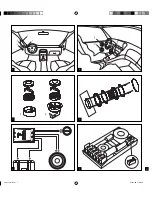
Surface-mounting
The flush-mounting fixing kit supplied
offers two possibilities for installing
the TN47 in an angle of 10°/30°.
This allows more flexibility for the
installation
(fig. C, 1)
.
Fix the assembly using the two screws
provided. Thread the cable from the
tweeter, through the back.
Then decide the defined angle and
lock in place on the support.
Flush-mounting
(highly recommended)
Cut a perfectly round hole of 45mm
(1.77“). Push in the support and
ensure it remains flat on the surface.
Ensure it is locked in place with the
screws supplied. Thread the cable
from the tweeter, through the back.
Then decide the defined angle and
lock the tweeter in place on the
support. To lock in place, insert the
key provided, and turn until locked
securely
(fig. C,2)
.
08
notice 130 165 kf 8
21/01/05, 17:36:33


