background image

Assembly Instructions

Assembly of lower handle to hood (A)

1. Place the ends of the lower handle into the slots 
2. Secure lower handle to hood by firmly pushing fix-

ing pin through holes in hood and handle 

(A1)

.

3. Repeat on the other side.

NOTE

Should a problem occur when securing handle with
the fixing pin, carefully lever the pin out of location
and repeat steps 1 to 3 above.

Fitting Upper Handles to Lower Handles (B)

1. Ensure the upper handle is located correctly with

the lock-off button on the switchbox uppermost.

2. Ensure the upper handle and the lower handle are

aligned correctly.

3. Insert the nut into the handle knob.
4. Fit the bolts, washers and handle knobs.
5. Fit the cable to the handles with the clips provided

making sure the cable is not trapped between the
upper and lower handles.

Cable clips (C)

1. Fit the cable to the handles with the clips provided.
2. Ensure the the cable is secured under the clip on

the hood.

A

C

Starting and Stopping

Starting

1. Form loop in mains cable and push the loop

through the slot as illustrated in picture 

(D)

.

2. To secure, position loop over the hook and pull the

cable back through the slot as illustrated in picture

(E)

.

3. Connect plug to mains.
4. To prevent a ring being cut in your lawn and to

clear any residual grass in the collection chute, tilt
your lawnmower slightly 

(F)

.  

• The switchbox is provided with a lock-off but-

ton (G1) to prevent accidental starting.

5. Press and hold the lock-off button 

(G)

on the

switchbox, then squeeze one of the Start/Stop
levers towards the upper handle 

(H)

.

6. Continue to squeeze the start/stop lever towards

the upper handle and release the lock-off button.

7. When the product has reached full speed gently

lower it onto the lawn.

• NOTE  There are two start/stop levers fitted.

Either one can be used for starting the prod-
uct.

• IMPORTANT  Do not use the start/stop levers

intermittently

Stopping

1. To prevent a ring being cut in your lawn, tilt your

product slightly 

(F)

.

2. Release the pressure on the Start/Stop lever.

1

B

lock-off

button

bolt

washer

handle

knob

nut

D

F

G

H

E

1

Summary of Contents for Trmmer

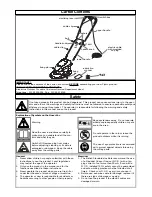
Page 1: ...IMPORTANT INFORMATION Read before use retain for future reference For all customer enquiries or for replacement parts contact 01325 300303 www flymo com eop customer services electrolux co uk Hover Vac ...

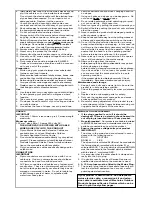
Page 2: ...doors while it is raining The use of eye protection is recommend ed to protect against objects thrown by the cutting parts General 1 Never allow children or people unfamiliar with these instructions to use the product Local regulations may restrict the age of the operator 2 Only use the product in the manner and for the functions described in these instructions 3 Never operate the product when you...

Page 3: ...Use only Flymo replacement cable 10 Always wind cable carefully avoiding kinking 11 Never carry the product by the cable 12 Never pull on the cable to disconnect any of the plugs 13 Use only on AC mains supply voltage shown on the product rating label 14 Our products are double insulated to EN60335 Under no circumstance should an earth be connect ed to any part of the product Preparation 1 While u...

Page 4: ... hood A C Starting and Stopping Starting 1 Form loop in mains cable and push the loop through the slot as illustrated in picture D 2 To secure position loop over the hook and pull the cable back through the slot as illustrated in picture E 3 Connect plug to mains 4 To prevent a ring being cut in your lawn and to clear any residual grass in the collection chute tilt your lawnmower slightly F The sw...

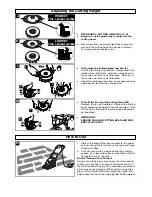
Page 5: ... the Cutting Head M Replace the fan as illustrated Replace the cutting head adjusting the height of cut as required Hold the fan firmly and twist the cutting head clockwise as illustrated IMPORTANT ENSURE FAN AND CUTTING HEAD ARE COR RECTLY LOCATED 1 Start at the edge of the lawn nearest to the power point so the cable is laid out on the lawn you have already cut N 2 Cut your grass twice a week du...

Page 6: ...ting Turn your product upside down 1 Push plastic cutter towards centre of cutting disc Lift plastic cutter away from cutting head T 2 If the plastic cutter is broken during use lever cut ter out of the slot and dispose of carefully 3 Fit new plastic cutters into the slots at each side of the cutting head and pull into place V IMPORTANT ENSURE PLASTIC CUTTERS ARE CORRECTLY LOCATED R S V T cutting ...

Page 7: ...cessary for work to be carried out by your Service Centre it is important to take your complete machine including cable and any extension cables used A network of specialist dealers can be found in your local Yellow Pages To obtain service on your Flymo product simply telephone or visit your local Service Centre Should you require service under the terms of our guarantee the Service Centre will re...

Page 8: ...sed by Electrolux Outdoor Products f The machine has not been used for hire g The machine is owned by the original purchaser h The machine has not been used commercially This guarantee is additional to and in no way diminishes the customers statutory rights Failures due to the following are not covered therefore it is important that you read the instructions contained in this Operator s Manual and...

Reviews: