

3
g
S
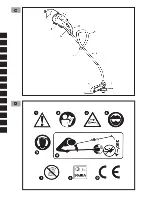
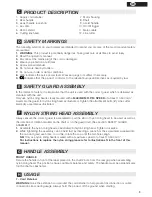
PRODUCT DESCRIPTION
1. Supply cord retainer
7. Motor housing
2. Rear handle
8. Shaft
3. Assist handle lock knob
9. Assist handle
4. Air vents
10. On/Off trigger
5. Debris shield
11. Mains cable
6. Cutting line head
12. Line cutter
T
SAFETY MARKINGS
The following symbols on your trimmer are intended to remind you of some of the most important safety
precautions:
1. WARNING.
This product is potentially dangerous. Take great care at all times to avoid injury.
2.
Read the operator’s manual.
3.
Disconnect the mains plug if the cord is damaged.
4.
Wear eye protection at all times.
5.
Approved ear defender.
6.
Do not work near bystanders.
7.
Do not use in rain or damp conditions.
8.
LWA indicates the noise power level. Wear ear plugs or mufflers if necessary.
9.
indicates that the product conforms to the relevant European Directives as required by law.
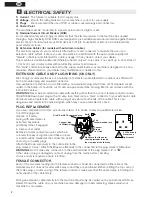
U
SAFETY GUARD ASSEMBLY
In the interest of safety, it is imperative that the unit is used with the correct guard which is delivered as
standard with the unit.
Only use nylon string heads clearly marked with a
MAXIMUM R.P.M. SPEED
of at least 10,500 min
-1
.
Assemble the guard for nylon string head as illustrated. Tighten the attachment bolts (
V
). Line cutter
blade (
L
): assemble as illustrated.
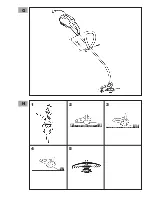
V
NYLON STRING HEAD ASSEMBLY
Always ensure the correct guard is assembled to suit the kind of nylon string head to be used as well as
the direction of rotation marked on the shaft or on the guard itself. (See section: SAFETY GUARD
ASSEMBLY).
1.
Assemble the nylon string head as illustrated: b) Nylon string head. Tighten clockwise.
2.
While tightening the assembly can be held fast by inserting a wrench or the screwdriver supplied into
the cap and gearcase holes; to do this, rotate the cap until the two holes align.
NB.
Only use nylon string heads marked with a maximum speed of at least 10.500 min
-1
.
For instructions to replace the nylon string please refer to illustrations N in the front of this
manual.
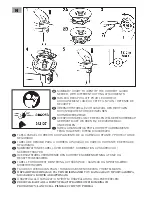
W
HANDLE ASSEMBLY
FRONT HANDLE
Secure the handle in front of the label placed on the shaft 25 cm from the rear grip when assembling
nylon string head. This position ensures optimum balance and safety. The handle must be perpendicular
too the shaft as illustrated.
X
USAGE
1 - Cord Retainer
WARNING:
Hook the extension cord around the cord retainer to help prevent disconnection or cable
connection stress during usage. Always hold the product off the ground when starting.


