background image

Logix

®

 420 Digital Positioner FCD LGENIM0106-07-AQ – 10/15

22

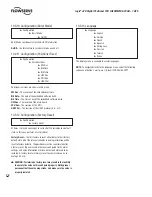
10.3 Menu Features

10.3.1 Status


► 

Status 


► 

Command (mA) 


► C

ommand (%) 


► 

Position (%) 


► T

emperature 


► 

Valve Cycles 


► 

Valve Travel (%)

The Status menu is used to view information about the configuration 
and operation of the system.

Command

 displays the final command in mA.  

Command

 displays the final command in %.  

Position

 displays the valve position in %.  

Temperature

 displays the temperature inside the positioner. 

Valve Cycles

 are counted each time the positioner changes direction. 

The movement must be beyond a dead-band window. This window is 
set to 0.5% as a default, but can be changed using the DTM. 

Valve Travel

 is counted in small increments every time the valve moves 

beyond the dead-band window. The travel is displayed in % of full 
stroke.

10.3.2 Alerts and Alarms


► 

Alerts and Alarms 


► 

Current Alarms (Prioritized) 


► 

Event History 


► 

Last Event 


► 

2nd Event 


► 

3rd Event 


► 

32nd Event

The Alerts and Alarms menu shows current and past alarms, warnings, 
alerts, and calibrations.

Current Alarms

 displays all events that are actively sounding.  

Event History

 displays past 32 events including alarms, warnings, 

alerts, and calibrations. The event that occurred most recently is 
displayed first (event 32) with later events recorded below.

10.2.3 Partial Stroke Test


► 

Partial Stroke Test 


► 

Start 


► 

Last Result

The Partial Stroke Test (PST) menu provides the user the ability to start 
a PST and see the results of the latest PST.

CAUTION: Performing a Partial Stroke Test will result in valve 

movement and the inability to operate the valve until the test 
is complete. Notify proper personnel that the valve may stroke, 
and make sure the valve is properly isolated if required by plant 
procedures.

Start 

allows the user to initialize the (PST).  

Last Result

 shows “Pass” or “Fail” from the last PST attempt.

10.3.4 Calibration


► 

Calibration 


► 

Stroke/Quick Calibration 


► 

Command Input Calibration 


► 

Calibration Dates

The Calibration menu allows the user to calibrate the positioner’s 
sensors. The positioner can accurately control with only a Quick-Cal. 
Typically this is all that is needed. A friction calibration is recommended 
if the positioner has been upgraded to Pro diagnostics. See section 8 
STARTUP for more details. 

CAUTION: Performing a calibration may result in valve movement 

and the inability to operate the valve until the calibration is 
complete. Notify proper personnel that the valve may stroke, and 
make sure the valve is properly isolated before proceeding.

Stroke/Quick Calibration

 starts an automatic calibration of the position 

feedback sensor. The stroke calibration determines the closed (0%) 
and open (100%) positions of the valve and gathers information 
about the response of the valve (such as valve stroke time) in order to 
determine the gains. The gains are then set automatically. After a stroke 
calibration, the positioner is ready to control. See section 8.4 STROKE 
CALIBRATION for more information.  

Command Input Calibration

 is used to adjust the input range. Set the 

lowest current (Set 0%) and the highest current (Set 100%) that will be 
used. The default input range is 4 to 20 mA. The “Set 0%” value must 
be lower than the “Set 100% value. 

Summary of Contents for Logix 420

Page 1: ...Experience In Motion Installation Operation Maintenance Safety Manual USER INSTRUCTIONS Logix 420 Digital Positioner FCD LGENIM0106 07 AQ 10 15 ...

Page 2: ...Y SAFE OPERATION 14 8 STARTUP 15 8 1 QUICK START INSTRUCTIONS 15 8 2 LOCAL USER INTERFACE OVERVIEW 15 8 3 CONFIGURATION SWITCH SETTINGS 15 8 4 STROKE CALIBRATION 16 9 POSITIONER FUNCTIONS NO DISPLAY REQUIRED 18 9 1 LIVE MANUAL TUNING ADJUSTING THE GAIN 18 9 2 LOCAL CONTROL OF VALVE POSITION 18 9 3 COMMAND SOURCE RESET 18 9 4 FACTORY RESET 19 9 5 VIEWING VERSION NUMBERS 18 10 POSITIONER FUNCTIONS L...

Page 3: ... Protective Clothing FLOWSERVE positioners use high pressure gas to operate Use eye protection when working around pressurized equipment Follow proper procedures for working with natural gas if it is used DANGER Standard industry safety practices must be adhered to when working on this or any process control product Specifi cally personal protective equipment must be used as warranted 1 4 Qualifie...

Page 4: ... Figure 1 shows a schematic of a Logix 420 positioner installed on a single acting linear actuator for air to open action 1 9 HART The Logix 420 receives power from the two wire 4 20 mA input signal However since this positioner utilizes HART communications two sources can be used for the command signal Analog and Digital In Analog source the 4 20 mA signal is used for the command source In Digita...

Page 5: ...r decreases the poppet valve moves up or down respectively The Hall effect sensor transmits the position of the poppet back to the inner loop electronics for control purposes 1 14 Detailed Sequence of Positioner Operations A more detailed example explains the control function Assume the unit is configured as follows Unit is in Analog command source Custom characterization is disabled therefore cha...

Page 6: ...der painted aluminum EN AC AlSi12 Fe Soft Goods Fluorosilicone Weight of Base Positioner Without Accessories With LCD and Glass Cover 2 70 kg 5 95 lb With Solid Cover 3 11 kg 6 85 lb 2 4 Pneumatic Output Table 4 Pneumatic Output Output Pressure Range 0 to 100 of air supply pressure Output Air Capacity Single Acting Relay 9 06 Nm h 1 5 bar 5 33 SCFM 22 PSI 20 8 Nm h 4 1 bar 12 2 SCFM 60 PSI 2 5 Str...

Page 7: ...Note Reference installation drawing 291780 0 WARNING Covers must be properly installed in order to maintain environmental ratings Special Conditions for Safe Use The equipment must be installed in such a manner as to minimize the risk of impact or friction with other metal surfaces To avoid possibility of static discharge clean only with a damp cloth For Intrinsically Safe installations the positi...

Page 8: ...e for corrosion or deterioration before using these products Fire protection for FLOWSERVE products must be provided by the end user 4 2 Unpacking While unpacking the valve and or Logix 500MD positioner check the packing list against the materials received Lists describing the system and accessories are included in each shipping container In the event of shipping damage contact the shipper immedia...

Page 9: ...tches accordingly See section 8 STARTUP 10 Press the QUICK CAL ACCEPT button for three to four seconds or until the positioner begins to move The positioner will now perform a stroke calibration 1 CAUTION Performing a Stroke Calibration will cause full movement of the valve in both directions 11 If the calibration was successful the green LED will blink GGGG or GGGY and the valve will be in contro...

Page 10: ...hes and QUICK CAL ACCEPT button 7 Refer to sticker on main board cover and set DIP switches accord ingly See section 8 STARTUP 8 Press the QUICK CAL ACCEPT button for three to four seconds or until the positioner begins to move The positioner will now perform a stroke calibration 9 If the calibration was successful the green LED will blink GGGG or GGGY and the valve will be in control mode 10 If c...

Page 11: ...upply pressure is higher than the maximum actuator pressure rating a supply regulator is required to lower the pressure to the actuator s maximum rating 6 3 Vented Design A standard Logix 420 positioner is vented directly to the atmosphere When supply air is substituted with sweet natural gas piping must be used to route the exhausted natural gas to a safe environment The exhaust port is located o...

Page 12: ... maximum loop current The operating current range is from 3 8 to 24 mA In order to determine if the loop will support the Logix 420 perform the calculation in Equation 1 The Available Voltage must be greater than 10VDC in order to support the Logix 420 Also see Table 1 Input Signal Equation 1 Available Voltage Controller Voltage Currentmax Currentmax Rbarrier Rwire Example DCS Controller Voltage 1...

Page 13: ...owable cable length In order to calculate the maximum network capacitance use the following formula Equation 2 In order to calculate the maximum cable length use the following formula Equation 3 To control cable resistance 24 AWG cable should be used for runs less than 5000 feet For cable runs longer than 5000 feet 20 AWG cable should be used The input loop current signal to the Logix 420 digital ...

Page 14: ...gnetic EM fields found in typical industrial environments Care should be taken to prevent the positioner from being used in environments with excessively high EM field strengths greater than 10 V m Portable EM devices such as hand held two way radios should not be used within 30 cm of the device Ensure proper wiring and shielding techniques of the control lines and route control lines away from el...

Page 15: ...figuration Switch settings are activated only by performing a Stroke calibration pressing the QUICK CAL button for 3 seconds However the Configuration Switch settings may be edited from the DTM or Handheld at any time 8 3 1 Air Action Switch This must be set to match the configuration of the valve actuator mechanical tubing connection since the tubing determines the air action of the system ATO In...

Page 16: ...utton to accept the 100 location See section 8 4 STROKE CALIBRATION for more details 8 3 6 Valve Stability Switch This switch adjusts the position control algorithm of the positioner for use with low friction control valves or high friction automated valves Lo Friction Placing the switch to Lo Friction optimizes the response for low friction high performance control valves This setting provides fo...

Page 17: ...vide a more active response In most cases selecting E will give the best results This is the default setting for all actuator sizes Raising or lowering the Selectable GAIN Switch setting is a function of the positioner valve response to the control signal and is not actuator size dependent Standard Preset Gains If standard preset gains are desired set the Auto Tune Configuration Switch to Off Afte...

Page 18: ... about 3 seconds The Up down buttons can then be used to position the valve While in this mode the LED s will flash a GRRY green red red yellow sequence To exit the local control mode and return to normal operation briefly press the ACCEPT QUICK CAL button 1 CAUTION When operating using local control of the valve the valve will not respond to external commands Notify proper personnel that the valv...

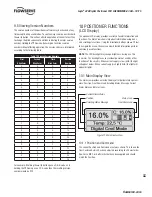
Page 19: ...n the resulting version number would be 2 12 10 POSITIONER FUNCTIONS LCD Display The optional LCD display provides a variety of useful information and functions The Main View shows important information using icons and scrolling status lines Using the directional buttons to navigate the menu the user can view detailed information perform commonly used functions NOTE The LCD backlight may change br...

Page 20: ...cation currently in progress Command Source Icons The positioner is in Analog Command mode if it is using the 4 20 mA signal to control the location of the valve In Digital Command mode the positioner ignores the 4 20 command and responds to the position command given through HART In Out Of Service mode the positioner is performing a calibration signature partial stroke test or is in a factory res...

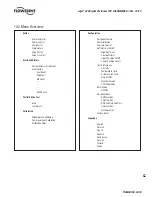
Page 21: ...uick Calibration Command Input Calibration Calibration Dates Configuration Positioner Tuning Characterization Pressure Control Soft Limits Cutoff High Soft Limit Low Soft Limit Upper Position Cutoff Lower Position Cutoff User Preferences All Units Temperature Units Actuator Area Units Date Format Number Format LCD Orientation Burst Mode ON OFF Positioner Revs EC Major Rev EC Minor Rev EC Build Dat...

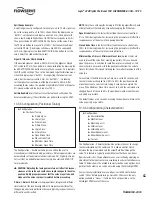
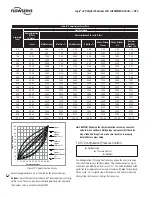
Page 22: ...Test will result in valve movement and the inability to operate the valve until the test is complete Notify proper personnel that the valve may stroke and make sure the valve is properly isolated if required by plant procedures Start allows the user to initialize the PST Last Result shows Pass or Fail from the last PST attempt 10 3 4 Calibration Calibration Stroke Quick Calibration Command Input C...

Page 23: ...ial elements of the feedback algorithm These gains are different for the opening and closing directions because typically responsiveness is different in each direction NOTE Only those with specific training in PID tuning algorithms should attempt to adjust the tuning by manually changing the PID values Open Stroke Time is the fastest time it took the valve to stroke from 0 to 100 during Quick Cal ...

Page 24: ...k Shear Stream Linear Shear Stream Custom Default Linear 0 0 0 00 0 00 0 00 0 00 0 00 0 00 0 00 0 00 5 0 5 00 6 50 1 00 13 00 4 00 25 00 8 00 0 62 10 0 10 00 11 60 2 00 20 00 6 00 35 00 14 00 1 35 15 0 15 00 16 20 3 00 26 25 7 80 44 00 17 00 2 22 20 0 20 00 20 50 4 40 32 10 9 30 50 20 21 00 3 25 25 0 25 00 24 60 5 80 37 50 11 50 55 50 24 00 4 47 30 0 30 00 28 50 7 40 42 60 14 00 60 20 27 50 5 91 3...

Page 25: ...htly close or open the valve It is used when a tight seal is needed or when debris or friction may otherwise interfere with complete closure When the valve is commanded past the Shutoff points the pilot relay will direct full supply pressure to the appropriate port applying all available force to close or open the valve The Shutoff points apply to the Final Command 1 CAUTION Changing the Shutoff l...

Page 26: ...all of the variables to a default state In this case perform a Factory Reset Factory Reset Use this feature to reset all variables to their factory default state All of the internal variables including calibration will be reset to factory defaults The positioner must be re calibrated after a factory reset Tag names and other user configured limits alarm settings and valve information will also be ...

Page 27: ... Handheld Communicator The Device Description DD files can be obtained from the HART Communication Foundation or from your Flowserve representative 11 3 Burst Mode Burst Mode is available with a handheld device In the menu of the handheld select the Burst Mode feature under the Configuration Menu NOTE The DTM will not function while the positioner is in Burst Mode 11 4 Changing HART Versions The L...

Page 28: ...rformed according to this manual Ensure tubing is configured to the actuator so that the fail safe state of the positioner matches the desired fail safe state of the valve 12 5 Required Configuration Settings The following user settable options must be properly configured for the individual application in order to provide the designed safety integrity for that application Calibrate the analog inpu...

Page 29: ...lication and has moved to that position within the allowed time This tests for failures that could prevent the closure of the valve including electronic and mechanical faults as well as valve faults 3 Inspect the Logix 420 Digital Positioner for any visible damage or contamination 4 Remove the bypass from the safety PLC or otherwise restore normal operation When the tests listed above are executed...

Page 30: ...e outer cover 3 Disconnect the power to the positioner 4 Remove the inner cover by removing the 3 retaining screws 5 Gently lift the main board rotating the bottom up while keeping the top in place 6 Disconnect the hall sensor cable the piezo cable and the feedback cable Use a small flat screwdriver to press in the locking features and carefully separate the connector from the main board Be carefu...

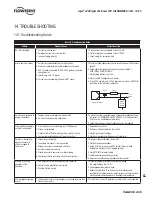
Page 31: ...osition reading is not what is expected 1 Stem position sensor mounting is off 180 degrees 2 Stroke not calibrated 3 Tight shutoff MPC Minimum position cutoff is active 4 Custom characterization or soft stops are active 1 Reposition the sensor 2 Perform a Stroke calibration Quick Cal 3 Verify Tight Shutoff settings 4 Verify custom characterization or soft stop limits Position is driven fully open ...

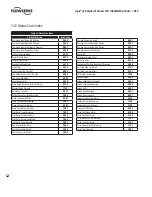
Page 32: ...es Warning YGGY Pilot Relay Response Alarm RRGG Pilot Relay Response Warning YRGG Pilot Relay Travel Warning YGGY Position Deviation Alarm RRRR Position High Limit Alert YGGG Position Low Limit Alert YGGG Position Range Too Small RGGY Position Sensor Above ADC Range RGGY Position Sensor Below ADC Range RGGY Position Sensor Failure Alarm RYRG Power ON GGGG Setting Inner Loop Offset GRGY Settle Time...

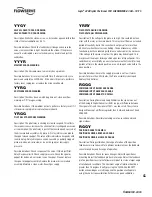
Page 33: ...nd is set by a digital HART command instead of the 4 20 mA signal Possible Solutions The input command source can be changed back to the 4 20 mA signal by using a handheld the Dashboard page of the DTM or performing a manual Command Reset Perform the Command Reset by holding both the UP and DOWN buttons and briefly pressing the QUICK CAL ACCEPT button GGYR INITIALIZING Description The positioner h...

Page 34: ... WARNING VALVE TRAVEL WARNING Description The cycle or travel limit of the valve actuator bellows or pilot relay has been exceeded Each cycle represents two reversals of the direction of valve movement The cycle counting criterion and count limit for the valve actuator and bellows are set by the user to track the usage of the valve assembly Possible Solutions Follow routine procedures for maintena...

Page 35: ...E HIGH WARNING PIEZO VOLTAGE LOW WARNING Description If the voltage to the piezo is to high this could indicate an error with the relay or the main board This may result from an extended period of inactivity but in this case should not persist for more than 30 minutes when the valve is controlling The positioner may still be functioning but have reduced performance under some circumstances If the ...

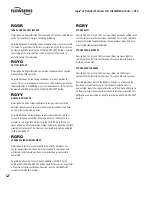
Page 36: ...r a larger actuator by doubling the time allowed for movement This error may be cleared by briefly pushing the QUICK CAL ACCEPT RGRG STROKE CALIBRATION REQUIRED Description A factory reset was performed and the positioner has not yet been calibrated The unit will not respond to commands and will remain in the failsafe position until a calibration is successfully completed Possible Solutions Perfor...

Page 37: ...m the valve assembly or the sensor has failed Possible Solutions Check the feedback arm linkage Recalibrate If the problem persists return the unit for repair RYRR MAIN BOARD ELECTRONIC FAILURE WARNING Description There has been an oscillator fault position sensor ADC failure supply voltage error reference voltage error shunt voltage error or piezo voltage error Possible Solutions This may be caus...

Page 38: ...ignal power This condition may occur briefly on an air to close valve that is held for long periods of time in the closed position or an air to open valve held in the open position Possible Solutions Ensure the supply pressure is not low If alarm persists for more than 30 minutes the Piezo assembly is damaged Replace the pilot relay RRRR POSITION DEVIATION ALARM Description The difference between ...

Page 39: ...h the return 4 Complete the RGA form Write any specific issues with the posi tioner you would like us to evaluate Please include the customer name and contact information 5 When packaging please secure the unit in a method that will insure it will reach our facility undamaged the weight of positioners will often settle through packing peanuts and pop large air packets 6 Please insert a copy of the...

Page 40: ...Logix 420 Digital Positioner FCD LGENIM0106 07 AQ 10 15 40 15 POSITIONER DIMENSIONS 15 1 Positioner Dimensions Figure 17 Overall Dimensions ...

Page 41: ...ting 5 16 18 UNC and M6 Pneumatics 1 4 NPTF Conduit M20 x 1 5 Vent 1 4 NPTF 2 1 Feedback Shaft D 316 Stainless Steel Shaft Valtek Standard D NAMUR VDI VDE 3845 Stainless Steel Shaft R D Certifications Gauges No Gages 0 1 Nickel Plated with Brass Internals psi bar kPa 1 Nickel Plated with Brass Internals psi kg cm2 2 SS with SS Internals psi bar kPa 3 SS with SS Internals psi kg cm2 4 UCC Press Tes...

Page 42: ... 26 27 29 Hazardous Area Certifications 7 I Inner Loop 5 Installation 9 L Language 26 LCD Menu 19 Limit Switch 14 Local Control Of Valve Position 18 Local User Interface 15 M Main Board 30 Maintenance 8 29 30 MaxFlo Rotary Valves 10 Minimum Close Time 23 Minimum Open Time 23 Mounting 9 O Outer Loop 5 P Partial Stroke Test 21 22 33 Performance 6 Positioner Dimensions 40 Pressure Control 16 20 24 Q ...

Page 43: ...GENIM0106 07 AQ 10 15 flowserve com T Temperature 6 20 21 22 25 Troubleshooting 12 31 Tubing 11 Tuning 18 23 V Valtek GS 9 Valve Cycles 22 Valve Stability Switch 16 Valve Travel 22 ValveSight DTM 6 27 Vented Design 11 Version Numbers 19 26 ...

Page 44: ...xas USA Flowserve is a registered trademark of Flowserve Corporation For more information about Flowserve Corporation contact www flowserve com or call USA 1 800 225 6989 FCD LGENIM0106 07 AQ Printed in USA 10 15 Control per SPP 250 Download Logix 420 Manual Certification information in manual may not be applicable Certifications on positioner label are valid Flowserve Headquarters 5215 N O Connor...

Reviews:

Related manuals for Logix 420