LIM60000FL2 Rev B
MN301034 rev D
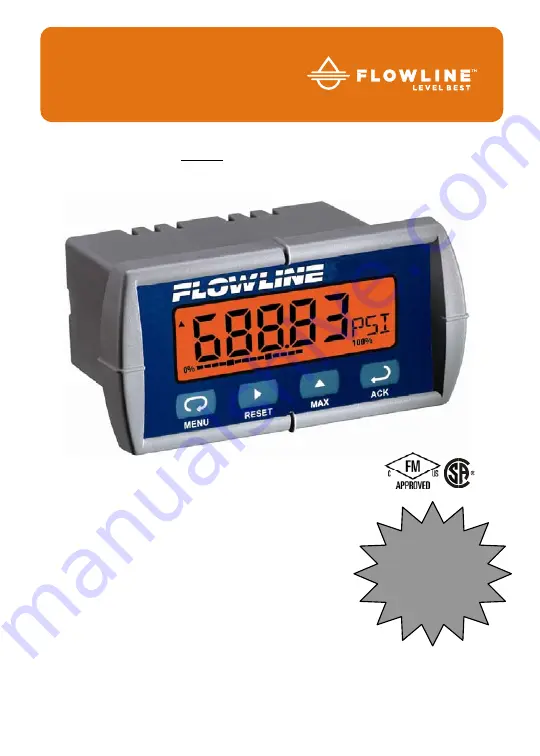
DataLoop
™
Loop-Powered Meters
Loop-
Powered
Backlight
Standard!
CALL TOLL FREE 877-742-2878 FOR SALES AND SUPPORT.
LI25 Series Instruction Manual
CLICK HERE TO RETURN TO WEBSITE
Page 1: ...60000FL2 Rev B MN301034 rev D DataLoop Loop Powered Meters Loop Powered Backlight Standard CALL TOLL FREE 877 742 2878 FOR SALES AND SUPPORT LI25 Series Instruction Manual CLICK HERE TO RETURN TO WEBS...
Page 2: ...he system and the convenience of scaling without a calibrated signal source make the LI25 Series the ideal choice for process display applications ORDERING INFORMATION Model Description LI25 1001 Loop...
Page 3: ...tions Messages 14 Main Menu 15 Setting Numeric Values 15 Setting Up the Meter SETUP 16 Setting the Decimal Point deCpt 16 Setting the Units Display units 17 Programming the Meter PrOG 18 Scaling the M...
Page 4: ...r to Factory Defaults 33 Factory Defaults User Settings 34 TROUBLESHOOTING 35 Troubleshooting Tips 35 QUICK USER INTERFACE REFERENCE GUIDE 36 TABLE OF FIGURES Figure 1 Panel Cutout and Mounting 9 Figu...
Page 5: ...MIN DISPLAY Max min readings reached by the process are stored until reset by the user or until power to the meter is turned off PASSWORD Programmable password restricts modification of programmed set...
Page 6: ...NCTION Linear square root or programmable exponent LOW FLOW CUTOFF 99999 to 99999 99999 disables cutoff function TEMPERATURE DRIFT 50 PPM C from 40 to 65 C ambient DECIMAL POINT Up to four decimal pla...
Page 7: ...1 2 Groups ABCD Class II Div 1 Groups EFG Class II Div 2 Groups FG Class III Div 1 2 Class 1 Zone 0 Group IIC SAFETY INFORMATION CAUTION Read complete instructions prior to installation and operation...
Page 8: ...ind the panel for wiring Panel thickness 0 04 0 25 1 0 mm 6 4 mm Minimum steel stainless steel panel thickness to maintain watertight rating 0 06 1 5 mm Note A steel or stainless steel panel rather th...
Page 9: ...and Mounting Refer to Mounting Dimensions page 23 for more details Panel Gasket Mounting Bracket Mounting Screw Removable Connector 3 622 92mm 1 772 45mm Panel Cutout to DIN 43700 Square Corners to 0...
Page 10: ...1001 LI25 2001 installation must be performed in accordance with Control Drawing QS301034 1 in order to meet agency approval ratings Observe all safety regulations Electrical wiring should be perform...
Page 11: ...total maximum voltage drop of 5 7 V The backlight is recommended for dim lighting conditions and is enabled when wired as shown in Figure 3 It may be bypassed if installed in bright lighting conditio...
Page 12: ...meter is factory calibrated for milliamps prior to shipment The calibration equipment is certified to NIST standards Overview There are no jumpers involved in the setup process of the meter Setup and...
Page 13: ...k Decreasing trend Press the Menu button to enter or exit the Programming Mode at any time Press the Right arrow button to move to the next digit or decimal position during programming Press the Up ar...
Page 14: ...pt Decimal point Set decimal point sCalE Scale Enter the Scale menu Inpt1 Input 1 Calibrate input 1 signal or program input 1 value DspL1 Display 1 Program display 1 value Inpt2 Input 2 Calibrate inpu...
Page 15: ...made to settings prior to pressing Enter Ack are not saved Changes to the settings are saved to memory only after pressing Enter Ack The display moves to the next menu every time a setting is accepted...
Page 16: ...access any menu or press Up arrow button to scroll through choices Press the Menu button to exit at any time Setting the Decimal Point deCpt Decimal point may be set with up to four decimal places or...
Page 17: ...a degrees symbol and x10 symbol eg C F x103 x106 x109 Preconfigured units are available for feet FT inches IN meters M centimeters CM gallons GAL liters L percent and percent PCT A custom unit or tag...
Page 18: ...right alphanumeric character may also be selected This character includes degree symbols and a degrees symbol and x10 symbol eg C F x103 x106 x109 Press the Enter Ack button at any time to accept the...
Page 19: ...ate and the Scale menus Inputs may be calibrated or scaled to any display within the range of the meter Additional parameters not needed for most applications are programmed with the Advanced features...
Page 20: ...rocess in engineering units A signal source is not needed to scale the meter simply program the inputs and corresponding display values For instructions on how to program numeric values see Setting Nu...
Page 21: ...the meter displays dspl1 Press Enter Ack enter a corresponding display value for the signal input and press Enter Ack to accept 4 The meter displays inpt1 Apply a known signal and press Enter Ack Tren...
Page 22: ...percentage process reading within a user defined span The span is determined by values entered for 0 and 100 If the 0 and 100 values are the same as the values that were entered for display 1 and disp...
Page 23: ...event unauthorized changes to the programmed parameter settings Locking the Meter Enter the Password menu and program a five digit password For instructions on how to program numeric values see Settin...
Page 24: ...ed using the Password menu Changes to the programmed parameter settings are allowed only with the password set to 00000 If the password entered is incorrect the meter displays Locd Locked for about th...
Page 25: ...MN301034 rev D 25 Advanced Features Menu To simplify the setup process functions not needed for most applications are located in the Advanced features menu Press and hold the Menu button for five sec...
Page 26: ...programmable exponent Cutof Low Flow Cutoff Set low flow cutoff contr Contrast Enter contrast adjustment menu fltEr Filter Set noise filter value bypAs Bypass Set filter bypass value TrEnd Trend Arrow...
Page 27: ...Exponent ProGE The programmable exponent function is used to linearize the level signal in applications using weirs and flumes and display flow rate in engineering units Upon selecting programmable ex...
Page 28: ...ages any minor or quick changes in the input signal and displays the reading with greater stability Increasing the filter value will help stabilize the display however this will reduce the display res...
Page 29: ...bration menu is part of the Advanced features menu 1 Press and hold the Menu button for five seconds to access the Advanced features of the meter 2 Press the Up arrow button to scroll to the Internal...
Page 30: ...he Advanced features menu to access Information menu see Advanced Features Menu page 25 It shows software and version number To determine the software version of a meter 1 Go to the Information menu i...
Page 31: ...DataLoop LI25 Level Controller Instruction Manual MN301034 rev D 31 Operation Front Panel Buttons Operation...
Page 32: ...n to display maximum reading since the last reset power up 2 Press Up arrow Max again to display the minimum reading since the last reset power up 3 Press Enter Ack to hold Max Min display reading the...
Page 33: ...Level Controller Instruction Manual MN301034 rev D 33 MOUNTING DIMENSIONS Figure 5 Meter Dimensions Side View Figure 6 Case Dimensions Top View 1 76 45mm 0 59 15mm 3 2 81mm 2 45 62mm 3 61 92mm 2 50 64...
Page 34: ...y defaults Instructions to load factory defaults 1 Enter the Advanced features menu by holding the Menu button for 5 seconds Press Up arrow until info is shown 2 Press and hold Right arrow Reset for f...
Page 35: ...____________ S N _______________ Date _________ Parameter Display Default Setting User Setting Units rnA mA Decimal point Dd ddd 3 places Scaling SCALE Input 1 InPt1 4 000 mA Display 1 Dspl1 4 000 Inp...
Page 36: ...or message during calibration error Check 1 Signal connections 2 Minimum input span requirements Meter displays 1 99999 2 99999 Check 1 Input signal within range 2 When using square root or programmab...
Page 37: ...DataLoop LI25 Level Controller Instruction Manual MN301034 rev D 37 QUICK USER INTERFACE REFERENCE GUIDE...
Page 38: ...git Go to Max Min Mode Enter Ack Accept selection value and move to next selection Toggle Rate Total Hold to Acknowledge Alarm Menu held for 5 seconds enters Advanced Features Max Min Mode While in Ru...
Page 39: ...nstructions therein All warranty and non warranty product returns to Flowline must be shipped prepaid and insured Flowline will not be responsible for any products lost or damaged in shipment LIMITATI...
Page 40: ...OR REPRESENTATIONS ON BEHALF OF FLOWLINE This warranty will be interpreted pursuant to the laws of the State of California If any portion of this warranty is held to be invalid or unenforceable for an...