


16
17
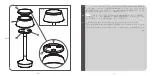
Fig. 2
<IT>
Fig.2
RICARICA BATTERIA.
Inserire la spina (G) nell’alimentatore (H) nella posizione di lavoro preferita (la spina
può essere inserita indifferetemente in uno qualsiasi dei lati della sede dell’alimentatore) fino ad avvertire
lo scatto di aggancio (utilizzare la tipologia di spina corretta per la regione in cui si installa l’apparecchio);
per rimuovere la spina agire sul pulsante (I) dell’alimentatore. Inserire la presa USB (L) del cavetto fornito
in dotazione nell’apposita sede (M) dell’alimentatore quindi inserire la presa micro-USB (O) nel connettore
(P) dell’apparecchio. Il tempo di ricarica completo è di 3 ore.
Con apparecchio acceso al 100% dell’intensità
luminosa, l’autonomia di funzionamento senza cavo è di 6 ore; superate le 6 ore, l’intensità luminosa si abbassa
automaticamente al 20% e l’apparecchio segnala la necessità di effettuare la ricarica con un triplo lampeggio
che verrà ripetuto ogni 10 minuti fino a quando non verrà messo in ricarica.
NOTA
: il prodotto è dotato di
sistema di autoprotezione: nel caso resti collegato all'alimentatore oltre il tempo di ricarica indicato, questo
non comprometterà il lifetime della batteria (1000 cicli di ricarica garantiti);
<EN>
Pic.2
RECHARGING THE BATTERY.
Insert the plug (G) in the power adaptor (H) in the preferred working position
(the plug can be inserted in any side of the power adaptor block) until you hear the snap-in click (use the
correct type of plug for the country the lamp is installed in); to remove the plug press the power adaptor's
push button (I). Insert the USB plug (L) of the cable provided in its housing (M) on the power adaptor then insert
the micro-USB plug (O) into the lamp's connector (P). The complete recharging time is 3 hours. With the lamp
turned on to 100% of the light intensity, the operating autonomy without cable is 6 hours; after 6 hours the
light intensity automatically reduces by 20% and the lamp signals the need for recharge with three flashes
which will be repeated every 10 minutes until it is put on charge.
NOTE
: This product includes a self-protection
system. If it remains connected to the power source for more than the indicated charging time, the service life
of the battery will not be affected (1000 charging cycles guaranteed).
<DE>
Abb.2
BATTERIEAUFLADUNG.
Den Stecker (G) ins Netzgerät (H) an der gewünschten Arbeitsposition (der
Stecker kann gleichermaßen in irgendeine der Seiten des Netzgerätsitzes eingefügt werden) einfügen, bis
das Schnappgeräusch zu hören ist (die richtige Steckerart für die Region, in der das Gerät installiert wird,
verwenden); zum Entfernen des Steckers den Knopf (I) des Netzsteckers betätigen. Die USB-Buchse (L) der
bereitgestellten Litze in den entsprechenden Sitz (M) des Netzgeräts einfügen, dann die Micro-USB-Buchse (O)
in die Steckvorrichtung (P) des Geräts einfügen. Die gesamte Ladezeit beträgt 3 Stunden. Bei mit 100%-iger
Lichtintensität eingeschaltetem Gerät beträgt die Betriebsautonomie ohne Kabel 6 Stunden; wenn die 6 Stunden
überschritten sind, verringert sich die Lichtintensität automatisch auf 20% und das Gerät zeigt den Ladebedarf
mit einem dreimaligen Aufleuchten an, welches alle 10 Minuten wiederholt wird, bis das Gerät nicht geladen wird.
HINWEIS:
Das Produkt ist mit einem Eigenschutzsystem ausgestattet: Sollte es über die angegebene Ladezeit
hinaus am Netzteil angeschlossen bleiben, hat dies keine negative Auswirkung auf die Lebensdauer der Batterie
(garantierte 1000 Ladezyklen);
G
P
I
H
L
O
M
Summary of Contents for A073058.005
Page 1: ...BON JOUR UNPLUGGED DESIGN BY PHILIPPE STARCK...
Page 4: ...6 SA FLOS FLOS FLOS 2 5 EGDE LIGHTING CN FLOS FLOS EDGE LIGHTING 2 5W...
Page 12: ...22 23 Fig 2 G P I H L O M SA H G 2 L USB I O USB M 3 P 20 6 100 1000 10...
Page 14: ...26 27 25287 07 10 2016...
Page 15: ...www flos com www flos com...