background image

36

GB

rubber covering. Only use extension 

cables that are intended for outdoor 

use and are labelled as such. Use ex

-

tension cables with a cable core diam

-

eter of at least one square millimetre. 

Always completely unwind the cable 

reel before use. Check the cable for 

damage.

•  Use the cable hanger fitted for the pur

-

pose when using an extension cable.

•  Do not carry the tool by the cable. Do 

not unplug the cable by tugging on it. 

Keep the cable away from heat, oil 

and sharp edges.

•  Connect the appliance to a power 

socket with a residual current circuit 

breaker of rated residual current no 

more than 30 mA.

Assembly instructions

  Always disconnect the tool from the 

mains before conducting any work 

on it. 

  While assembling the tool, make 

sure that the mains cable (2) does 

not become caught and has enough 

slack.

Fitting the grip tubing

B

 1.  Push the two fork grips (1a/1b) 

into the plastic cross-plate (4), 

and screw the plate into the cor-

responding holes in the grip tub

-

ing from behind using the bolts 

provided (13).


2.  Screw both central tubes (5) onto 

the fork handles (1a/1b). To do 

this, push the enclosed screws 

(14) inwards through the holes 

from the outside and screw them 

in place with the wing nuts (15).


3.  Position the handle rod with the 

pipe ends to the left and right 

on the lower frame tubing (

A

6) and screw it in place with the 

enclosed screws (14) and wing 

nuts (15).

  When assembled correctly, the 

handle ends point away from the 

equipment  front with the ventilation 

slits (see 

A

 7).


4.  Fasten the mains cable with the 

cable clips supplied:


  - Large cable clip (3a) above the 


  cross-plate


  - Small cable clip (3b) at the 


    frame tubing.

Operation

  Observe noise-abatement laws and 

local by-laws.

Switching on and off

  Before switching the tool on, make 

sure that the tool is not touching 

any other objects and hold it firmly 

in both hands. 

C

 1.  Plug the tool into the extension 

cable.


2.  Loop the end of the extension 

cable and hang it onto the cable 

tension relief (16) to ease the 

tension on the cable.


3.  Plug the tool into the mains.


4.  Hang the extension cable onto 

the belt clip (12) and fasten it to 

your trouser belt.


5.  To switch on, press the safety 

release catch (17) and then 

squeeze the dead-man lever 

Summary of Contents for 102836

Page 1: ...Originalbetriebsanleitung Bineuse lectrique Traduction du mode d emploi d origine Garden Cultivator Translation of original operation manual Bineuse lectrique FGH 710 A1 102836_flo_Gartenkultivator_co...

Page 2: ...illustrations et familiarisez vous ensuite avec toutes les fonctions de l appareil Klappen Sie vor dem Lesen die Seite mit den Abbildungen aus und machen Sie sich anschlie end mit allen Funktionen de...

Page 3: ...A D E B 10 9 7 8 6 5 3a 3b 4 1a 1b 2 4 14 14 14 14 15 15 3b 15 15 6 16 2 18 17 12 12 11 1a 1b 13 5 5 2 3a 19 20 21 23 10 11 C 22...

Page 4: ...reil est destin b cher le sol broyer les mottes de terre et m langer l engrais la tourbe et le compost dans le domaine domestique Toute autre utilisation qui n est pas autori s e explicitement dans ce...

Page 5: ...avec guidage du c ble Accessoires de montage pinces de c ble et clip de ceinture Mode d emploi Apercu A 1a Poign e d appui droite avec levier de d marrage bouton de d verrouillage et syst me anti tra...

Page 6: ...tre utilis e pour com parer un outil lectrique avec un autre outil La valeur totale de vibrations d clar e peut galement tre utilis e pour une valuation pr liminaire de l exposition Avertissement La...

Page 7: ...risez vous avec toutes les pi ces avant de vous servir de cet appareil Si le c ble d alimentation est en dommag il doit tre remplac par le fabricant son service apr s vente ou des personnes de qualifi...

Page 8: ...l appareil si les dispositifs de s curit par ex le blocage anti d mar rage ou la protection de s curit les pi ces du dispositif de coupe ou des boulons font d faut sont us s ou en dommag s Assurez vou...

Page 9: ...machines faible puissance pour des travaux difficiles N utilisez pas votre appareil des fins auxquelles il n est pas destin vitez d effectuer tout endommagement sur l appareil N ajoutez pas de poids s...

Page 10: ...t corporel avec les l ments reli s la terre par ex cl tures m talliques poteaux m talliques L accouplement de la rallonge doit tre prot g contre les claboussures tre compos en caoutchouc ou recouvert...

Page 11: ...on for mez une boucle avec l extr mit de la rallonge et accrochez la dans le syst me anti traction 16 3 Branchez l appareil la tension lectrique 4 Accrochez la rallonge dans le clip de ceinture 12 et...

Page 12: ...ames de broyage s arr tent compl tement et d bran chez la fiche lectrique Effectuez r guli rement les travaux de net toyage et d entretien suivants Ceci garan tit une utilisation longue et fiable Trav...

Page 13: ...n ce que les trous de l axe des lames concorde avec les trous plac s sur l arbre d entra nement voir D V rifiez si le sens de rotation des lames de broyage est correct Les fl ches visibles sur l engre...

Page 14: ...ndeur du produit Ces droits l gaux ne sont pas limit s par notre garan tie pr sent e par la suite Conditions de garantie Le d lai de garantie d bute avec la date d achat Veuillez conserver soigneuseme...

Page 15: ...n garde est mise doivent absolument tre vit s Marche suivre dans le cas de garantie Pour garantir un traitement rapide de votre demande veuillez suivre les instructions suivantes Tenez vous pr t pr se...

Page 16: ...c une note indiquant le d faut constat Les appareils envoy s en port d comme marchandises encombrantes en envoi express ou avec toute autre taxe sp ciale ne seront pas accept s Nous ex cutons gratuite...

Page 17: ...te mit aus Bestimmungsgem e Verwendung Das Ger t ist f r das Hacken und Zerklei nern grobscholligen Bodens und f r die Einarbeitung von D nger Torf und Kompost im h uslichen Bereich bestimmt Jede ande...

Page 18: ...r Netzanschlussleitung Linker Gabelgriff Querb gel Kunststoff Montagezubeh r 2 Kabelklemmen und G rtelclip Betriebsanleitung bersicht A 1a Rechter Gabelgriff mit Starthebel Entriegelungsknopf und Zuge...

Page 19: ...ktrowerkzeugs mit einem anderen verwendet werden Der angegebene Schwingungsemissi onswert kann auch zu einer einleitenden Einsch tzung der Aussetzung verwendet werden Warnung Der Schwingungsemis sions...

Page 20: ...n Sie sich mit allen Bedienteilen gut vertraut Wenn die Anschlussleitung dieses Ger tes besch digt wird muss sie durch eine besondere Anschlusslei tung ersetzt werden die vom Her steller oder seinem K...

Page 21: ...en abgenutzt oder besch digt sind Pr fen Sie insbesondere die Netz anschlussleitung und den Starthebel auf Besch digung Zur Vermeidung einer Unwucht d rfen besch digte Werkzeuge und Bolzen nur satzwei...

Page 22: ...Sie das Ger t nicht ber festen Untergrund wie Fliesen oder Trep pen Entfernen Sie regelm ig Pflanzen und Wurzelreste im Bereich der Antriebswel le Sie vermeiden damit eine berla stung und Besch digung...

Page 23: ...etallz une Metallpfosten Die Kupplung des Verl ngerungskabels muss vor Spritzwasser gesch tzt sein aus Gummi bestehen oder mit Gummi berzogen sein Verwenden Sie nur Ver l ngerungskabel die f r den Geb...

Page 24: ...Sie aus dem Ende des Verl ngerungska bels eine Schlaufe und h ngen die se in die Zugentlastung 16 ein 3 Schlie en Sie das Ger t an die Netzspannung an 4 H ngen Sie das Verl ngerungska bel in den G rt...

Page 25: ...ie Gefahr eines Stromschlags F hren Sie folgende Wartungs und Reini gungsarbeiten regelm ig durch Dadurch ist eine lange und zuverl ssige Nutzung gew hrleistet Allgemeine Reinigungs und Wartungsarbeit...

Page 26: ...reinstimmen siehe D Achten Sie auf die korrekte Dreh richtung der Hackmesser 11 Die Pfeile auf Getriebe 9 und Hack messer 11 m ssen in die gleiche Richtung zeigen siehe D 5 Schieben Sie die Sechskant...

Page 27: ...Wieder verwertung zugef hrt werden Fragen Sie hierzu unser Service Center Zur Entsorgung der Verpackung geben Sie den Karton zum Papierm ll Kunst stoffteile f hren Sie dem Dualen System zu Ersatzteile...

Page 28: ...pa cken gemeldet werden Nach Ablauf der Garantiezeit anfallende Reparaturen sind kostenp ichtig Garantieumfang Das Ger t wurde nach strengen Qualit ts richtlinien sorgf ltig produziert und vor Anliefe...

Page 29: ...raturen die nicht der Ga rantie unterliegen gegen Berechnung von unserer Service Niederlassung durchf hren lassen Sie erstellt Ihnen gerne einen Kostenvoranschlag Wir k nnen nur Ger te bearbeiten die...

Page 30: ...e tool is intended for breaking up and tilling coarse soil for the purpose of mixing in fertiliser peat and compost in domestic areas Any use other than that specifically named in this manual may lead...

Page 31: ...nd belt clip User manual Functional description Your hand operated garden tiller is equipped with a maintenance free electric motor and a gearbox with sump lubrica tion The tool is fitted with four ro...

Page 32: ...vibration emission value was measured in accordance with a standard testing procedure and may be used to com pare one power tool to another The stated vibration emission value may also be used for a...

Page 33: ...e for this equip ment is damaged it must be re placed with a special power cable which is available from the manu facturer or a customer service agent of the same Please read the following safety guid...

Page 34: ...from the tines while working espe cially when starting up the tool in jury hazard Observe any noise prevention regula tions and local by laws Do not use the tool to chop up stones or till lawn soil as...

Page 35: ...tool collides with an obstacle or starts to vibrate in an unusual manner In this case examine the tool for damage and have it repaired if necessary Use the tool away from flammable fluids or gases Fai...

Page 36: ...e bolts provided 13 2 Screw both central tubes 5 onto the fork handles 1a 1b To do this push the enclosed screws 14 inwards through the holes from the outside and screw them in place with the wing nut...

Page 37: ...and in a line as straight as possible Always work away from the mains socket Make sure that the cable is kept well away from the working area Hanging the cable into the belt clip included in the packa...

Page 38: ...self locking nut 20 on the tine wheel pair 11 2 Slide the tine wheel pair off the shaft 10 3 Clean the driveshaft with biologi cal oil 4 Slide the new tines onto the driveshaft with the holes on the a...

Page 39: ...te of purchase of this product we will repair or replace at our choice the product for you free of charge This guarantee requires the defective equipment and proof of pur chase to be presented within...

Page 40: ...urchase receipt and specification of what constitutes the defect and when it occurred In or der to avoid acceptance problems and additional costs please be sure to use only the address communicated to...

Page 41: ...garanti 93 dB A mesur 91 dB A Proc d d valuation de la conformit ap pliqu selon l annexe VI 2000 14 EC Bureau declar T V S d NB 0036 We additionally confirm the following in accordance with the 2000...

Page 42: ...s tzlich wird entsprechend der Ger uschemissionsrichtlinie 2000 14 EG best tigt Schallleistungspegel Garantiert 93 dB A Gemessen 91 dB A Angewendetes Konformit tsbewertungsverfahren entsprechend Anh V...

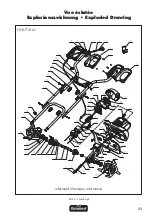
Page 43: ...39 42 43 44 46 47 48 49 45 40 41 33 34 35 37 36 50 32 66 65 61 62 63 64 60 59 69 67 68 70 72 71 51 53 52 54 55 57 58 56 19 15 14 18 6 7 6 9 10 11 12 13 Vue clat e Explosionszeichnung Exploded Drawing...

Page 44: ...44...

Page 45: ...45...

Page 46: ...Stockst dter Stra e 20 D 63762 Gro ostheim Version des informations Stand der Informationen Last Information Update 09 2014 Ident No 76005560092014 FR IAN 102836 2 102836_flo_Gartenkultivator_cover_F...

Reviews: