

C. Auto-Calibrate the Camera
From the navigation bar, select the
Settings > Analytics > Depth
tab. The web interface
opens on the
Depth > AUTO
screen. Verify that the camera is installed at a height of at
least four meters (13 feet) and that the horizon is less than 30% of the Field of View.
1. From the
Units
drop-down list, select
Feet
or
Meter
.
2. Select
Set camera height
and enter the estimated camera height.
3. Click
START
. The camera automatically calibrates the depth. Be sure that a person is
walking along the Y (Vertical) axis of the FoV while Auto Calibration is in process.
4. Verify that the horizon, camera height, and human marker settings are correct.
5. Click
MANUAL
and finish configuring depth settings.
·
While Auto Calibration is in progress, you can go to steps D (Select Rule) and E (Detect).
·
The Auto Calibration finishes when the progress bar reaches 100%. If you stop the
procedure before it finishes, the analytic process will reset.
·
If you change from Auto to Manual mode, you must wait until the analytic process resets in
order to use Manual mode.
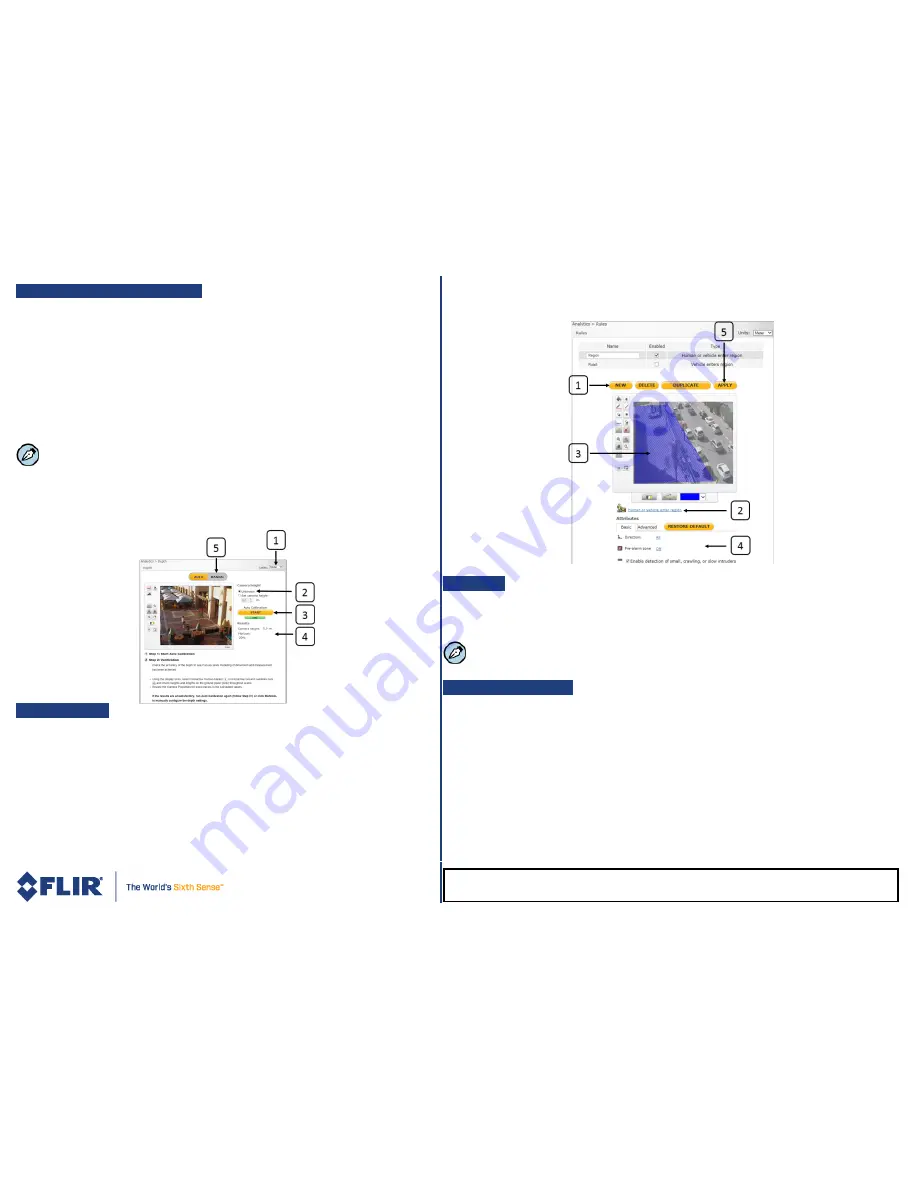
D. Select Rule
From the navigation bar, select
Analytic > Rules
to activate rules, modify settings,
delete, or add a new rule. A rule for detecting humans or vehicles entering the scene
(blue masked area) is defined by default. To create a new rule:
1. Click
NEW
.
2. Select the rule type by clicking the link.
3. Draw on the video scene where you want the detection to take place.
4. Define the attributes for detection from the
Basic
and
Advanced
tabs.
5. When finished, click
APPLY
to save the settings.
E. Detect
1. Select the
Live
tab.
2. Click
ARM
. The camera is ready for use.
3. Click the red recording icon to start recording.
Analytic performance is optimized only after the auto depth calibration process is completed.
F. Attach to Latitude
1. In Latitude, click
Physical View
on the sidebar.
2. On the Navigation Tree, click the system name.
3. From the
Discovery
tab, do the following:
a. Under
Cameras and Encoders
, select
IOimage
Latitude 7
)
or
FLIR
(Latitude 8).
b. Click
Start
. The camera details are displayed in the Discovery table.
c. If the camera was not discovered, click
Discover Unit Manually
.
d. Enter the camera’s IP address and select
IOimage
(Latitude 7
)
or
FLIR
and
Auto Detect
(Latitude 8).
e. Click
OK
.
4. In the
Discovery
table, right-click the camera.
5. Click
Attach
.
6. Click the Archiver name to attach.
7. Click
Save
.
IOI HD_CF-52x2_QIG_3May17_v1
FLIR Systems, Inc. 6769 Hollister Ave. Goleta, CA 93117
Tel: +1 888.388-3577 [email protected] www.flir.com/security


