


18
ARMASIGHT by FLIR
SPARK
U S E R M A N U A L
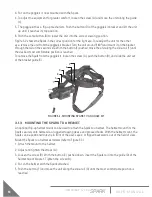
3. To secure the QRM onto the weapon rail, turn the lever (B) forward. Secure the clamping device (A)
tightly to the weapon rail. To adjust the force of the lever clamp, loosen or tighten the nut (D) as
necessary:
– When the clamping device (A) unlocked, push the lever holder (C) so that the nut (D) gets out of its
hollow.
– To tighten/loosen clamping device, turn the nut (D) CW/CCW, respectively, by one-two increments
(the eight-sided nuts of the AIM clamping devices fit their hollows only if turned in one of the
discrete positions), when the holder (C) pushed. Just as the holder (C) released, backmoving
springs makes the nut (D) get back into its hollow.
– Check to ensure the clamping device holds weapon/NVM rail firmly.
4. While pushing down on the lever holder (F), turn the lever (E) forward.
5. Install the Spark on the QRM rail by inserting the stop (G) into the transverse slot of the unit rail.
6. Attach the Spark to the QRM rail by turning the lever (E) backwards. Secure the QRM clamping
device (H tightly to the Spark rail. To adjust the force of the lever clamp, loosen or tighten the nut (I)
as necessary.
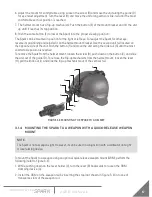
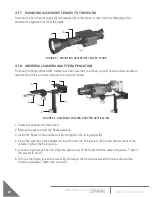
3.1.5 MOUNTING AN IR ILLUMINATOR TO THE SPARK
To mount an IR illuminator to the Spark, use the optional Dovetail to Weaver Transfer Piece. Perform the
following steps (refer to Figure 3-5):
FIGURE 3-4. MOUNTING THE SPARK TO A WEAPON WITH A QUICK-RELEASE WEAPON MOUNT
A
B
F
D
B
A
E
C
D
G
I
H
E
FIGURE 3-5. MOUNTING AN IR ILLUMINATOR TO THE SPARK
B
C
A


