background image

Getting started

16

Operators manual

Handheld Multi-Purpose Interface (HHMPI)

Flight Data Systems recommends using the HHMPI Cradle for the following reasons:

The cradle provides direct current (DC) charging which extends battery life by avoid-

ing trickle charging.

The transfer of files from the HHMPI to the PC is stable and easy to operate when 

docked.

Auto-sync and transfer files from the unit to a nominated FTP server via Ethernet con-

nection.

Configure the unit in the web interface using the Ethernet connection on the cradle.

3.2.4  Turning on the HHMPI and self-test

To turn on a battery powered HHMPI, press 

cancel

 or 

OK

 for 2–3 seconds until the unit 

beeps.

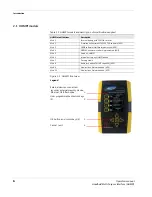
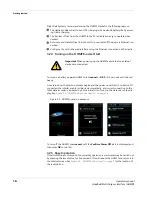
Once turned on, the start-up process begins and the power-on self-test is carried out. If 

connected, the interface cable is detected automatically, and correct connection to the 

flight data recorder is indicated by a blue aircraft icon found in the status bar of the dis-

play. See 

Figure 9.0, ”HHMPI power-on sequence”, on page 16

.

Figure 9.0   HHMPI power-on sequence

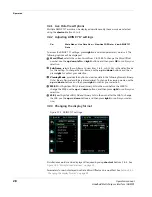
To turn off the HHMPI, press 

cancel

 until the 

Confirm Power Off

 alert is displayed, and 

then press 

OK

 to confirm.

3.2.5  Reset operation

If the HHMPI does not respond to normal key operation, a warm reset may be carried out 

by pressing the reset button for five seconds. This will reboot the HHMPI and return it to 

the shortcut screen. Se

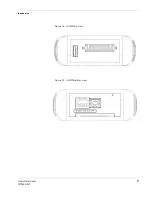
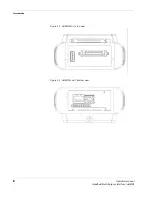
Figure 3.0, ”HHMPI bottom view”, on page 7

 for the location of 

the reset button.

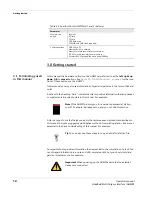
Important

 When powering up the HHMPI ensure that no external 

devices are connected.

Summary of Contents for FDS 400-301

Page 1: ...his manual is a controlled document and as such is subject to amendment It is in the interest of the user to register this man ual with Flight Data Systems to ensure receipt of any amendments The use duplication and or disclosure by persons receiving this manual may be subject to restrictions No part of this document and or data contained herein may be reproduced and or used in any form without wr...

Page 2: ... on a PC 20 4 2 3 Transferring the Aircraft List to the HHMPI 20 4 2 4 Creating the Aircraft List on the HHMPI 21 4 2 5 Adding Entries to the HHMPI Aircraft File 21 4 2 6 Deleting an aircraft from the Aircraft list on the HHMPI 21 4 2 7 Saving the Aircraft list to the USB flash drive on the HHMPI 22 4 2 8 Deleting all aircraft from the Aircraft list on the HHMPI 22 4 2 9 Prompt for Tail No 22 4 3 ...

Page 3: ...6 1 4 Uploading files via FTP with a wireless network connec tion 44 7 0 Troubleshooting 44 8 0 FA2100 FA2200 and FA2300 Interface Supplement 48 8 1 Download Operations 48 8 2 Recorder Operations 48 8 3 FDR Status 49 8 4 CVR Status 49 8 5 FDR or CVR Fault Output 49 8 6 Clear Latched Fault 49 8 7 Clear Fault Log 49 8 8 Dump Fault Log 49 8 9 Dump Debug Trace 49 8 10 Memory Marker 49 8 11 Audio Opera...

Page 4: ...ultiple live data view 29 Figure 19 0 Word offset adjust 29 Figure 20 0 Selected tail number on the shortcut screen 31 Figure 21 0 Changing from Raw Mode to EU Mode 31 Figure 22 0 Accessing aircraft parameters alphabetically 32 Figure 23 0 Four parameters populated with Engineering Units 32 Figure 24 0 DHCP or manual IP configuration 34 Figure 25 0 Setting up the FTP client 35 Figure 26 0 FTP type...

Page 5: ...DR from the HHMPI 61 List of tables Table 1 0 Record of changes 4 Table 2 0 HHMPI models and description of modifications applied 6 Table 3 0 HHMPI equipment list 9 Table 4 0 Interface cables and software options 10 Table 5 0 Specifications HHMPI Mod 5 no battery 10 Table 6 0 Specifications HHMPI Mod 1 and 5 battery 11 Table 7 0 Troubleshooting common issues with the HHMPI 45 Table 8 0 File extens...

Page 6: ...00 CVR software ADF Mod 3 VADR software interface implemented ADF Mod 4 MCR500 software interface implemented ADF Mod 5 Version 2 HHMPI Mod 6 Internal battery on HHMPI added Mod 7 Docking cradle Mod 8 Audio jack added for CVR capability ADF Mod 9 New revision firmware added ADF Mod 10 New revision firmware added ADF Legend External devices connected recorder external memory device Ethernet USB fla...

Page 7: ...Introduction Operators manual 7 FDS 400 301 Figure 2 0 HHMPI top view Figure 3 0 HHMPI bottom view ...

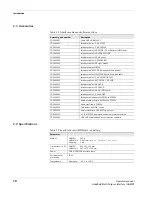
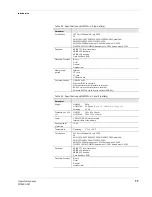
Page 8: ...Introduction 8 Operators manual Handheld Multi Purpose Interface HHMPI Figure 4 0 HHMPI Mod 1 top view Figure 5 0 HHMPI Mod 1 bottom view ...

Page 9: ...ll FDS400 301 HHMPI Mod 5 FDS400 301 HHMPI with internal battery Mod 5 6 FDS400 301 HHMPI with external battery and PCMCIA card Mod 1 5 FDS400 302 USB flash drive 2GB All FDS400 303 Compact flash card HHMPI Option all FDS400 304 SD card HHMPI Option all FDS400 321 Carry case yellow All except Mod 1 FDS400 322 Power adapter kit global charger for internal battery Mod 6 FDS400 334 Carry case black M...

Page 10: ...nterface cable L 3 AR FA5000 FA5001 FDS400 224 Interface cable UASC CVFDR CVR FDR FDS400 227 Interface cable HNY DVDR FDS400 232 Interface cable HNY HFR5 D FDS400 246 Interface cable HNY AR CVR Combi FDS400 241 Interface cable L 3 Micro QAR FDS400 257 Interface cable adapter MCR500 to SCR500 FDS400 258 Audio breakout fixture MCR500 to SCR500 FDS400 259 Audio test fixture SCR500 FDS400 331 Card rea...

Page 11: ...ess 802 11g capability via optional USB key Table 6 0 Specifications HHMPI Mod 1 and 5 battery Parameter Weight HHMPI 495 g HHMPI kit 3 2 kg see Figure 6 0 HHMPI kit on page 9 Shipping 4 2 kg Dimensions L x W x H HHMPI 145 x 95 x 46 mm HHMPI kit 365 x 270 x 135 mm Power USB or FDR CVR interface cable Internal Lithium Ion battery Environmental protection IP 40 Temperature Operating 0 C to 60 C Cert...

Page 12: ...leting a task tips are not essential to the basic understanding of this manual For example An important note provides information that is essential to the completion of a task You can disregard information in a note and still complete a task but you should not disre gard an important note For example Memory sup ported Internal SD card CF card USB flash drive PCMCIA card ATA flash type only Communi...

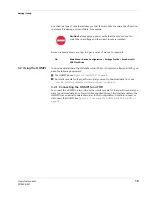
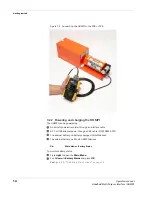
Page 13: ...der you want to download data from see Table 4 0 Interface cables and software options on page 10 3 2 1 Connecting the HHMPI to an FDR To connect the HHMPI to a recorder use the interface cable for the specific recorder you want to download data from Power is often supplied through the interface cable to the HMMPI from an aircraft powered recorder In this configuration it is safe to connect or dis...

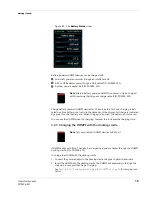
Page 14: ...n aircraft powered recorder through an interface cable A PC or USB adapter power though a USB cable P N FDS400 107 The internal battery on battery equipped HHMPI devices The external battery on Mod 2 HHMPI devices To monitor battery status Press right to open the Main Menu Scroll down to Battery Status and press OK See Figure 8 0 The Battery Status screen on page 15 Main Menu Battery Status ...

Page 15: ...red You can use the HHMPI when it is charging however this increases the charging time 3 2 3 Charging the HHMPI with the docking cradle HHMPI devices with Mod 7 can also be charged by a power adapter through the HHMPI docking cradle P N FDS400 373 To charge the HHMPI with the docking cradle 1 Connect the power adapter to the docking cradle the green light will illuminate 2 Insert the HHMPI into th...

Page 16: ...beeps Once turned on the start up process begins and the power on self test is carried out If connected the interface cable is detected automatically and correct connection to the flight data recorder is indicated by a blue aircraft icon found in the status bar of the dis play See Figure 9 0 HHMPI power on sequence on page 16 Figure 9 0 HHMPI power on sequence To turn off the HHMPI press cancel un...

Page 17: ...onfigured via a web interface or directly on the unit Using the web interface is the easiest way to set up the HHMPI see Section 5 4 1 Changing the HHMPI configuration via the web interface on page 39 3 5 1 Clock Settings Set the date and time format 3 5 2 Display Settings Set the brightness of the display 1 is minimum brightness and 10 is maximum brightness 3 5 3 Memory Settings Set the preferred...

Page 18: ...rict Configuration Restrict modification of any HHMPI settings Restrict Menus Only allow access to previously configured shortcut keys 3 5 7 Live Data Settings Set the global live data settings to be used in the live data view from some of these options may only be available for the L 3 Communications SRVIVR interface ARINC 717 ARINC 429 Standard or periodic DLR Settings Select the data display fo...

Page 19: ...on is _ aircraft tail number _ date _time _download type ext For example _20101010_1204_FDR_5_MINUTES fdr _VHFDS_101_20101010_1204_FDR_ALL dlu _VHFDS_101_20101010_1204_CVR_ALL cvr 4 2 Aircraft lists Stored in the HHMPI as a comma separated variable file the Aircraft List contains a list of all aircraft in the fleet Using an Aircraft List makes it easier to assign tail numbers to operational downlo...

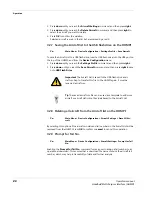
Page 20: ...h drive containing the file named aircraft csv into the USB port on top of the HHMPI 1 From the Main Menu press down until you reach the Device Configuration com mand and then press right 2 Press down until you reach the Settings Profile command and then press right 3 Press down until you reach the Load Aircraft command and then press right 4 Select where the file named aircraft csv is located and...

Page 21: ... add additional aircraft repeat steps 1 to 6 for each aircraft See Section Figure 11 0 Adding aircraft to the Aircraft List on the HHMPI on page 21 Figure 11 0 Adding aircraft to the Aircraft List on the HHMPI 4 2 5 Adding Entries to the HHMPI Aircraft File See Section 4 2 4 Creating the Aircraft List on the HHMPI on page 21 4 2 6 Deleting an aircraft from the Aircraft list on the HHMPI To delete ...

Page 22: ...eting all aircraft from the Aircraft list on the HHMPI By selecting this option all the aircraft models and tail numbers in the Aircraft List will be removed from the HHMPI Press OK to confirm or cancel to cancel this operation 4 2 9 Prompt for Tail No Enabling the Prompt for Tail No command forces a user to assign a tail number to an operational download This ensures that a download file name con...

Page 23: ...ect the HHMPI to the FDR with an interface cable see Figure 7 0 Connecting the HHMPI to the FDR or CVR on page 14 2 Turn on the HHMPI and FDR Once turned on the start up process begins and the power on self test is carried out If connected to the HHMPI the interface cable is detected automatically and correct connection to the FDR is indicated by a blue air craft icon found in the status bar of th...

Page 24: ... the download completes press OK Figure 13 0 Downloading progress bar 4 3 2 Decompressing CVR data at the aircraft To play CVR files on a computer or another device you may need to decompress the raw file into a waveform file wav See Section 4 3 Downloading flight data on page 23 After selecting CVR download the De multiplex to Wave option will appear Press the OK button to decompress the raw CVR ...

Page 25: ...of the HHMPI kit Figure 14 0 Downloading and decompressing CVR data 4 3 3 Decompressing CVR away from the aircraft From the home screen press right to access the Main Menu scroll down to the Utilities command and then press OK On the Decompress DLU command press OK and then select the raw dlu file to decompress and the decompression process will begin Main Menu Utilities Decompress DLU Note To dec...

Page 26: ...tor into the back of the CVR and reconnect aircraft power to the CVR Rack adaptor instead Power the CVR at the aircraft and then connect the HHMPI interface cable connected to the Rack Adaptor to the HHMPI and start up the unit With CVR recording now disabled using the Rack Adaptor ensure the blue plane appears in the HHMPI and begin a CVR download at the aircraft 4 3 4 2 Using the L 3 CVR Rack Ad...

Page 27: ...he status bar of the display 3 From the Main menu press down until you reach the Live Data View command and then press right Then press down until you reach the View Live FDR Data com mand and then press right to View ARINC 717 Data See Figure 16 0 Viewing live data on page 27 4 Wait until the HHMPI synchronizes with the FDR while synchronizing UNKNOWN is displayed on the screen After synchronizin...

Page 28: ...g Mode provides the option to view live data in the following formats Binary Octal Binary Decimal and Binary Hexadecimal To change the viewing mode use the up and down buttons and then press right to confirm your selection MSB Most Significant Bit hides all binary bits in the word before the MSB To change the MSB use the up and down buttons and then press right to confirm your selection LSB Least ...

Page 29: ...t data in Engineering Units EU Mode you must associate an Aircraft Definition file with an aircraft The Aircraft Definition file is exported from STARS with the extension sdf You will need to transfer this file to the HHMPI either through a direct USB Tip Word Offset can be adjusted by the following Main Menu Live Data View View Live FDR Data View ARINC 717 Data Up Down Left Right ...

Page 30: ... live flight data on page 26 4 5 2 Viewing Live Flight Data After assigning an Aircraft Definition file to an aircraft see Section 4 5 1 Assigning an Aircraft Definition file to an aircraft on page 30 to view the live flight data in Engineer ing Units 1 To view live flight data in Engineering Units you must select an aircraft which already has an Aircraft Definition file database assigned to it To...

Page 31: ...ton to select a parameter word cell 4 Press right to display the ARINC 717 settings menu 5 Enable the EU Mode radio button then press down until you reach the Select Parameter command and then press right An alphabetical list will be displayed see Figure 22 0 Accessing aircraft parameters alphabetically on page 32 Figure 21 0 Changing from Raw Mode to EU Mode Note The EU Mode radio button will onl...

Page 32: ...cells can be displayed and con figured independently Values will update once per sub frame and SAMPLING will flash green and white for each update See Section Figure 23 0 Four parameters populated with Engineering Units on page 32 Figure 23 0 Four parameters populated with Engineering Units 4 6 File transfer operations 4 6 1 File transfer between HHMPI storage locations The general method of trans...

Page 33: ...rom the HHMPI to the PC To erase files from the HHMPI internal memory see Section 4 6 1 File transfer between HHMPI storage locations on page 32 4 7 Network operations The HHMPI is capable of transferring files over a network using FTP and also for device configuration in any web browser 4 7 1 DHCP network settings To view DHCP automatic network settings Navigate to Wired Settings as above Select ...

Page 34: ...he easiest way to configure the FTP server settings 5 1 Adding a new FTP server from the HHMPI To add a new FTP server from the HHMPI from the Main menu 1 Press down until you reach the Device Configuration command and then press right Then press down until you reach the Network Settings command and then press right Then press down until you reach the FTP Servers command and then press right See F...

Page 35: ...ing OK between each letter When complete press cancel to exit the alphabet grid and then press OK to confirm your selected FTP server name Figure 25 0 Setting up the FTP client 5 2 Configuring an existing FTP server from the HHMPI To configure an existing FTP server from the FTP Servers menu press down until you reach the FTP server name you want to configure and then press right Then do one of th...

Page 36: ... save a Remote Path press right on the Remote Path command and then press up to enter the remote path from the alphabet grid with the arrow buttons pressing OK between each letter When complete press cancel to exit the alphabet grid and then press OK to confirm the remote path The Remote Path field controls which folder the file is uploaded to on the FTP server Depending on the FTP server configur...

Page 37: ... You can configure the HHMPI through the web interface in any web browser Using the web interface is the easiest way to configure the HHMPI To access the HHMPI web interface 1 Connect the HHMPI to the local area network LAN router or switch which will allo cate a unique IP address 2 From the Main menu press down until you reach the Network Operations com mand and then press right Then press down u...

Page 38: ...he browser s address bar 2 Login to the HHMPI web interface using the default username and password Username admin Password admin See Figure 29 0 Web interface login on page 38 Figure 29 0 Web interface login Note If no link is detected an IP address has not been assigned to the HHMPI this may be because of you network security settings See your IT department or contact Flight Data Systems for mor...

Page 39: ...Admin displays the administrators configuration including owner information and access restrictions 5 4 1 Changing the HHMPI configuration via the web interface To configure the HHMPI through the web interface in any web browser 1 Log on to the HHMPI web interface per Section 5 4 Setting up an FTP connection from the web interface on page 37 2 Click the Device Configuration tab see Figure 31 0 Dev...

Page 40: ...HHMPI web interface per Section 5 4 Setting up an FTP connection from the web interface on page 37 2 Click the Backup Restore tab see Figure 31 0 Device configuration screen on page 40 The Backup Restore screen allows you to back up the device configuration aircraft list and SSL certificate if installed in order to restore it later 3 Click Aircraft List and then click Save 4 Repeat steps 1 to 3 to...

Page 41: ...tricting configuration or restricting main menu access Change the administrator login Reset the device or restore back to factory settings Figure 33 0 Device configuration screen To change admin settings follow these steps 1 From the Access Restrictions collapsible menu set the new passcode and then click Save 2 The next time you turn on the HHMPI the new passcode will take effect when attempting ...

Page 42: ...ssly upload files from the HHMPI to a server when in range of a wireless net work 1 Turn on the HHMPI 2 Plug the USB wireless network adapter into the USB port on the top of the HHMPI An alert Configuring Wi Fi Please Wait should appear monetarily A white antenna icon will also appear in the status bar indicating the HHMPI is ready to connect to wireless networks in range 3 From the Main menu pres...

Page 43: ...rn to the Wireless Settings menu then press down to select the Key command and then press right to enter the key 3 Press up to enter the key from the alphabet grid with the arrow buttons pressing OK between each letter When you are finished press cancel and then OK to return to the Wireless Settings menu If you have successfully connected to a wireless network the white antenna icon in the status ...

Page 44: ...een configured See Section 5 0 Configuring an FTP connection on page 34 7 0 Troubleshooting To troubleshoot the HHMP first try the following steps Turn the HHMPI on and off by following the steps in Section 3 2 4 Turning on the HHMPI and self test on page 16 If this did not work try connecting the HHMPI to a power adapter and plug the power adapter into an electrical outlet or connect the HHMPI to...

Page 45: ...y requires charge for battery equipped units For HHMPIs without an internal battery ensure that it is con nected to a powered recorder Screen is not visible Reset the HHMPI by following the steps in Section 3 2 5 Reset operation on page 16 No communication between the HHMPI and the recorder Ensure that the HHMPI is configured for the recorder see Sys tem Information in Section 5 4 1 Changing the H...

Page 46: ...t get IP address through wireless network Ensure that the USB wireless network adapter is plugged into the USB port on the top of the HHMPI and ensure correct con nection to the recorder Connection is indicated by a white antennae icon found in the status bar of the display See Section 3 5 4 Network Settings on page 18 Ensure wireless networking is enabled If no link is detected an IP address has ...

Page 47: ...rmat described in Section 4 2 2 Creating an Aircraft List on a PC on page 20 Try loading the file through the web interface see Section 5 4 1 Changing the HHMPI configuration via the web interface on page 39 Cannot copy file from external memory device Ensure that the external memory device is connected Connec tion is indicated by an orange USB flash drive icon found in the status bar of the displ...

Page 48: ... can be played on a PC or other device CVR Time Retrieves the last specified duration of cockpit voice recordings See Section 4 3 Downloading flight data on page 23 8 2 Recorder Operations The FA2100 supports the following recorder operations Monitoring of FDR Status Monitoring of CVR Status Setting of FDR and CVR memory markers Unsupported Cable Detected Ensure that the aircraft interface cable i...

Page 49: ...ht can be forced on or off using the left and right buttons 8 6 Clear Latched Fault Sets or reset the fault log 8 7 Clear Fault Log Erases the fault log 8 8 Dump Fault Log Saves the fault log to selected memory See Figure 37 0 FA2100 Recorder Operations Dump Debug Trace on page 49 Figure 37 0 FA2100 Recorder Operations Dump Debug Trace 8 9 Dump Debug Trace This function dumps the running debug str...

Page 50: ...ind or fast forward the current playback position See Figure 38 0 CVR Live Audio volume control on page 50 Figure 38 0 CVR Live Audio volume control 8 12 Live Data View Real time ARINC 717 data can be monitored from the FA2100 See Section 4 4 Viewing live flight data on page 26 8 13 Menu Tree The following menu items are enabled on connection to a FA5000 FA5001 recorder Note The CVFDR must be conf...

Page 51: ...R Since Last Retrieves only new Datalink recordings recorded since the last down load operation was performed DLR Last Flight Retrieves only new Datalink recordings recorded since the last flight DLR Time Retrieves the last specified duration of Datalink recordings Recorder Operations FDR Status FDR Stream Detected Frame Lock Recorded Minutes Latched Fault CVR Status Latched Fault Recording FDR Fa...

Page 52: ...es only new BIT data recorded since the last flight BIT Time Retrieves the last specified duration of BIT data See Figure 39 0 SRVIVR Download Operations on page 52 and Section 4 3 Down loading flight data on page 23 Figure 39 0 SRVIVR Download Operations 9 2 Recorder Operations The SRVIVR supports the following recorder operations Monitoring of CVFDR information including system version serial nu...

Page 53: ... which channel you want to listen to Shortcut button 2 increases the volume and shortcut button 3 decreases the volume See Figure 45 0 CVR Live Audio volume control on page 58 9 4 Live Data View Three streams of real time data can be monitored from the SRVIVR Live ARINC 717 see Section 4 4 Viewing live flight data on page 26 Monitoring of Captain s Clock on the ARINC 429 GMT BUS both labels 125 an...

Page 54: ...Last Flight DLR Time FDR All FDR Since Last FDR Last Flight FDR Time BIT All BIT Since Last BIT Last Flight BIT Time Recorder Operations Information System Version Serial Number Hardware Version Processor Version CPM Version Audio Version ARINC Version Boot Version OFP Version OFP CRC Config Data Version Config Data CRC Operating Hours Last Time Stamp CVFDR Mode Discrete Inputs Discrete Outputs CV...

Page 55: ...t voice recordings newer than a specified memory mark DLR All Retrieves all Datalink recordings from the recorder DLR Since Last Retrieves only new Datalink recordings recorded since the last down load operation was performed DLR Mark Retrieves all Datalink recordings newer than a specified memory mark See Figure 42 0 FA5000 FA5001 Download Operations on page 56 and Section 4 3 Downloading flight ...

Page 56: ...ink recordings recorded since the last down load operation was performed DLR Mark Retrieves all Datalink recordings newer than a specified memory mark Figure 42 0 FA5000 FA5001 Download Operations 10 2 Recorder Operations The FA5000 FA5001 supports the following recorder operations Monitoring of FDR Status See Figure 43 0 FA5000 FA5001 Recorder Operations FDR Status on page 57 Monitoring of CVR St...

Page 57: ...FA5000 FA5001 audio can be both monitored in real time and also play back previ ously recorded data To listen to audio plug headphones into the audio jack on the bot tom of the HHMPI see Figure 3 0 HHMPI bottom view on page 7 Press the up and down buttons to select which channel you want to listen to Shortcut button 2 increases the volume and shortcut button 3 decreases the volume In playback mode...

Page 58: ...5 and 150 Monitoring of Rotor Frequency in Hz 10 6 Menu Tree The following menu items are enabled on connection to a FA5000 FA5001 recorder Note The CVFDR must be configured appropriately for playback that is not currently recording Refer to the component maintenance manual for instructions Table 12 0 Additional menu items for FA5000 FA5001 CVFDR Main Menu Menu Level 1 Menu Level 2 Download Operat...

Page 59: ... List of storage devices FDR Configuration Information Recorder Part Number Aircraft ID Recorder Serial Number Date YYYY MM DD Time HH MM SS MS FW Version L3 HW FPGA Part Number L3 HW FPGA Part Number Revision L3 FW FPGA Part Number L3 FW FPGA Part Number Revi sion L3 FPGA FW Date DD MM YYYY PN Unknown1 PN Unknown2 Audio Operations CVR Live Audio Select Monitor Channel HQV1 HQV2 HQV3 SQN SQC HQC A...

Page 60: ...om the recorder 11 3 FDR Configuration The FDR configuration menu details information such as aircraft serial number version numbers MP Software P N and CP Software P N upload of Operational Flight Program OFP and settings for the aircraft tail number See Figure 46 0 VADR information on page 60 Figure 46 0 VADR information 11 4 Upload OFP to the HHMPI To upload OFP to the HHMPI 1 Power up the HHMP...

Page 61: ...nual 61 FDS 400 301 Once complete return to the FDR Configuration and confirm the files are loaded in the information section See Figure 47 0 Uploading OFP to the VADR from the HHMPI on page 61 Figure 47 0 Uploading OFP to the VADR from the HHMPI ...

Reviews: