15
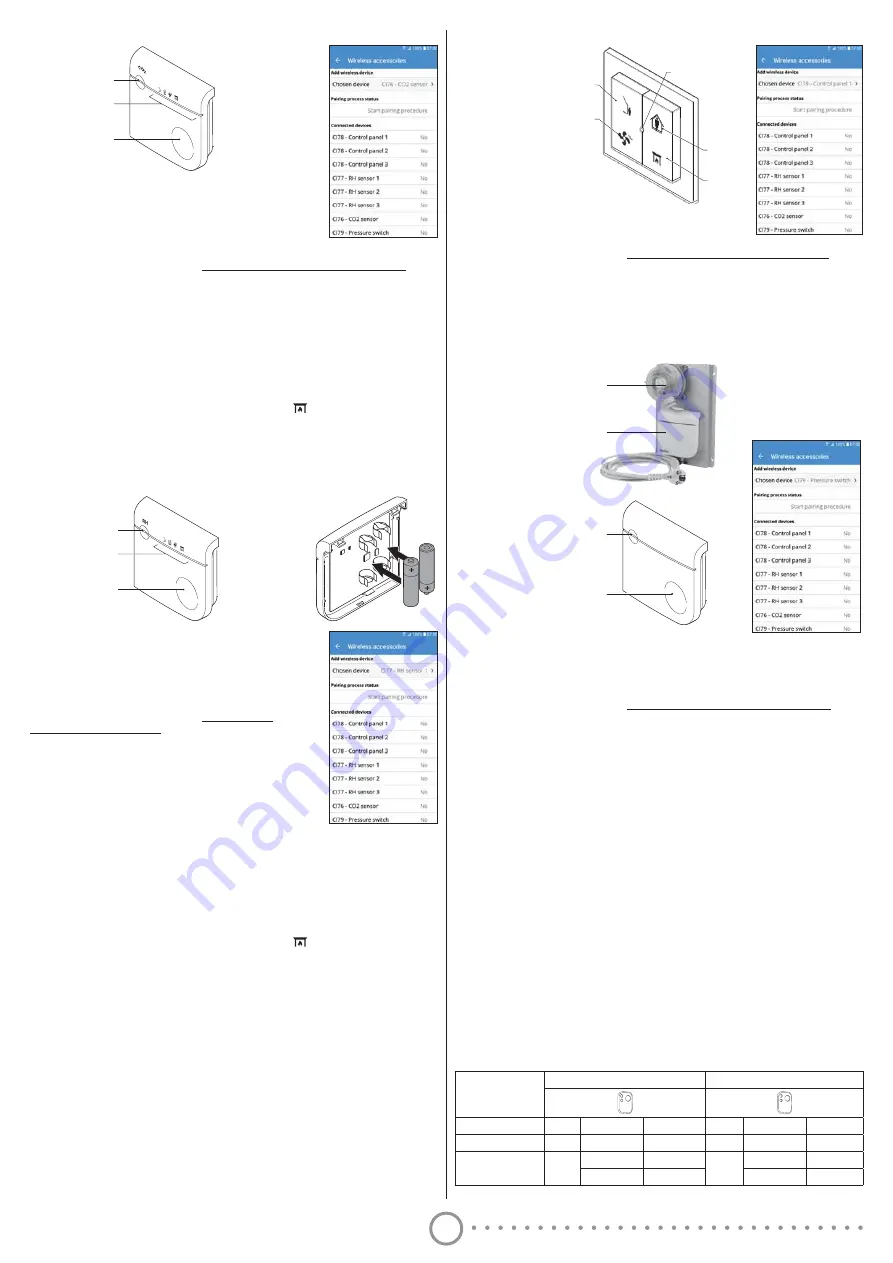
&RPPLVVLRQLQJ&Ζ&2
2
-sensor
A: Status LED
B: Mode LEDs
C: Touch
button
A
B
C
3UHUHTXLVLWH$GDSWHU&ΖPXVWEHLQVWDOOHGDQGFRQȴJXUHG
2 Turn on the power to the device, all LEDs will light for 3 seconds.
3 Wait until the status indicator shows the connection mode, status
/('$ȵDVKHVDOWHUQDWLQJJUHHQUHGΖIWKHGHYLFHVKRZVDQRWKHU
indication, follow the instructions under 3.3.1.1.
4 Launch the Flexit GO app on your mobile device and connect to the
product.
5 When the home screen appears, go to More
/
Additional functions
/
Wireless accessories.
6 Press
Chosen device
under the heading
Add wireless device
. Then choose
CI 76 CO
2
sensor
.
7 When the
Pairing process status
has switched to
Start pairing procedure
(see image),
SUHVVEXWWRQ&ΖIVWDWXV/('$ȵDVKHVJUHHQHYHU\WKLQJLV2.ΖIQRWSUHVVEXWWRQ&DJDLQ7KH
device is now connected with the product which is shown in the list
Connected devices
after a
few seconds.
ΖIWKH&ΖKDVEHHQFRQQHFWHGEHIRUH
1 Launch the Flexit GO app on your mobile device and connect to the product.
2 When the home screen appears, go to More/Additional functions/Wireless accessories.
3 Press
Chosen device
under the heading
Add wireless device
. Then choose
CI 76 CO
2
sensor
.
4 When the
Pairing process status
has switched to
Start pairing procedure
(see image),
repeat pressing button C until Mode LEDs B indicate Fireplace
. Press and hold button C until
WKHVWDWXV/('$LVȵDVKLQJZKLWHDQGWKHQUHOHDVHEXWWRQ&:KHQWKHVWDWXV/('$LVȵDVKLQJ
DOWHUQDWLQJJUHHQUHGSUHVVEXWWRQ&ΖIWKHVWDWXV/('$LVȵDVKLQJJUHHQHYHU\WLQJLV2.LI
not, press button C again. The device is now connected with the product which is shown in the
list
Connected devices
after a few seconds.
&RPPLVVLRQLQJ&Ζ5+VHQVRU
A: Status LED
B: Mode LEDs
C: Touch button
A
B
C
3UHUHTXLVLWH$GDSWHU&ΖPXVWEHLQVWDOOHGDQGFRQȴJXUHG
2 Place the batteries, all LEDs will be lit for 3 seconds. The status
LQGLFDWRUVKRZVWKHFRQQHFWLRQPRGHWKHVWDWXV/('$ȵDVKHV
alternating green / red. If the device shows another indication,
follow the instructions under 3.3.2.1.
3 Launch the Flexit GO app on your mobile device and connect to
the product.
4 When the home screen appears, go to More/Additional
functions/Wireless accessories.
5 Press
Chosen device
under the heading
Add wireless device
.
Then choose
CI 77 RH sensor 1
if you have not installed any
previously, otherwise choose the next available no.
6 When the
Pairing process status
has switched to
Start
pairing procedure
VHHLPDJHSUHVVbEXWWRQ&
The status indicator shows the connection mode. Press button
&RQFHDJDLQZLWKLQVHFΖIWKHVWDWXVOLJKW$ȵDVKHVJUHHQ
everything is OK. If not, press the button C again.
The device is now connected with the product, which is shown in the list
Connected devices
after a few seconds. To add more devices, repeat the process.
ΖIWKH&ΖKDVEHHQFRQQHFWHGEHIRUH
1 Launch the Flexit GO app on your mobile device and connect to the product.
2 When the home screen appears, go to More/Additional functions/Wireless accessories.
3 Press
Chosen device
under the heading
Add wireless device
. Then choose
CI 77 RH sensor 1
if you have not installed any previously, otherwise choose the next available no.
4 When the
Pairing process status
has switched to
Start pairing procedure
(see image),
repeat pressing button C until Mode LEDs B indicate Fireplace
. Press and hold button C until
WKHVWDWXV/('$LVȵDVKLQJZKLWHDQGWKHQUHOHDVHEXWWRQ&:KHQWKHVWDWXV/('$LVȵDVKLQJ
DOWHUQDWLQJJUHHQUHGSUHVVEXWWRQ&ΖIWKHVWDWXV/('$LVȵDVKLQJJUHHQHYHU\WLQJLV2.LI
not, press button C again. The device is now connected with the product which is shown in the
list
Connected devices
after a few seconds.
&RPPLVVLRQLQJ&ΖFRQWUROSDQHO
A:
Away button
B:
Home button
C:
Timer button
D:
Fireplace button
E:
Status LED
A
C
D
B
E
3UHUHTXLVLWH$GDSWHU&ΖPXVWEHLQVWDOOHGDQGFRQȴJXUHG
2 Launch the Flexit GO app on your mobile device and connect to
the product.
3 When the home screen appears, go to More
/
Additional functions
/
Wireless accessories.
4 Press
&KRVHQGHYLFH
under the heading
$GGZLUHOHVVGHYLFH
b7KHQFKRRVH
&Ζ&RQWURO
Panel 1
if you have not installed any previously, otherwise choose the next available no.
5 When the
Pairing process status
has switched to
Start pairing procedure
(see image), press
DQGKROGGRZQEXWWRQ$DQG%XQWLOWKHVWDWXV/('(ȵDVKHVJUHHQ
The device is now connected with the product, which is shown in the
&RQQHFWHGGHYLFHVOLVW
after a few seconds. To add more devices, repeat the process.
&RPPLVVLRQLQJ&ΖSUHVVXUHVZLWFK
A: Pressure switch
B: Input module, wireless
A
B
C: Status LED
D: Touch button
C
D
3UHUHTXLVLWH$GDSWHU&ΖPXVWEHLQVWDOOHGDQGFRQȴJXUHG
2 Turn on the power to the device, the status LED will light for 3 seconds.
:DLWXQWLOWKHVWDWXVLQGLFDWRUVKRZVWKHFRQQHFWLRQPRGHVWDWXV/('&ȵDVKHVDOWHUQDWLQJ
green / red. If the device shows another indication, follow the instructions under 3.3.4.1.
4 Launch the Flexit GO app on your mobile device and connect to the product.
5 When the home screen appears, go to More
/
Additional functions
/
Wireless accessories.
6 Press
Chosen device
under the heading
Add wireless device
. Then choose
CI 79 pressure
switch
.
7 When the
Pairing process status
has switched to
Start pairing procedure
(see image),
SUHVVbEXWWRQ'ΖIVWDWXVOLJKW&ȵDVKHVJUHHQHYHU\WKLQJLV2.ΖIQRWSUHVVEXWWRQ'DJDLQ7KH
device is now connected with the product which is shown in the list
Connected devices
after a
few seconds.
ΖIWKH&ΖKDVEHHQFRQQHFWHGEHIRUH
1 Launch the Flexit GO app on your mobile device and connect to the product.
2 When the home screen appears, go to More/Additional functions/Wireless accessories.
3 Press
Chosen device
under the heading
Add wireless device
. Then choose
CI 79
pressureswitch
.
4 When the
Pairing process status
has switched to
Start pairing procedure
(see image),
SUHVVDQGKROGEXWWRQ'XQWLOWKHVWDWXV/('&LVȵDVKLQJZKLWHDQGWKHQUHOHDVHEXWWRQ'
:KHQWKHVWDWXV/('&LVȵDVKLQJDOWHUQDWLQJJUHHQUHGSUHVVEXWWRQ'ΖIWKHVWDWXV/('&LV
ȵDVKLQJJUHHQHYHU\WLQJLV2.LIQRWSUHVVEXWWRQ'DJDLQ7KHGHYLFHLVQRZFRQQHFWHGZLWKWKH
product which is shown in the list
Connected devices
after a few seconds.
4 Description
ΖQWHQGHGXVH
The device is designed to work as a bridge between the ventilation unit and wireless accesories
such as CO
2
sensor, RH sensor, control panel and pressure switch.
:RUNLQJSULQFLSOH
The device communicates with the ventilation unit using Modbus RTU/RS485. Via the LEDs you
can read the status of the unit.
9LVXDOVLJQDOV
3RZHU/('
(UURU/('
Startup
White Continuous
White
Continuous
System status
Green Continuous
Power ON
Red
Continuous
Red
Continuous
Alarm
ȵDVK
ȵDVK
Summary of Contents for CI 75
Page 2: ...2 3 5 8 10 13...


