-14-
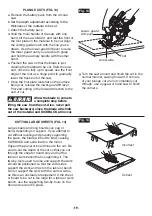
90° CUTTING ANGLE CHECK (FIG. 5)
a. Remove the battery pack from the circular
saw. Set the foot to the maximum depth of cut
setting.
b. Loosen the bevel-adjustment lever and set the
bevel indicator to 0° on quadrant. Retighten
the lever, and check for 90° angle between
the blade and bottom plane of foot with a
square.
c. Use a 3/32" allen wrench (not included) to
make adjustments, if necessary, by turning
the small alignment screw from the bottom
side of the foot.
BEVEL ADJUSTMENT (FIG. 6)
a. Remove the battery pack from the circular
saw.
b. Loosen the bevel-adjustment lever at the
front of the saw. Tilt the saw foot and align
the bevel indicator to the desired angle on
the calibrated quadrant, and then tighten the
bevel-adjustment lever.
Bevel-preset Knob
The bevel-preset knob allows the operator to
quickly set bevel at 22.5°,45°and 56°.
The bevel-preset knob of your saw was set to
56° at the factory.
a. Push the bevel-preset knob and turn it to one
of the desired setting (22.5°/ 45°/ 56°).
b. Release the bevel-preset knob and it will
serve as a travel stop when adjusting the
bevel angle.
WARNING
Because of the increased
amount of blade
engagement in the work and decreased
stability of the foot, blade binding may
occur. Keep the saw steady and the foot
firmly on the workpiece.
Fig. 6
Bevel-
preset
Knob
Bevel-adjustment Lever
Quadrant
Fig.5
Quadrant
Bevel Adjustment
Lever
Foot
Blade
90
°
Alignment Screw
Bevel
Indicator


