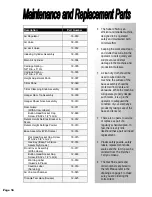
Fletcher-Terry Fletcher Saber 250-A Owner'S Manual Download Page 17

Description

Part Number

Air Regulator

18-000

Air Valve

18-001

Air Limit Valve

18-002

Indexing Cylinder Assembly

18-003

Main Air Cylinder

18-004

Carriage Spring –
5/8" Dia. x 5" LG

18-005

Carriage Spring –
1/2" Dia. x 5" LG

18-006

Height Adjustment Knob

18-007

T-Bar Shoe

12-349

T-Bar Clamping Knob Assembly

18-008

Hanger Ram Tip Assembly

18-009

Hanger Shear Nose Assembly

18-010

Ram Guard

(With Arrow Labels)

18-011

Button Head Socket Cap
Screw, #8-32 x 1/2" LG (4)

12-848

Detent Height Settings Bracket &
Scale

18-012

Detent Height Settings Pointer

18-013

Base Assembly (With Scales)

18-014

Flat Head Socket Cap Screw,
#10-32 x 5/8" LG (2)

18-015

Hex Key (Base-To-Frame
Assembly Screws)

18-016

Front Cover Assembly

(With Labels)

18-017

Button Head Socket Cap
Screw, #8-32 x 1/2" LG (4)

12-848

Warning Label
(Guards in Place)

18-018

Caution Label
(Servicing)

18-019

Air Volume Chamber

18-020

Triangle Template (Square)

12-625

ÿ

The Saber 250-A is an
efficient and reliable machine,
designed to be operated
safely and maintained with
minimal effort.

ÿ

Keeping the work area clean
and clutter-free will allow the
operator to work quickly and
will prevent accidental
damage to the machine and
production materials.

ÿ

A clean dry cloth should be
used to wipe down the
machine; the surface of the
base assembly should be
protected from dents and
abrasions. While the machine
will operate properly despite
such marks, it is up to the
operator to safeguard the
condition of your company’s
product by taking care of the
base and fence(s).

ÿ

There are no parts to service
or replace as part of a
regularly scheduled plan. In
fact, there is very little
likelihood that a part will need
replacement.

ÿ

Plastic safety guards, safety
labels, replacement knobs,
scales and the ram tip can be
ordered from The Fletcher-
Terry Company.

ÿ

The machine’s parts and
order numbers are listed to
the left. Please refer to the
drawings on page 4 to make
sure you are ordering the
correct item.

ÿþýü úù

Summary of Contents for Fletcher Saber 250-A

Page 1: ...ccurate and Efficient Saw Tooth Hanger Installation Form 032404 The Fletcher Terry Company 65 Spring Lane Farmington CT USA 06032 3311 Tel 860 677 7331 or 800 843 3826 Fax 860 676 8858 www fletcher terry com customerservice fletcher terry com ...

Page 2: ...e of purchase The Fletcher Terry Company warrants that it will repair or replace any such defective machine or replace parts providing the machine has been under normal use and service and the defective part or machine is returned to The Fletcher Terry Company at the purchaser s expense The Fletcher Terry Company must authorize the return in writing Proof of purchase must be submitted to validate ...

Page 3: ... before performing maintenance removing a jam or cleaning the Saber 250 A Even if a hanger strip is not visible on the guide assume that there may be one or two hangers remaining in the machine ÿ Use clean dry regulated compressed air at a minimum pressure of 100 PSI at 2 CFM The system includes a filter and pressure regulator Do not connect this machine to an air supply with maximum potential pre...

Page 4: ... a This Owners Manual b A Warranty Card c Flat Head Socket Cap Screws 2 d Hex Key 1 e Triangle Template for squaring 1 All instructions in this manual assume that you are facing the front of the machine and that the machine has been placed on a flat and secure surface If anything is missing please contact a Fletcher Terry Customer Service Representative at 800 843 3826 at 860 677 7331 or customers...

Page 5: ...VIEW A FROM RIGHT SIDE VIEW B FROM THE FRONT VIEW C FROM ABOVE Figure 4 Figure 5 Figure 6 ÿþýü ú ...

Page 6: ...ator Be sure to leave sufficient room for attaching the base assembly The base assembly will run along the front edge of the workstation If you decide to anchor the Saber 250 A to your work surface locate the four predrilled holes on the crossmember of the frame Figure 7 These will allow you to secure the machine with four bolts not included Please Note When the base is attached to the tower a squ...

Page 7: ...ws Loosely tighten the left but do not tighten the right screw The right screw will not be tightened until the squaring procedure is complete Attach the fence assembly and position it at the 10 mark on Scale A Gently move the base assembly until the triangle is perfectly squared to the fence and T bar When you have done so tighten the right screw and then the left THE MACHINE IS NOW PROPERLY SQUAR...

Page 8: ...ng downwards and teeth facing the machine s operator i e the front of the Saber 250 A Once the strip is loaded onto the guide the operator pushes the strip forward toward the front of the machine until the hanger strip stops The required hanger strips part number 08 810 may be ordered by contacting the Fletcher Terry Customer Service Department at 800 843 3826 outside the U S call 860 677 7331 or ...

Page 9: ...ve a saw tooth hanger using the Saber 250 A ÿþ üûúùø û öõû ô úóû úòñ ðñïøùö öõû üúîõíòû The Saber 250 A requires the operator to determine three measurements before proper placement of a saw tooth hanger can be made a The width of the frame b The hanger s placement from the top of the frame to the centerline of the hanger c The height or thickness of the frame Figure 11 úû ...

Page 10: ... notice that doing so will free the Carriage to glide up or down as you wish v This movement of the Carriage will cause the Height Setting Pointer to move along the Height Scale Scale C at the upper right hand corner of the machine vi The Carriage will lock into any one of six 6 pre set positions that correspond to a range of heights vii Find the range that includes measurement c viii Feel for the...

Page 11: ...y guidelines of your employer ÿ You are wearing safety glasses prior to working with this equipment ÿ You have assembled the Saber 250 A and have created an uncluttered work area for the machine ÿ It is securely positioned possibly mounted on your work surface ÿ You are familiar with the major components of the Saber 250 A and know that three measurements must be taken before adjusting the machine...

Page 12: ...ckside up with its left edge pressed against the left fence þ The top edge of the frame is leveled against the T Bar assembly þ The operator then pushes the frame squarely into the machine against the T Bar thereby triggering the pneumatic switch þ When the pneumatic cylinder is activated the machine s ram will insert the hanger into the frame at the proper location This process can be repeated 25...

Page 13: ...fence assembly may be ordered to attach on the right side of the base in order to provide the operator with a step saving method of installing the hangers Using a Small Frame Adapter to Insert Hangers The sizes of some frames are such that they will be too small to be effectively handled by the standard T Bar assembly of the Saber 250 A Therefore The Fletcher Terry Company has designed an optional...

Page 14: ...ereas a single hanger is centered on a frame two hangers must be lined up horizontally at an equal distance from the center or at an equal distance from the frame s edge ÿ The operator manually determines the placement of the first hanger and takes that measurement The essential thing to remember is that the placement and measurement of the second hanger must mirror that of the first Both fences m...

Page 15: ...design To remove the hanger strip locate the ram guard above the T bar assembly and push up on the orange release lever Remove the hanger and then make sure the hanger strip is reloaded properly before reconnecting the air supply See page 6 There is no air pressure The source of compressed air is disconnected or improperly connected to the Saber 250 A Re check your air source and hose connections ...

Page 16: ...measurements reflected on the scale on Scale B Refer to page 9 in order to review measurement settings Hanger strip does not feed properly a The hanger strip may be slightly bent or twisted b The flow control valve is closed or clogged a The hanger strip can be fed with minimal misshape however it should be manually corrected if possible If the strip is badly bent the strip needs to be replaced b ...

Page 17: ...le Template Square 12 625 ÿ The Saber 250 A is an efficient and reliable machine designed to be operated safely and maintained with minimal effort ÿ Keeping the work area clean and clutter free will allow the operator to work quickly and will prevent accidental damage to the machine and production materials ÿ A clean dry cloth should be used to wipe down the machine the surface of the base assembl...

Reviews: