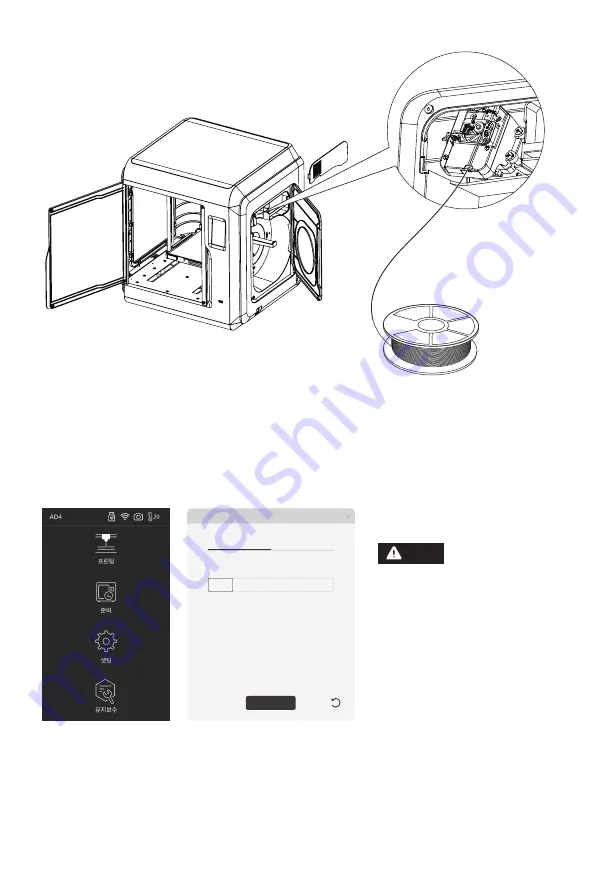
FLASHFORGE 3D PRINTER Adventurer 4 Quick Start Manual Download Page 26

2. 

필라멘트


로딩

 : 

오른쪽에


있는


필라멘트


덮개를


열고


필라멘트를


필라멘트


흡입구에


삽입

하고


약간의


저항이


느껴질


때까지


필라멘트를


공급


휠로


밀어


넣습니다

필라멘트가


공급


있는지


확인하십시오

.

[

준비

]-[

필라멘트

]-[

로딩

]

순서로


탭하세요

 . 

지침을


따르십시오

노즐에서


필라멘트가나오면

성공을


나타냅니다

.

3.

모델 파일 전송

방법

1: 

와이파이 연결


[

셋팅

]-[

네트워크

]-[

와이파이

]


누르고


지시에


따라


작동하십시오

. FlashPrint


열고


[

프린팅

]

를클릭한


다음

 [

기기 종류

]


클릭하고

 [FlashForge Adventurer 4]


선택합니다

IP 

주소를


입력하거나


자동으로


스캔할


있습니다

. IP 

주소는

 [

셋팅

] - [

대하여

]

에서


확인할


있습니다.

사용자가


브라우저를


사용하여

이미지를


보려면


프린터와

 PC


인트라넷에


있어야


합니다

(

프린터와

 PC


동일한


라우터에


연결된


상태

 ).

IP Address

IP Port:

192

.

.

.

:

168

2

122

8899

Auto-scan

Connection

Connect

주의

24

Summary of Contents for Adventurer 4

Page 1: ...FLASHFORGE Adventurer 4 3D printer WARNING 1 Do not remove the wrapping around the nozzle 2 Hot Avoid touching the heating nozzle in operation 3 Moving parts in printer may cause injury Do not wear gl...

Page 2: ......

Page 3: ...uckle 18 Air duct 19 Nozzle 14 Cable slot 1 2 3 4 5 9 10 7 8 6 11 12 20 13 14 15 16 17 18 19 21 Adventurer 4 Quick Start Guide 5 Filament intake cover 7 Platform base 9 Touch screen 4 Spool holder 1 P...

Page 4: ...Disk Packing Specification 02 Adventurer 4 4 Quick Start Guide EN CN DE FR A01 4 3D This guide is only applicable to FLASHFORGE Adventurer 4 3D printer WARNING 1 Do not remove the wrapping around the...

Page 5: ...tep is optional please refer to the interface function introduction before operation Find the FlashPrint installation package in the USB disk and select the version corresponding to your system to ins...

Page 6: ...Model File Transfer Method 1 Wi Fi Connection Tap Settings Network WIFI operate according to the instruction Open FlashPrint click Print then click Machine Type select FlashForge Adventurer 4 You can...

Page 7: ...print 4 Model Removal Take out the removable build plate and bend the plate to get the model Nozzle and build plate are still hot after finishing printing please wait for them to cool down before you...

Page 8: ...20 13 15 12 16 21 17 18 19 14 1 2 3 4 5 9 10 7 8 6 11 12 20 13 14 15 16 17 18 19 21 4 5 7 9 4 1 2 8 6 11 10 USB 3 06...

Page 9: ...icable to FLASHFORGE Adventurer 4 3D printer WARNING 1 Do not remove the wrapping around the nozzle 2 Hot Avoid touching the heating nozzle in operation 3 Moving parts in printer may cause injury Do n...

Page 10: ...U FlashPrint www sz3dp com 1 08...

Page 11: ...2 3 WiFi WiFi FlashPrint 4 IP IP IP IP 192 168 2 122 8899 09...

Page 12: ...stl obj U U U U 4 10...

Page 13: ...hrung Rohrverbindung 15 Gebl se f r die Modellk hlung 11 Ethernet Eingang 12 Extruder 10 USB 16 Gebl se f r die Extruderk hlung 21 Luftfilter 17 Spange Luftkanal 18 Luftkanal 3 Filamentabdeckung 19 D...

Page 14: ...arte USB Festplatte Verpackung 12 Adventurer 4 4 Quick Start Guide EN CN DE FR A01 4 3D This guide is only applicable to FLASHFORGE Adventurer 4 3D printer WARNING 1 Do not remove the wrapping around...

Page 15: ...tionen entnehmen Sie bitte der Beschreibung f r die entsprechende Funktion Suchen Sie das FlashPrint Installationspaket auf dem USB Wechseldatentr ger und w hlen Sie f r die Installation die entsprech...

Page 16: ...lossen 3 bertragung der Modelldatei Methode 1 WLAN Verbindung Ber hren Sie Einstellungen Netzwerk WIFI und befolgen Sie die Anweisungen ffnen FlashPrint Tippen Sie auf Drucken Ger tetyp und auf Flashf...

Page 17: ...r und w hlen Sie die Dateien f r den Druck aus 4 Modell herausnehmen Nehmen Sie die Bauplatte heraus und biegen Sie die Platte um das Modell zu l sen Nach dem Druckvorgang sind D se und Konstruktionsp...

Page 18: ...du tige de guidage de filament 15 Ventilateur pour le refroissement du mod le 11 Entr e Ethernet 12 Extrudeuse 10 USB 16 Ventilateur pour le refroissement de l extrudeuse 21 Filtre air 17 Boucle 18 C...

Page 19: ...ment Cl USB Sp cification de l emballage 17 Adventurer 4 4 Quick Start Guide EN CN DE FR A01 4 3D This guide is only applicable to FLASHFORGE Adventurer 4 3D printer WARNING 1 Do not remove the wrappi...

Page 20: ...pr sentation de la fonction d interface avant l utilisation Vous pouvez trouvez votre package d installation de FlashPrint dans la cl USB S lectionnez la version qui correspond votre syst me Vous pou...

Page 21: ...ssi 3 Transfert de fichier de mod le M thode 1 Connection au Wi Fi Cliquez sur Param tres R seau WIFI et suivez les instructions Ouvrez le FlashPrint cliquez sur Imprimer puis cliquez sur Type Machine...

Page 22: ...fichier imprimer 4 Retrait du mod le apr s l impression Retirez le plateau pliable et pliez le pour obtenir le mod le La buse et le plateau sont toujours chauds apr s l impression Veuillez attendre qu...

Page 23: ...5 7 9 4 1 2 8 6 20 13 15 11 12 10 USB 16 21 17 18 3 19 14 1 2 3 4 5 9 10 7 8 6 11 12 20 13 14 15 16 17 18 19 21 Aadventurer 4 21...

Page 24: ...cable to FLASHFORGE Adventurer 4 3D printer WARNING 1 Do not remove the wrapping around the nozzle 2 Hot Avoid touching the heating nozzle in operation 3 Moving parts in printer may cause injury Do no...

Page 25: ...3D USB FlashPrint https www flashforge com download center 1 23...

Page 26: ...2 3 1 FlashPrint FlashForge Adventurer 4 IP IP PC PC IP Address IP Port 192 168 2 122 8899 Auto scan Connection Connect 24...

Page 27: ...stl obj 2 USB USB USB 4 Removable 25...

Page 28: ...Zhejiang Flashforge 3D Technology Co Ltd Address No 518 XianYuan Road Jinhua City Zhejiang Province China Service Hotline 86 579 82273989 support ashforge com Follow us...

Reviews: