FLASHFORGE 3D PRINTER Adventurer 4 Lite User Manual Download Page 23

Q3. Do we need to calibrate the extruder after replacing nozzle?

Yes, small errors may occur because of the calibration. To keep best printing 
quality, you need to calibrate it again.

Q4

. What can I do if no filament comes out of the extruder after I choose the file 

and the extruder moves normally?

Q5

. How to solve if the distance between nozzle and platform is too large(far 

away) or too small(that they collide)?

Tap[Maintain]--[Calibration];

The printer starts pre-calibrating. The first point is to calibrate the initial distance 

between the extruder and the platform (see Z-axis deviation value). Click the up 

and down arrows to adjust the Z-axis deviation value. With the help of the leveling 

card, you can feel if there is any slight resistance to decide the appropriate 

distance.

When the extruder is still unable to properly print a large size model after 

calibration, or when the model fails to be printed due to uneven platforms, please 

continue using this function. The machine will calibrate the remaining 8 points. 

After calibration is completed, the software will automatically calculate a 

compensation mean to compensate. When each point is being calibrated, the user 

can also adjust the Z-axis deviation by clicking the up and down arrows. After 

compensation is completed, the value is memorized and the extruder goes back to 

zero.

1.

2.

3.

1.

2.

Check the filament guide tube, make sure the filament has been pushed into the 

extruder; if not, please tap [Load] till filament comes out;

check whether the extruder is clogged, if so, please refer to Q1.

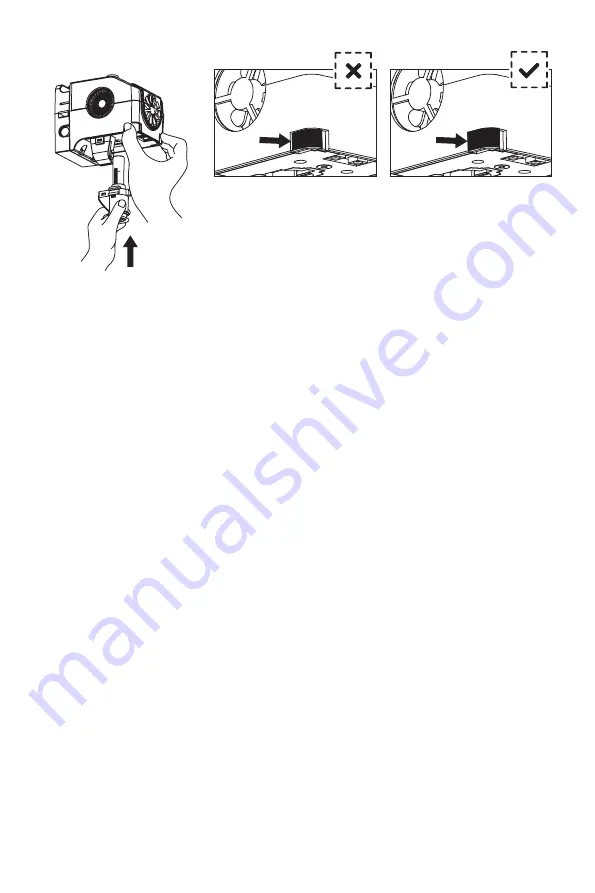
Whether the extruder assembly is in place is judged as 

follows:

1.When installed, the extruder must be pushed to the 

end;

2.Check whether the installation is in place:

   ①Touch the black buckle and the lower shell of the 

white extruder, make sure no hollows are felt;

   ②Observe to make sure there is no large gap in the 

joint of the black buckle and the lower shell of the white 

extruder.

Improperly installed 

with seam

Properly installed with 

no seam

22

Summary of Contents for Adventurer 4 Lite

Page 1: ...Adventurer 4 Series 4 User Guide EN CN A01 P28 4 3D This guide is only applicable to FLASHFORGE Adventurer 4 Series 3D printer...

Page 2: ...2 1 Build 2 2 Prepare 2 2 1 Preheat 2 2 2 Filament 2 3 Settings 2 4 Maintain 2 4 1 Upgrade 2 4 2 Log 2 4 3 Calibration 2 4 4 ChangeExtruder 2 4 5 Maintain Chapter 3 Software Installation Chapter 4 Pr...

Page 3: ...ccelerate the aging of plastic parts To avoid device damage please use the power supply provided by Flashforge Avoid using the device during a thunderstorm In case of uncertain accident please unplug...

Page 4: ...build plate before loading unloading filament The distance between the nozzle and build plate should be kept for at least 50mm Operate the device in well ventilated environment Never use the device fo...

Page 5: ...ived including interference that may cause undesired operation Flashforge shall not be liable for errors contained herein for incidental consequential damages in connection with furnishing performance...

Page 6: ...s 0 011 mm Z axis 0 0025 mm 0 1 0 4 mm 220 x 200 x 250 mm 0 4 default 0 6 0 3 mm optional 10 150mm s 265 240 ABS PLA PC PETG PLA CF PETG CF AC100 240V DC 24V 13 3A 320W 500 L 470 W 550 H mm USB Disk W...

Page 7: ...ra AD4 13 Filament guide tube joint 15 Fan for cooling extruder 11 Ethernet input 12 Extruder 10 USB 16 Fan for cooling model 21 Air filter AD4 17 Buckle 18 Air duct 3 Filament cover 19 Nozzle 14 Cabl...

Page 8: ...Pin Tool Power Cable Grease Allen Wrench Filament Guide Tube Joint Leveling Card USB Disk AD4 Equipped 1 2 Packing Specification Scraper AD4 Lite Equipped Adventurer 4 Series 4 User Guide EN CN A01 P2...

Page 9: ...on purposes NOTE There is no camera on AD4 Lite This manual uses the interface screen of the Adventurer 4 as a reference 2 File list Tap model file for file details Long press model file multi selecti...

Page 10: ...ayer and the extruder The up and down arrows indicate that the extruder moves upward or downward Fan The fan for cooling the model Wind speed can be adjusted for printing different filaments Click OK...

Page 11: ...peedily Turn ON OFF the extruder or platform preheat Extruder highest preheat temperature 265 It s up to the chosen extruder Platform highest preheat temperature 110 Temperature can be adjusted anytim...

Page 12: ...loading is fast Change Click on Change the extruder will be heated up to the preset temperature Pull out the filament according to the instruction Insert new filament in the filament intake until some...

Page 13: ...note that the noise is normal if it moves past the farthest point of the left side and to move the build plate back and forth note that the noise is normal if it moves past the farthest point of the...

Page 14: ...the device is connected to the network it will be prompted to upgrade when the new firmware is released 2 4 2 Log When the equipment has abnormal movements the problem can be fed back to the official...

Page 15: ...extruder calibra tion or failure occurs due to uneven platform please finish 9 point leveling by calibrat ing all 9 points After calibration the software will automatically calculate a mean value for...

Page 16: ...during preheating will be set according to the selected nozzle Please ensure that the installed nozzle is the same as the selected nozzle type and click Complete to return to the maintenance interfac...

Page 17: ...onduct Calibration after unpacking This step is optional please refer to the interface function introduction before operation Find the FlashPrint installation package in the USB disk and select the ve...

Page 18: ...Filament open the filament cover on the right side insert the filament into the filament intake push filament into the feeding wheel until some resistance is felt Please make sure filaments are in the...

Page 19: ...twork WIFI operate according to the instruction Open FlashPrint click Print then click Machine Type select FlashForge Adventurer 4 4 Lite You can try to enter the IP address or scan it automatically T...

Page 20: ...lease add a printer Name Registration Code Type Cn Add Printer 2 Click My Printer Add Printer Fill in the registration number Registration Code on page and name the printer After clicking OK the infor...

Page 21: ...r to take out the model Nozzle and build plate are still hot after finishing printing please wait for them to cool down before you operate It is recommended to take the plate to the outside of the equ...

Page 22: ...t work out use an unclogging pin tool to unclog lament If method 1 2 do not work out please replace the nozzle Press the left and right clips and pull out the nozzle Push in the lament through the lam...

Page 23: ...printed due to uneven platforms please continue using this function The machine will calibrate the remaining 8 points After calibration is completed the software will automatically calculate a compen...

Page 24: ...printing job is nished No Q9 What kinds of le formats does Adventurer 4 Series support Q10 Does Adventurer 4 Series support other cloud platforms besides FlashCloud Yes Adventurer 4 Series interface...

Page 25: ...temperature setting in the slicer le might not match the highest temperature of the replaced nozzle Errors Errors in temperature displaying indicate that the new nozzle is not properly installed and...

Page 26: ...l Open FlashCloud interface or about on the printer Add the printer on FlashCloud website enter name and registration code of printer Turn on the FlashCloud switch to connect the printer 1 2 3 4 Q21 H...

Page 27: ...hite screen and no firmware If you hear the power on sound change the screen or the wiring If you cannot hear the power on sound please contact the supplier When the printer is not used for a long tim...

Page 28: ...The Flashforge support team can be reached by e mail or phone between the working hours of 8 00 a m to 5 00 p m PST Monday through Saturday In case you contact us during o duty time your inquiry will...

Page 29: ...1 1 1 2 2 1 2 2 2 2 1 2 2 2 2 3 2 4 2 4 1 2 4 2 2 4 3 2 4 4 2 4 5 Q A 29 31 31 32 33 33 35 35 36 37 38 38 38 38 39 40 40 40 41 45 50 28...

Page 30: ...5 20 T10AL250V 3D 29...

Page 31: ...30 20cm 35cm 0 40 15 30 20 70 2021 4 Copyright 2021 50mm...

Page 32: ...5 7 9 4 1 2 8 6 20 AD4 13 15 11 12 10 USB 16 21 AD4 17 18 3 19 14 1 2 3 4 5 9 10 7 8 6 11 12 20 13 14 15 16 17 18 19 21 1 1 31 Adventurer 4 lite...

Page 33: ...3D 3D 0 4 265 AD4 U AD4 1 2 AD4 Lite 32 AD4 Lite Adventurer 4 Series 4 User Guide EN CN A01 P28 4 3D This guide is only applicable to FLASHFORGE Adventurer 4 Series 3D printer...

Page 34: ...1 U 4 Lite 4 2 2 1 33...

Page 35: ...Z Z 34...

Page 36: ...265 110 2 2 1 2 2 35...

Page 37: ...2 2 2 36...

Page 38: ...Polar 2 3 37...

Page 39: ...2 4 1 2 4 2 2 4 3 2 4 38...

Page 40: ...9 Z 9 9 Z 10 30 2 4 4 39...

Page 41: ...2 4 5 U FlashPrint www sz3dp com 40...

Page 42: ...1 2 41...

Page 43: ...stl obj U U U U 3 WiFi WiFi FlashPrint 4 4 Lite IP IP IP IP 192 168 2 122 8899 42...

Page 44: ...Polar Polar Polar https Polar 3d com Settings PIN Code PIN 4 4 Lite Polar PIN FlashCloud En 2 1 https cloud sz3dp com 43...

Page 45: ...4 44 4 4 Lite...

Page 46: ...Q A Q1 Q2 1 2 1 2 3 1 1 2 3 4 5 45...

Page 47: ...Q6 Q7 4 AC 4 24V 13 3A 100V 240V Q8 4 Q9 4 Q10 4 3D Cloud 4 3MF STL OBJ FPP BMP PNG JPG JPEG GX G Q11 ABS ABS HEPA PLA Z Z 8 Z 4 ABS PLA PC PETG PLA CF PETG CF 4 ABS PLA PC PETG PLA CF PETG CF 1 2 3 1...

Page 48: ...Q12 Q13 Q14 300 Q15 Q16 Q17 U 4 FAT32 U FAT32 Q18 U 9 Q2 Q1 1 2 3 4 5 6 47...

Page 49: ...Q19 Polar 10 20 Q23 Polar https polar3d com PIN Polar PIN Polar Polar 1 2 3 4 Q20 Flash https cloud sz3dp com login html 1 2 3 4 Q21 100 1 2 Q24 Q25 Q22 1 2 Q26 WiFi WiFi 1 2 48...

Page 50: ...Q27 Q28 2 HEPA 1 2 2 1 49...

Page 51: ...S N FFAD QQ www sz3dp com 8 00 5 00 QQ 400 400 8866023 QQ 2850862986 2850863000 2853382161 3D QQ 206773820 518 50...

Page 52: ...Zhejiang Flashforge 3D Technology Co Ltd Address No 518 XianYuan Road Jinhua City Zhejiang Province China Service Hotline 86 579 82273989 support ashforge com Follow us...

Reviews: