Flash F7100330 User Manual Download Page 3

LED PAR 64 18x10W RGBW 4w1 IP65 

 Art No F7100330

 Light: LED 4in1

 Control: DMX 512/Auto/Master/Slave, 

Sound Activate

 Sound controll with sensitivity 

adjustable

 Housing: Extruded aluminium par 

housing

 Waterproof: IP65

The  unit  should  be  mounted  via  its  screw 

holes on the bracket. Always ensure that 

the  unit  is  firmly  fixed  to  avoid  vibration 

and slipping while operating. Always 

ensure that the structure  to which you are 

attaching the unit is secure and is able to 

support a weight of 10 times of  the unit’s 

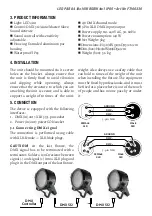
5.1 Connecting DMX signal

The  connection  is  performed  using  cable 

with XLR-female -> XLR-Male plugs.

4. INSTALLATION

5. CONNECTION

3. PRODUCT INFORMATION

 4/8 DMX channel mode.

 3-Pin XLR DMX input/output


 Power supply: 110-240V AC, 50-60Hz

 Power consumption: 140 W

 Net Weight: 5kg

Dimensions: H(30)xW(30)xD(15/26) cm

Dim. (box): H(29)xW(29)xD(34) cm

 Weight (box): 5,6 kg

weight. Also always use a safety cable that 

can hold 12 times of the weight of the unit 

when installing the fixture. The equipment 

must be fixed by professionals. And it must 

be fixed at a place where is out of the touch 

of people and has no one pass by or under 

it.

The  device  is  equipped  with  the  following 

interfaces:

1.   DMX (in/out): XLR 3(5)-pin socket

2.   Power (in/out): powerCON socket

1

3

2

2

FEMALE

XLR

GROUND

DMX +
DMX -

MALE

XLR

3

1

CAUTION!

  At  the  last  fixture,  the 

DMX signal has to be terminated with a 

terminator. Solder a 120Ω resistor between 

signal (-) and signal (+) into a XLR plug and 

plug it in the DMX output of the last fixture.

DMX

Controller

DMX 512

DMX 512

1

FEMALE

XLR

GROUND

DMX +

DMX -

MALE

XLR

2

3

4

5

1

2

3

4 5

3-pin XLR

5-pin XLR

Summary of Contents for F7100330

Page 1: ...User Manual Instrukcja Obsługi F7100330 LED PAR 64 18x10W RGBW 4w1 IP65 ...

Page 2: ... does not completely encircle the structure when fastened WARNING Position or shade the head so that the front lens will not be exposed to sunlight or any other strong light source from any angle even for a few seconds See Figure 2 The LMH 150W Spot lens can focused the sun s rays creating a potential fire hazard and causing damage IMPORTANT Do not point strong light output from other fixtures at ...

Page 3: ...t output Power supply 110 240V AC 50 60Hz Power consumption 140 W Net Weight 5kg Dimensions H 30 xW 30 xD 15 26 cm Dim box H 29 xW 29 xD 34 cm Weight box 5 6 kg weight Also always use a safety cable that can hold 12 times of the weight of the unit when installing the fixture The equipment must be fixed by professionals And it must be fixed at a place where is out of the touch of people and has no ...

Page 4: ...evice parameters and limitations are not exceeded Using lamp the change rate of power voltage should be within 10 if the voltage is too high it will shorten the light s life if it s not enough the lamp will be dark Please restart it after turning off light for 20 minutes until full cooling Frequent switching will reduce the life span of lamps and bulbs intermittent using will improve the life of b...

Page 5: ...8 CHs Address Code Change the address code by B or C button 2 CHAL 1 99 4 8 Colors Changing Autorun 3 CC01 Pulsive changing 4 CP01 1 99 4 8 Colors mixed changing Speed of gradual changing by B or C button 5 CL00 1 99 4 8 Colors mixed changing Select color While change color with B or C button 6 BEBE Sound activate 7 R001 0 255 Red color Changing Change the color by B or C button 8 G001 0 255 Green...

Page 6: ...ch zacisków typu Quick Half Coupler Hak Nie używaj zacisków które nie przylegają do konstrukcji po zamocowaniu UWAGA Ustaw lub przyciemnij urządzenie aby przednia soczewka nie była narażona na działanie promieni słonecznych lub innych silnych źródeł światła pod dowolnym kątem nawet przez kilka sekund Patrz rysunek 2 Urządzenie może skupiać promienie słoneczne tworząc potencjalne zagrożenie pożarow...

Page 7: ...5cm od najbliższej powierzchni ściany sufitu itp Jednocześnie należy upewnić się że otwory wentylacyjne nie są zatkane oraz wentylatory działają poprawnie UWAGA Urządzenie musi być podłączone do zasilania w celu uniknięcia zjawiska kondensacji Po wyjęciu urządzenia z opakowania należy sprawdzić czy nie zostało ono uszkodzone podczas transportu Przed podłączeniem do sieci elektrycznej należy upewni...

Page 8: ...SKI XLR 3 1 Połączenie odbywa się przy użyciu przewodu zakończonego z jednej strony wtyczką sieci elektrycznej i wtyczką typu powerCON z drugiej strony w zestawie Urządzenie musi być obsługiwane przez UWAGA W przypadku uszkodzenia przewodu nie należy dokonywać samodzielnejnaprawy Wymianalubnaprawamożebyćwykonanajedynie w serwisie producenta lub przez osobę z odpowiednimi uprawnieniami wykwalifikow...

Page 9: ...o Ciemny do Jasnego 4 Niebieski 0 255 B dimmer Liniowo Ciemny do Jasnego 5 Biały 0 255 W dimmer Liniowo Ciemny do Jasnego 6 Stroboskop 0 255 Stroboskop 7 Aktywacja Dźwiękiem 1 79 Macro Funkcje Aktywacja Dźwiękiem 8 Speed 0 255 CH Function Value Description 1 Czerwony 0 255 R dimmer Liniowo Ciemny do Jasnego 2 Zielony 0 255 G dimmer Liniowo Ciemny do Jasnego 3 Niebieski 0 255 B dimmer Liniowo Ciemn...

Page 10: ...cisków B lub C 5 AU50 1 99 4 8 CHs Mieszanie Kolorów Wybór koloru za pomocą przycisków B lub C 6 BEBE Aktywacja Dźwiękiem 7 R001 0 255 Czerwony Zmiana Koloru Zmiana koloru za pomocą przycisku B lub C 8 G001 0 255 Zielony Zmiana Koloru Zmiana koloru za pomocą przycisku B lub C 9 B001 0 255 Niebieski Zmiana Koloru Zmiana koloru za pomocą przycisku B lub C 10 W001 0 255 Biały Zmiana Koloru Zmiana kol...

Page 11: ...LED PAR 64 18x10W RGBW 4w1 RGBW IP65 Art No F7100330 ...

Page 12: ...www flash butrym pl F7100330 ...

Reviews: