background image

2x Moving Head 7R - BEAM (SET) - F7100523 


www.flash-butrym.pl 

3


Control interface: Wheel controller 


Operating modes: DMX512, Auto, Sound-controlled, Master / Slave   


AC IN/OUT: powerCON 


DMX IN/OUT: XLR - 3 pin 


Cooling: Active 


Height [cm]: 50 


Width [cm]: 37 


Depth [cm]: 32 


Weight (1pc) [kg]: 16,4 

5


INSTALLATION 

After removing the packaging, check if the device was not damaged during transport. Before connecting to 
the mains, make sure that the device is securely mounted. The manufacturer is not responsible for damage 
caused by unstable mounting.  

Ensure proper connection to the mains and proper grounding. Make sure that the electrical parameters are 
consistent with device requirements. All activities, including connecting the device to the mains must be 
performed by qualified personnel. 

6


CONNECTIONS 

The device is equipped with the DMX interface (3-pin XLR in/out). The connection is performed using cable 
with XLR-female -> XLR-Male plugs. 

The device is equipped with the following interfaces: 

1.


DMX (in/out): XLR 3-pin socket 

2.


Power (in/out): powerCON socket 


6.1


Connecting DMX signal 

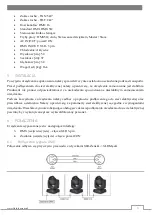
The connection is performed using cable with XLR-female -> XLR-Male plugs 


Summary of Contents for 2x Moving Head 7R

Page 1: ...USER MANUAL INSTRUKCJA OBSŁUGI 2x Moving Head 7R F7100523 ...

Page 2: ...tion 3 6 connections 3 6 1 Connecting DMX signal 3 6 2 Voltage specification 4 6 3 Connecting power supply 4 6 4 DMX channel list 4 Spis treści 1 Wprowadzenie 7 2 Zasady bezpieczeństwa 7 3 Konserwacja 7 4 Specyfikacja produktu 7 5 Instalacja 8 6 Połączenia 8 6 1 Podłączenie sygnału DMX 8 6 2 Specyfikacja zasilania 9 6 3 Podłączanie zasilania 9 6 4 Lista kanałów DMX 9 ...

Page 3: ... IS HOT Please turn off or restart the device only after 20 minutes after turning off the lamp once it is fully cooled down Frequent switching will reduce the life span of lamps and bulbs CAUTION The head and yoke must be unlocked before operation Check the pan tilt locks 3 MAINTENANCE 1 Regularly clean the fan and the fan cover to maintain good air circulation 2 After turning the unit off wait 20...

Page 4: ...s not responsible for damage caused by unstable mounting Ensure proper connection to the mains and proper grounding Make sure that the electrical parameters are consistent with device requirements All activities including connecting the device to the mains must be performed by qualified personnel 6 CONNECTIONS The device is equipped with the DMX interface 3 pin XLR in out The connection is perform...

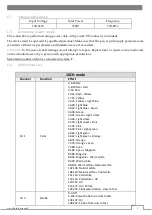
Page 5: ...cted in series 2 6 4 DMX channel list 16CH mode Channel Function Effect CH 1 Color 0 4 White 5 8 White Red 9 12 Red 13 16 Red Yellow 17 21 Yellow 22 25 Yellow Light blue 26 29 Light blue 30 33 Light blue Green 34 38 Green 39 42 Green Light violet 43 46 Light violet 47 50 Light violet Pink 51 55 Pink 56 59 Pink Light green 60 63 Light green 64 67 Light green Orange 68 71 Orange 72 76 Orange Cyan 77...

Page 6: ... fast 160 165 Gobo 1 shake 166 171 Gobo 2 shake 172 176 Gobo 3 shake 177 182 Gobo 4 shake 183 187 Gobo 5 shake 188 192 Gobo 6 shake 193 199 Gobo 7 shake 200 204 Gobo 8 shake 205 210 Gobo 9 shake 211 215 Gobo 10 shake 216 221 Gobo 11 shake 222 227 Gobo 12 shake 228 232 Gobo 13 shake 233 238 Gobo 14 shake 239 243 Gobo 15 shake 244 249 Gobo 16 shake 250 255 Gobo 17 shake CH 5 Prism 0 127 Off 128 255 ...

Page 7: ...www flash butrym pl 6 CH13 Tilt fine 0 255 Fine adjustment CH14 Empty CH15 Reset 0 100 No function 101 255 Reset CH16 Bulb Reset 0 30 No function 31 100 Lamp off 101 255 Lamp on ...

Page 8: ...ży instalować na stabilnych konstrukcjach UWAGA ŻARÓWKA JEST GORĄCA Wyłączenie lub resetowanie urządzenia powinno odbywać się najwcześniej 20 minut od wyłączenia lampy w celu zapewnienia jej odpowiedniego schłodzenia Częste włączanie i wyłączanie może mieć negatywny wpływ na żywotność lampy UWAGA Głowica i jarzmo muszą zostać odblokowane przed uruchomieniem W tym celu należy sprawdzić blokady pan ...

Page 9: ... stabilnie Producent nie ponosi odpowiedzialności za uszkodzenia spowodowane niestabilnym zamocowaniem urządzenia Podczas korzystania z urządzenia należy zadbać o poprawne podłączenie go do sieci elektrycznej oraz prawidłowe uziemienie Należy upewnić się że parametry sieci elektrycznej są zgodne z wymaganiami urządzenia Wszelkie czynności obejmujące obsługę w zakresie podłączania urządzenia do sie...

Page 10: ...rawa może być wykonana jedynie w serwisie producenta lub przez osobę z odpowiednimi uprawnieniami Maksymalna ilość urządzeń połączonych szeregowo kablem zasilającym 2 6 4 Lista kanałów DMX Tryb 16CH Kanał Funkcja Efekt CH 1 Kolor 0 4 Biały 5 8 Biały Czerwony 9 12 Czerwony 13 16 Czerwony Żółty 17 21 Żółty 22 25 Żółty Jasnoniebieski 26 29 Jasnoniebieski 30 33 Jasnoniebieski Zielony 34 38 Zielony 39 ...

Page 11: ...71 Gobo 17 72 113 Obrót w prawo szybko powoli 114 117 Stop 118 159 Obrót w lewo powoli szybko 160 165 Gobo 1 efekt Shake 166 171 Gobo 2 efekt Shake 172 176 Gobo 3 efekt Shake 177 182 Gobo 4 efekt Shake 183 187 Gobo 5 efekt Shake 188 192 Gobo 6 efekt Shake 193 199 Gobo 7 efekt Shake 200 204 Gobo 8 efekt Shake 205 210 Gobo 9 efekt Shake 211 215 Gobo 10 efekt Shake 216 221 Gobo 11 efekt Shake 222 227...

Page 12: ...nie ostrości CH 10 Pan 0 255 0 540 CH 11 Pan ustawienie precyzyjne 0 255 Ustawienie precyzyjne CH 12 Tilt 0 255 0 240 CH13 Tilt ustawienie precyzyjne 0 255 Ustawienie precyzyjne CH14 Pusty CH15 Reset 0 100 Brak funkcji 101 255 Reset CH16 Lampa Reset 0 30 Brak funkcji 31 100 Wyłączenie lampy 101 255 Włączenie lampy ...

Reviews: