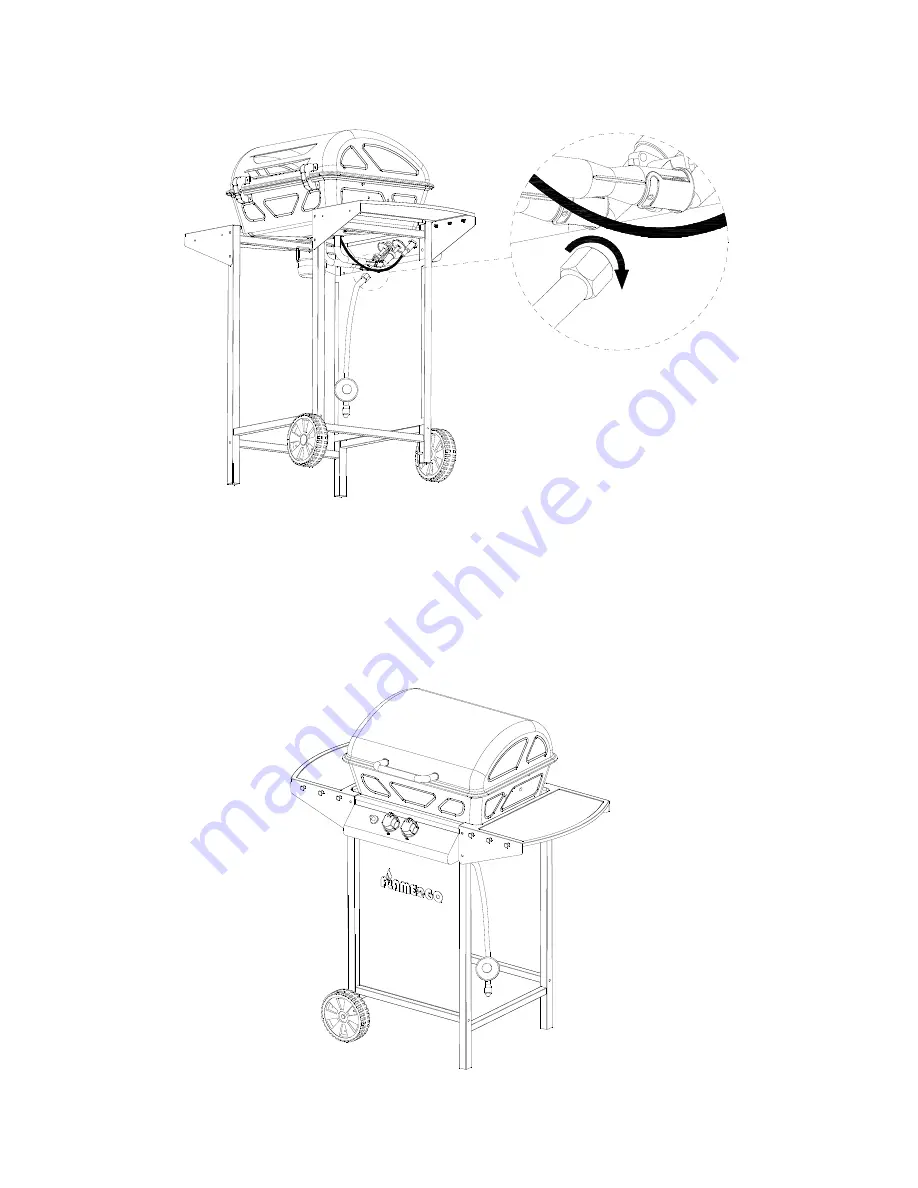
STEP 14
After the connection is made between
hose assembly and BBQ valve, a leak
test must be performed before the BBQ
can be operated to check the connections are gas-tight.
STEP 15
Page 1: ...cessary please contact either our Customer Service Department or your local dealer The use of unauthorised parts can create unsafe conditions and environment Picture of appliance Marketed by Gascraft...
Page 2: ...mbar INJECTOR SIZE Main 0 84mm CE IDENTIFICATION CODE 359BU1034 MIN GAS SUPPLY PRESSURE 2 05 kPA MAX GAS SUPPLY PRESSURE 3 45 kPA MAX OVERPRESSURE 6 50 kPA FOR USE OUTDOORS AND IN WELL VENTILATED AREA...
Page 3: ...oking glove is advised z Use caution when opening the hood as hot gases inside are released upon opening z This barbecue becomes very hot care must be taken when children the elderly or animals are pr...
Page 4: ...27 28 1 2 10 11 18 19 20 21 26 25 24 23 22 13 14 15 16 17 12 9 8 7 6 5 4 3...
Page 5: ...8 7 6 5 4 3 2 1 Q TY Figure Description NO 1 2 1 1 1 2 1 19 13 14 1 4 F M5Nut 18 Wheel Axle 1 1 2 1 1 1 2 2 2 1 Trolley Wheel Flame Tamer Burner Body Warming Rack Cooking grid Side Shelf Right Knob C...
Page 6: ...Part 28 Clip 2PCS Wheel Axle 2Pcs Front Left STEP 2 STEP 1 M6X40 4Pcs A Front Right Back Left Back Right Front Left Back Left Front Right Back Right A A A A Part 23...
Page 7: ...F D STEP 3 M4X10 4Pcs F D M5X10 3Pcs F F STEP 4...
Page 8: ...Part 13 E D C E M5Nut 8Pcs D M5X10 4Pcs M5X30 4Pcs C B M6X10 8Pcs STEP 7 STEP 5 STEP 6 Hooks 6Pcs B B B B D C E E E...
Page 9: ...E E E E C M5Nut 4Pcs E C M5X30 4Pcs STEP 8 M5X30 2 Pcs C E STEP 9 C C C C C E E M5Nut 2 Pcs...
Page 10: ...D D D D E E STEP 11 Part 9 Part 28 M5Nut 4Pcs E M5X10 6Pcs D STEP 10 Lid Support Axle 2PCS Clip 2PCS...
Page 11: ...STEP 12 STEP 13...
Page 12: ...STEP 14 After the connection is made between hose assembly and BBQ valve a leak test must be performed before the BBQ can be operated to check the connections are gas tight STEP 15...
Page 13: ...the appliance is not to be used for a period of time it should be stored in its original packaging and stored in a dry dust free environment Gas Cylinder The gas cylinder should not be dropped or hand...
Page 14: ...er LIGHTING YOUR BARBECUE Lighting Instructions 1 Open the hood 2 Turn all the control knobs clockwise to OFF position 3 Connect the regulator to the gas bottle Turn the gas supply ON at the cylinder...
Page 15: ...rush scraper and or cleaning pad then wash with a soapy water solution Rinse with water and allow to dry WARNING Build up of cooking fats can creat a fire risk Always clean your BBQ after each use COO...