


Before assembling the Fjordsen XL roof top tent, read and act on the following instructions and information.
Assembly
Assemble and use this product after the assembly instructions and safety instructions have been read and understood. Only assemble the roof tent in accordance with this installation manual. The steps mentioned and the safety instructions for
installation, operation and use of the roof tent must be followed. Even the smallest deviations can lead to incorrect assembly or incorrect use. Remove all parts from the packaging and lay them out clearly. Each step will clearly describe and explain
which parts are required for the installation of the Fjordsen XL roof tent.
SAFETY & WARRANTY
Do not make any modifications to the supplied parts. Warranty claims are not accepted and we can no longer guarantee the correct functioning of the roof tent if modifications have been made. We are not liable for any damage caused as a result of
improper installation, operation or modification. Fjordsen cannot be held responsible for accidents or damage to the vehicle or material damage. The Fjordsen warranty does not cover: defects due to circumstances beyond Fjordsen's control. These
include, but are not limited to, misuse or failure to assemble, assemble, or use the product or accessory in accordance with Fjordsen's written instructions, FAQs, and safety guidelines.
Lesen und befolgen Sie die nachstehenden Anweisungen und Informationen, bevor Sie das Fjordsen XL-Dachzelt installieren.
EINSTELLEN
Montieren und verwenden Sie dieses Produkt, nachdem Sie die Montageanweisungen und Sicherheitshinweise gelesen und verstanden haben. Montieren Sie das Dachzelt nur gem
dieser Installationsanleitung. Die genannten Schritte und die
Sicherheitshinweise f r Installation, Betrieb und Verwendung des Dachzeltes sind zu befolgen. Selbst kleinste Abweichungen k nnen zu fehlerhafter Montage oder Missbrauch f hren. Nehmen Sie alle Teile aus der Verpackung und legen Sie sie klar
ab. Jeder Schritt beschreibt und zeigt deutlich, welche Teile f r die Installation des Fjordsen XL-Dachzeltes erforderlich sind.
SICHERHEIT & GARANTIE
Nehmen Sie keine nderungen an den mitgelieferten Teilen vor. Gew hrleistungsanspr che werden nicht akzeptiert und wir k nnen die ordnungsgem
e Funktion des Dachzeltes nicht garantieren, wenn nderungen vorgenommen wurden. Wir
haften nicht f r Sch den, die durch unsachgem
e Installation, Bedienung oder nderungen verursacht wurden. Fjordsen kann nicht f r Unf lle oder Sch den am Fahrzeug oder Sachsch den verantwortlich gemacht werden. Die Fjordsen-Garantie
deckt nicht ab: M ngel aufgrund von Umst nden, die au erhalb der Kontrolle von Fjordsen liegen. Dies umfasst, ohne darauf beschr nkt zu sein, den Missbrauch oder die Nichtmontage, Montage oder Verwendung des Produkts oder Zubeh rs
gem
den schriftlichen Anweisungen, FAQs und Sicherheitsrichtlinien von Fjordsen.
Lisez et suivez les instructions et informations ci-dessous avant d'installer la tente de toit Fjordsen XL.
AJUSTER
Assemblez et utilisez ce produit apr s avoir lu et compris les instructions de montage et les consignes de s curit . Assemblez et assemblez la tente de toit uniquement selon ces instructions d'installation. Les tapes mentionn es et les consignes de
s curit pour l'installation, le fonctionnement et l'utilisation de la tente de toit doivent tre suivies. M me les plus petits carts peuvent entra ner un montage incorrect ou une mauvaise utilisation. Retirez toutes les pi ces de l'emballage et
posez-les clairement. Chaque tape d crit et montre clairement les pi ces n cessaires pour installer la tente de toit Fjordsen XL.
S CURIT ET GARANTIE
N'apportez aucune modification aux pi ces fournies. Les demandes de garantie ne sont pas accept es et nous ne pouvons garantir le bon fonctionnement de la tente de toit si des modifications ont t apport es. Nous ne sommes pas responsables
des dommages caus s par une installation, un fonctionnement ou des modifications incorrects. Fjordsen ne peut tre tenu responsable des accidents ou des dommages au v hicule ou des dommages mat riels. La garantie Fjordsen ne couvre pas:
les d fauts dus des circonstances ind pendantes de la volont de Fjordsen. Cela comprend, mais sans s'y limiter, une mauvaise utilisation ou un d faut d'assemblage, d'assemblage ou d'utilisation du produit ou des accessoires conform ment aux
instructions crites, aux FAQ et aux consignes de s curit de Fjordsen.
Lees voordat u de Fjordsen XL daktent gaat monteren de volgende instructies en informatie aandachtig door en handel ernaar.
MONTAGE
Dit product monteren en gebruiken nadat de montagehandleiding en veiligheidsvoorschriften geheel zijn doorgelezen en duidelijk zijn. De assemblage en montage van de daktent alleen volgens deze montagehandleiding uitvoeren. De stappen die
worden genoemd en de veiligheidsinstructies voor montage, bediening en gebruik van de daktent moeten beslist worden opgevolgd. Al de kleinste afwijkingen kunnen leiden tot verkeerde montage of verkeerd gebruik. Haal alle onderdelen uit de
verpakking en leg deze overzichtelijk neer. Per stap zal duidelijk beschreven en te zien zijn welke onderdelen nodig zijn voor de montage van de Fjordsen XL daktent.
VEILIGHEID & GARANTIE
Voer geen modificaties uit aan de aangeleverde onderdelen. Garantie claims worden niet geaccepteerd en wij kunnen de juiste werking van de daktent niet meer garanderen indien modificaties zijn uitgevoerd. Wij zijn niet aansprakelijk voor welke
schade dan ook veroorzaakt als resultaat van onjuiste installatie, bediening of modificatie. Fjordsen kan niet aansprakelijk worden gesteld voor ongevallen of schade aan het voertuig of materi le schade. De Fjordsen-garantie dekt niet: defecten als
gevolg van omstandigheden waarop Fjordsen geen invloed heeft. Deze omvatten, maar zijn niet beperkt tot, misbruik of het niet monteren, monteren of gebruiken van het product of het accessoire in overeenstemming met de schriftelijke
instructies, veelgestelde vragen en veiligheidsrichtlijnen van Fjordsen.
Summary of Contents for Bolt set
Page 1: ...Assembly manual Montageanleitung Manuel de montage Montagehandleiding...
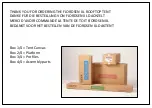
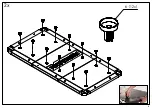
Page 4: ...1 2x 3 24x 7 12x 8 36x 2 40x 6 24x 4 24x 4 24x 4 24x 1 8x 5 48x Bolt set...
Page 5: ...2 18 4x 19 8x 22 4x 23 8x 21 8x Mounting kit...
Page 7: ...4 7 2x 8 7...
Page 8: ...5 6 12x 2x...
Page 9: ...6 5 12x Grey 2x...
Page 10: ...7 4 12x Black 2x...
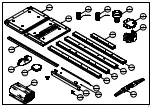
Page 11: ...8 9 11 12 10 9 10 11 12...
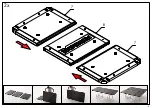
Page 12: ...9 15A 15B 15B 2x 9 9 15A 10...
Page 13: ...10 13 13 13 13 Click 1A 8x 1B...
Page 14: ...11 13 13 13 13 12 11 10 9...
Page 15: ...A A 8x B B 40x 12 B B 1 Bolt set 5 Bolt set 4 Bolt set A A 5 Bolt set 4 Bolt set 2 Bolt set...
Page 16: ...A A 8x B B 40x 13 A B B A...
Page 17: ...14...
Page 19: ...16 2 Bolt set 5 Bolt set 4 Bolt set 2x 2x 14 14 11 12 10 9...
Page 20: ...A A 17 12x A A 3 Bolt set 6 Bolt set 4 Bolt set 12 9 11 10...
Page 21: ...X Y X Y 18 16 A A A A 16 16...
Page 22: ...19 2 4x 2 16 16 16 2 2 2 2...
Page 23: ...20 17 17...
Page 24: ...A A 21 A A 3 Bolt set 8 3x Bolt set 6 Bolt set 4 Bolt set 12x 17 7 Bolt set...
Page 25: ...X Y X Y 22 16 16 A A A A 17 16 17 16...
Page 26: ...23 2 4x 16 16 2 2 2 2 16 2 17 17 17 17 17 17...
Page 27: ...X Y X Y 24 24x 24x 3...
Page 29: ...26...


