


CLEANING TIPS
•
Check the condition of the area to be cleaned. Look
for loose carpet, heavily soiled areas, stains or spots
and worn areas. Bring these to the attention of the
person in charge before performing the cleaning job.
Make sure all edges of the carpet are securely tacked
in place and all seams are sewn ( or glued) tight. This
is your protection against shrinkage.
• Locate an inconspicuous spot on the area to be
cleaned. Test carpet for colorfastness before pro-
ceeding. Pour the concentrated cleaning solution on
the spot, cover with a white towel and place a heavy
object on top to absorb the cleaning solution. Wait
approximately 10 minuets for any reaction to take
place. Remove weight. If there is no color transfer, it
should be safe to clean. Apply this procedure if dif-
ferent color-texture carpet is seen in adjacent rooms
or areas to be cleaned.
• Remove the furniture from the area to be cleaned.
Large pieces can be moved to opposite end of the
room from where you start cleaning and replaced
when it is completed. After cleaning carpet, place a
small square of aluminum foil under the furniture
legs to prevent moisture from damaging the finish
and avoid dye and rust from transferring to the car-
pet.
• Clean the area with an upright vacuum. DO NOT
USE THIS MACHINE AS A DRY VACUUM! Heav-
ily soiled carpet or areas of concentrated foot traffic
should be treated with recommended pre-spotting
or pre-spray chemicals. If a spotter is used, follow
label directions exactly. Do not allow any spotter or
prespray to dry on the carpet as it may damage the
carpet permanently.
• Identify the type of carpet fiber to be cleaned. Most
commercial carpet fibers in use are acrylic or nylon
based. Best results in cleaning would be obtained if
hot water is used to clean these fibers. On the other
hand, hot water would shrink natural fiber carpet-
ing, like wool and cotton in particular. Exercise
caution when cleaning natural fibers by using cool
water, testing for colorfastness and applying the least
amount of cleaning solution possible.
• Plan your cleaning route. Start cleaning at the far-
thest point away from where you plugged the ma-
chine and work back towards the outlet so that the
cord will not get in the way.
TO CLEAN CARPET:
1.
PREPARE THE MACHINE
Make sure the switch us in the “OFF” position and all
hoses are connected. Using only approved cleaning solu-
tion, mix according to the bottle instructions and pour
in the correct side of the bucket. Use the fill level label
to fill with the correct amount of solution. To reduce
foaming, pour 2 ounces of defoamer into the recovery
bladder. Place bucket onto machine and close lid.
2.
TO CLEAN
For 401TR models,
turn black rocker switch to
“CARPET” position and turn pump switch to “ON.”
While pushing the “ACTIVATE” switch, pull the ma-
chine as you step backwards. Release the “ACTIVATE”
switch 6 inches before ending a stroke. Repeat cleaning
stroke with 3” overlaps. Continue until cleaning solution
is consumed. Empty and rinse bucket. Repeat steps 1
and 2.
For 411TR models,
turn the solution control valve on
the side of the machine to “CARPET”. Turn the black
rocker switch to the “PUMP” position and turn the
Brush and Vacuum switches to the “ON” position. While
pushing the “ACTIVATE” switch, pull the machine as
you step backwards. Release the “ACTIVATE” switch 6
inches before ending a stroke. Repeat cleaning stroke
with 3” overlaps. Continue until cleaning solution is
consumed. Empty and rinse bucket.
Repeat steps 1 and 2
3.
CHECK BUCKET LID
If excessive foam appears in the lid, add 2 ounces of
defoamer or empty and rinse the bucket. Repeat steps I
and 2.
4.
CLEAN MACHINE BEFORE RETURNING
Clean the lid filter screen and rinse out bucket. Wipe all
surfaces including the bottom of machine. Remove car-
pet lint and strings from brush and vacuum nozzle.
4
Summary of Contents for 401TR
Page 6: ...6 ...
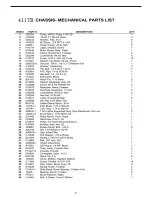
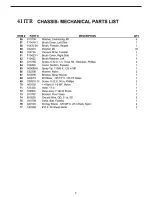
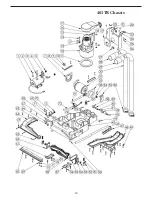
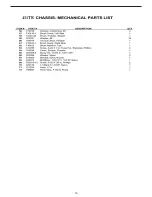
Page 7: ...7 CHASSIS 411TR ...
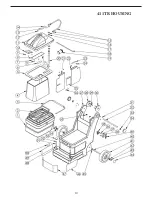
Page 8: ...8 411TR ...
Page 9: ...9 411TR ...
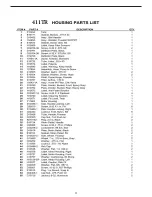
Page 10: ...10 411TR HOUSING ...
Page 11: ...11 411TR ...
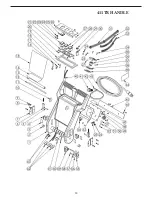
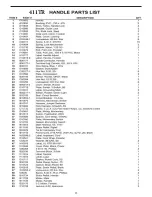
Page 12: ...12 411TR HANDLE ...
Page 13: ...13 411TR ...
Page 14: ...14 401TR Chassis ...
Page 15: ...15 401TR ...
Page 16: ...16 411TR ...
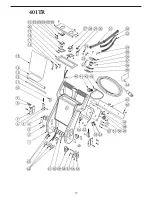
Page 17: ...17 401TR ...
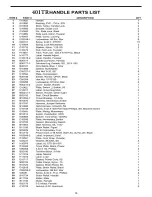
Page 18: ...2 D10482 2 1 18 401TR ...
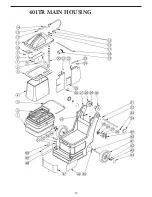
Page 19: ...19 401TR MAIN HOUSING ...
Page 20: ...20 401TR ...


